
Struggling with how to cover a blanket is a universal frustration. Whether you’re wrestling with a king-sized duvet, a bulky quilt, or a heavy weighted blanket, getting it neatly into its cover can feel like an impossible task. The good news: there are proven, one-person techniques that make the process fast, twist-free, and frustration-proof. This guide covers the best methods for inserting any blanket into a cover, including a DIY fix for weighted blankets that stays put all night.
You’ll learn exactly how to align corners without bunching, choose the right technique for your specific blanket type, and modify standard duvet covers for long-term ease. Whether you need a quick solution for everyday duvets or a permanent anchoring system for weighted blankets, there’s a method here that will transform your bedding routine.
Choose the Right Method for Your Blanket Type
Not all blankets need the same approach. Lightweight quilts slip in easily, but thick or heavy inserts require smarter strategies. The key is matching your method to the blanket type. Below are the top five techniques, each tested and optimized for solo use.
Matching Technique to Blanket
Consider these factors before choosing your method:
- Duvets: Medium-weight, often down-filled. Best with rolling methods.
- Quilts: Light to medium, flat layers. Gravity or reverse roll works well.
- Weighted blankets: Dense, 10–30 lbs. Require anchoring to prevent shifting.
- Oversized inserts: Need precision alignment. Clip method is ideal.
Always check size compatibility. A cover 2–3 inches larger than the blanket is acceptable. Anything more increases shifting risk significantly.
Use the Reverse Roll Method for Fast, Twist-Free Insertion
The reverse roll method is the most reliable technique for standard duvets and quilts. It’s fast, requires no tools, and eliminates twisting completely.
Why It Works
By rolling the blanket and cover together before turning, you pre-align the layers. The final flip pulls the duvet smoothly into place without any arm-wrestling with fabric.
Step-by-Step Instructions
- Lay the duvet cover inside-out on the bed, fully open.
- Place the blanket on top, matching all four corners as closely as possible.
- Start rolling from the foot of the bed, tucking both layers tightly toward the head.
- Keep the roll compact. Pause and adjust if you feel a bulge.
- Once rolled, grab the open end of the cover and flip it right-side-out over the roll.
- Unroll slowly back toward the foot of the bed. The duvet will slide into place.
- Shake firmly to settle the insert evenly.
- Zip or button the closure.
Pro Tips
- Do this on a smooth surface to reduce friction.
- If the blanket bunches, unroll slightly and re-flip the cover.
- Works for twin to king sizes with no extra help needed.
This method takes 3–5 minutes and is ideal for frequent cover changes.
Try the Rolling Burrito Method for Standard Duvets
The burrito method is a classic for a reason. It’s especially effective for medium-weight duvets and users who prefer controlled, step-by-step insertion.
How It Differs from Reverse Roll
Instead of rolling toward the head, you roll from head to foot, then flip the cover over the roll from the open end. This creates a different alignment that some users find easier.
Step-by-Step Instructions
- Place the cover inside-out on the bed.
- Lay the duvet on top, corners aligned.
- Roll both together tightly from head to foot like a sleeping bag.
- Reach into the open end at the foot and grab the far corners of the cover.
- Flip the cover over the roll, exposing the outer side.
- Continue flipping until the entire cover is right-side-out.
- Unroll back toward the head.
- Shake and zip.
Common Mistake to Avoid
Do not roll too loosely. Slack causes internal bunching and defeats the purpose of the method. Keep pressure even across the width throughout the roll.
Apply the Clip Method for Bulky or Oversized Inserts
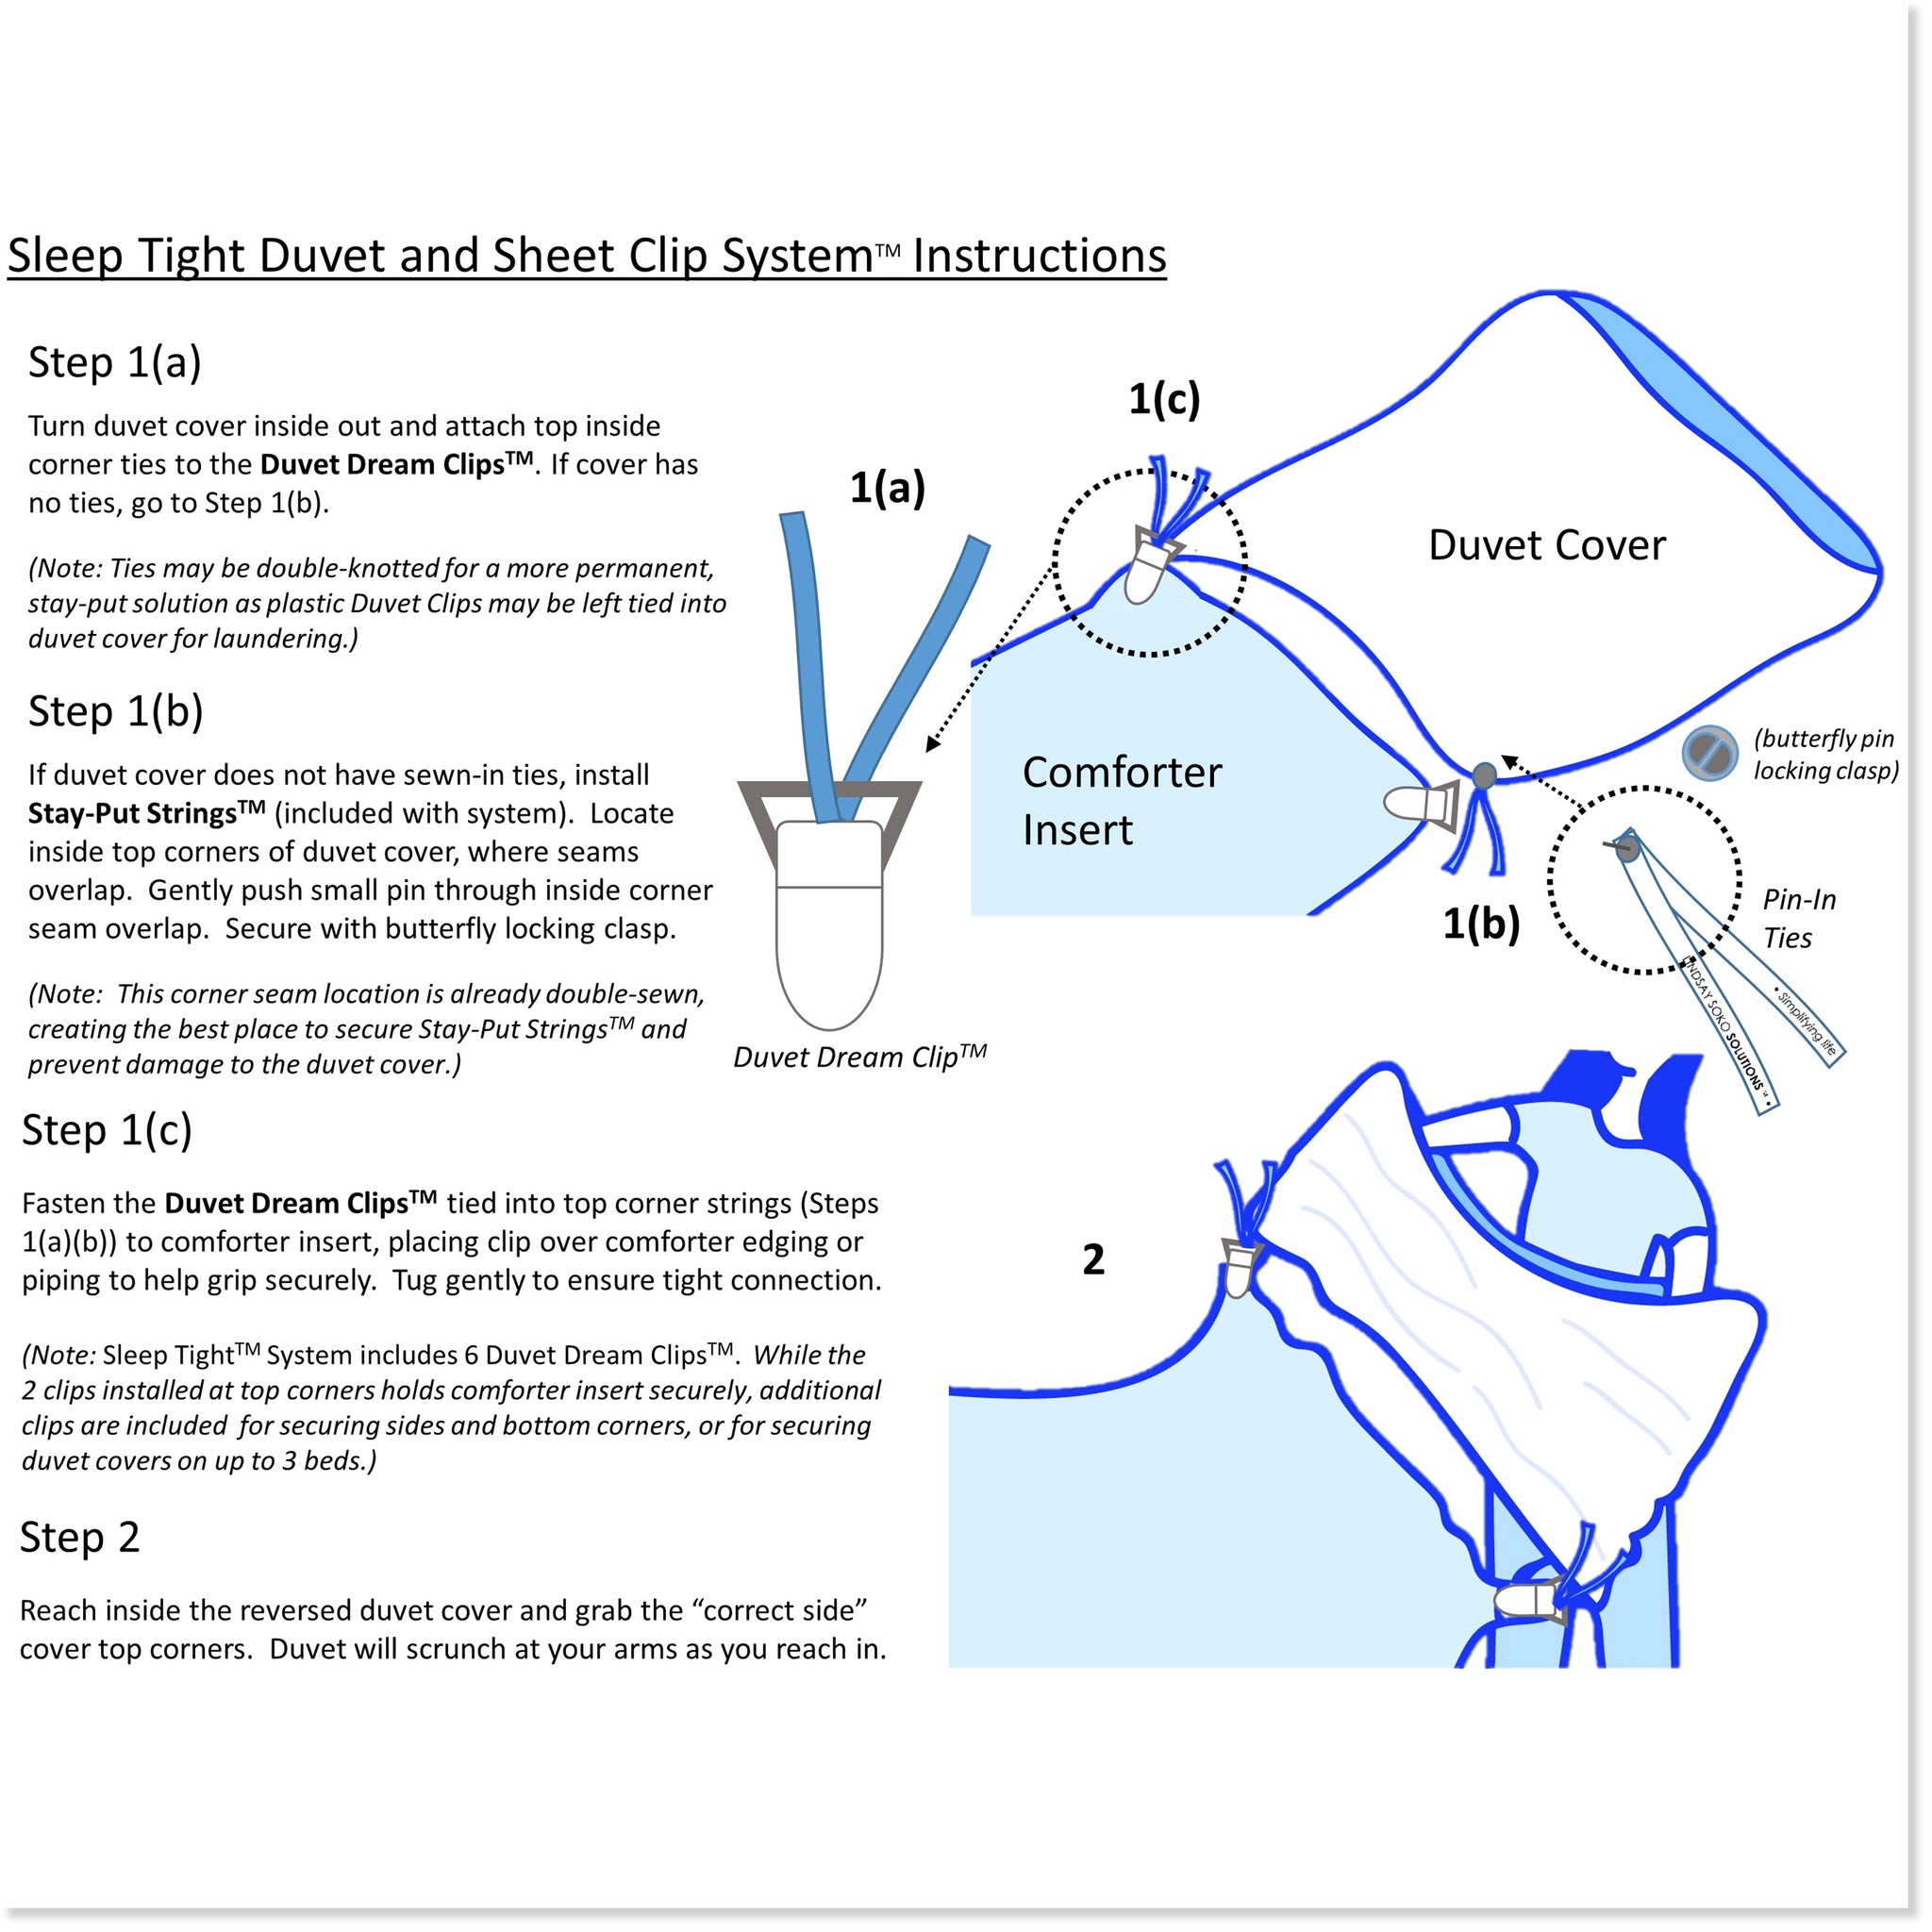
If your blanket is thick, oversized, or prone to shifting, the clip method gives you full control. It uses binder clips or clothespins to lock corners in place before final insertion.
Why It Works for Precision
By securing corners inside-out, you eliminate guesswork. When you pull each corner outward, the blanket follows perfectly into position without twisting or bunching.
Step-by-Step Instructions
- Lay the cover inside-out on the bed, opening at the top.
- Place the blanket on top, aligning all corners.
- Reach through the opening and grab the top-left corner of the cover.
- Pull the matching blanket corner back through and clip it in place.
- Repeat for top-right, bottom-left, and bottom-right corners.
- Pull each clipped corner outward to its correct position on the bed.
- The blanket will slide in smoothly behind it.
- Remove clips and close the cover.
Tools You Will Need
- Four durable clips. Binder clips work best.
- Optional: label corners beforehand for faster matching.
This method takes 4–6 minutes but delivers near-perfect alignment, ideal for down comforters or thick quilts.
Use the Gravity Method for Lightweight Quilts
The gravity method uses the blanket’s weight to pull it into the cover. It’s fast but best suited for light to medium quilts only.
When to Use This Technique
Only use this for non-bulky, flexible inserts. Heavy duvets will not feed through easily and may get stuck halfway.
Step-by-Step Instructions
- Fold the blanket lengthwise and lay it across the foot of the bed.
- Turn the cover inside-out.
- Reach through the opening and grab the far corners of the blanket.
- Pull them into the cover and let gravity help pull the rest down.
- Shake vigorously to encourage full insertion.
- Tuck in remaining ends and zip.
Key Tip
Shake multiple times throughout the process. If the blanket snags, reposition and try again.
This method takes 2–4 minutes but has moderate risk of twisting, so it is not ideal for precision work.
Secure a Weighted Blanket with DIY Tie Modifications
Standard duvet covers fail completely with weighted blankets. Without anchoring, the blanket shifts, bunches, or slides to the foot of the bed every night. The fix involves adding eight tie points to your cover.
Why Ties Are Essential
- Weighted blankets are too heavy to wash frequently, so covers are necessary.
- Covers must stay aligned to maintain even pressure distribution.
- Movement during sleep pulls the cover away from the insert continuously.
Most weighted blankets have eight built-in loops: four corners and four mid-edge points. You can match these with ties on a regular duvet cover.
Materials Needed
- Duvet cover, same size as your blanket
- Eight lengths of 40 cm cotton tape, 1 cm wide
- Strong thread, linen or heavy-duty cotton
- Sewing needle
- Scissors
Step-by-Step Modification
- Turn the cover inside-out.
- Locate the loops on your weighted blanket and confirm placement.
- Sew one tape to each corner of the cover using a backstitch. Stitch through the inner layer only, with no visibility from outside. Use 5–6 stitches per tie for strength.
- Fold the cover in half to find midpoints of each edge.
- Sew remaining four tapes at these midpoint positions.
- Test insertion by matching loops to tapes and tying with double knots.
Alternative Fasteners
If sewing is not an option, consider these alternatives:
- Snap buttons or hook-and-loop strips
- Plastic clips for quick access
- Toggle buttons
Initial setup takes 30–45 minutes, but daily use takes under 5 minutes once complete.
Compare Blanket Covering Methods at a Glance

| Method | Best For | Solo Use | Tools Needed | Time | Twisting Risk | Heavy Blanket |
|---|---|---|---|---|---|---|
| Reverse Roll | All standard duvets | Yes | None | 3–5 min | Very Low | High |
| Burrito Method | Medium duvets | Yes | None | 3–5 min | Low | Moderate |
| Clip Method | Bulky inserts | Yes | 4 clips | 4–6 min | Very Low | High |
| Gravity Method | Lightweight quilts | Yes | None | 2–4 min | Moderate | Low |
| DIY Tie Method | Weighted blankets | Yes | Sewing kit | 30–45 min setup | None | Excellent |
Maintain Your Blanket System for Long-Term Use
Once your blanket is covered, keep it working smoothly with simple maintenance practices.
Washing Best Practices
- Always remove the insert before washing the cover.
- Follow care labels, especially for weighted blankets.
- Wash large covers on gentle cycle and avoid overloading the machine.
Inspect Ties Regularly
- Check cotton tapes and knots monthly.
- Replace frayed tapes or re-stitch loose connections.
- Re-tie knots if they loosen over time.
Storage Tips
- Keep duvet cover and blanket separately in breathable cotton bags.
- Avoid plastic bins, as trapped moisture causes mildew.
Select the Right Duvet Cover Features
Not all duvet covers are created equal. Select one that supports easy insertion and long-term use.
Closure Types Compared
- Zipper: Most secure, prevents slipping, best for weighted blankets.
- Buttons: Traditional look, slower to close but very durable.
- Ties: Adjustable but may loosen during use.
Fabric and Fit Considerations
- Cotton, microfiber, and bamboo all work well.
- Use exact dimensions for optimal fit.
- Slight oversizing, 1–2 inches, is acceptable.
Key Takeaways for Covering Your Blanket Effortlessly
Covering a blanket does not have to be a battle. With the right method, whether it’s the reverse roll for everyday duvets or DIY ties for weighted blankets, you can achieve a smooth, secure fit every time. The most important step is matching your technique to your blanket type. Lightweight quilts work well with the gravity method, while bulky comforters need the clip method for precision. For weighted blankets, never rely on insertion alone. Anchoring with eight tie points is essential to keep the blanket centered all night.
Invest a little effort upfront. The reverse roll and burrito methods take minutes to learn and eliminate the frustration of twisting and bunching forever. Once you find your preferred technique, bedding changes become quick and painless. Sleep soundly knowing your blanket will stay exactly where it should be.
Frequently Asked Questions About Covering Blankets
What is the easiest way to put a duvet cover on by yourself?
The reverse roll method is the easiest solo technique. Lay the cover inside-out, place the duvet on top, roll tightly from foot to head, flip the cover over the roll, and unroll. This takes 3–5 minutes with no twisting.
How do I keep my weighted blanket from sliding in the cover?
Modify your duvet cover with eight cotton tape ties: four at corners and four at mid-edge points. Sew using backstitch and tie each tape to the corresponding loop on the blanket with double knots. This anchors the blanket securely.
Why does my duvet keep twisting inside the cover?
Twisting happens when the roll is too loose or the corners are not aligned properly. Use the clip method to secure corners before insertion, or switch to the reverse roll technique which naturally prevents internal twisting.
Can I use a regular duvet cover for a weighted blanket?
Regular duvet covers alone will not work for weighted blankets. The weight causes the blanket to shift and bunch. You must add anchoring ties or use specialized weighted blanket covers with built-in attachment points.
How long does it take to modify a duvet cover with ties?
The initial modification takes 30–45 minutes. After that, inserting and securing the weighted blanket takes under 5 minutes. The time investment pays off with months of hassle-free use.

