
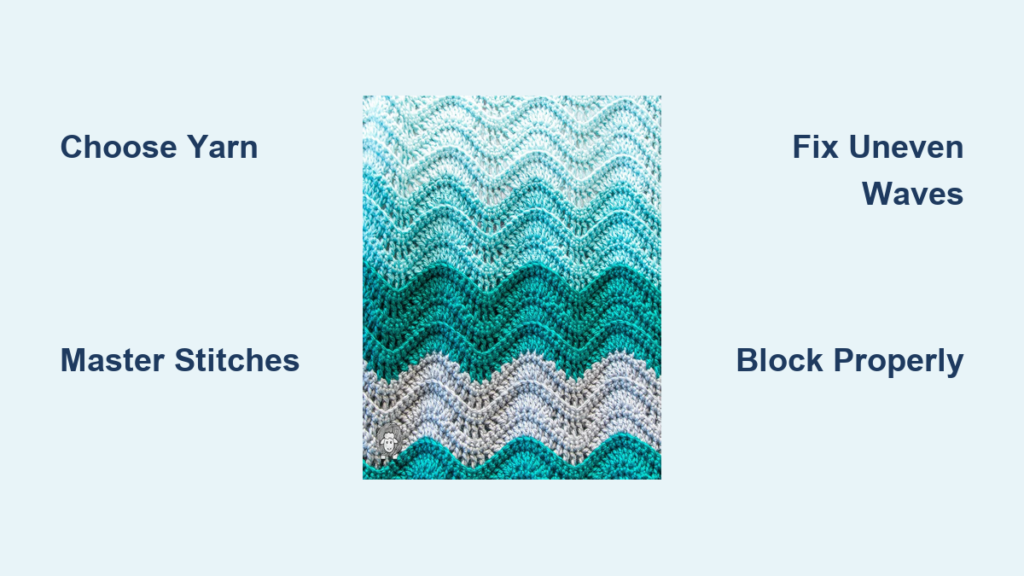
Nothing says cozy quite like a handmade wave blanket. With its gentle, rolling ridges that mimic ocean swells or rolling hills, this type of afghan combines visual rhythm with soothing texture. Whether you are making a baby stroller blanket or a king-sized throw, crocheting a wave blanket is a satisfying project that builds on simple increases and decreases to create stunning depth. The pattern flows naturally once you find the rhythm, and many versions are beginner-friendly with just a few core stitches.
In this guide, you will learn how to crochet a wave blanket step by step, from choosing yarn and hook size to mastering stitch patterns, managing color changes, and finishing with professional flair. We will walk through multiple wave techniques so you can pick the one that suits your skill level and vision. No more guesswork: by the end, you will be ready to start chaining and watch your waves rise row after row.
Choose the Right Materials for Your Wave Blanket
Pick Suitable Yarn
Start with worsted weight (Category 4) acrylic yarn, the most common choice for wave blankets. It is soft, durable, machine-washable, and widely available in every color imaginable. Brands like Bernat Softee Baby Cotton, Furls Wander, or Caron Cotton Cakes work beautifully.
If you are using DK weight yarn, hold two strands together to match worsted thickness. This also creates a slightly denser fabric, ideal for lapghans or baby blankets.
For special effects, consider these options:
– Use gradient or self-striping cake yarns for automatic color transitions
– Try scraps or stash yarn for a fun, eclectic look, just use 2 rows per color to keep the rhythm smooth
– Select chenille for ultra-soft baby blankets
– Choose cotton for breathable summer throws
Pro tip: Always buy at least one extra skein per color to avoid running out mid-project or facing dye lot inconsistencies.
Select the Correct Hook Size
Match your hook to your yarn weight for the best results:
– 5.5 mm (I-9): Standard for worsted weight
– 6.0 mm (J): Ideal for looser drape and easier stitching
– 6.5 mm (K-10.5): Great for soft, open waves
– 4.5 mm (G): Use only with thinner baby or sport weight yarns
Many crocheters prefer ergonomic hooks like Clover Amour or Furls for long sessions. Your hands will thank you after hours of stitching.
Gather Essential Tools
You will also need these supplies:
– Tapestry needle for weaving in ends
– Scissors to cut yarn cleanly
– Stitch markers helpful for marking pattern repeats
– Measuring tape to track progress
– Row counter optional but useful for large projects
– Blocking mat and pins for final shaping
Keep everything in a project bag so you are always ready to crochet.
Master the Basic Stitches Before Starting
Know Your Crochet Terms
All instructions here use US crochet terminology. Here is what you need to know:
– dc = double crochet
– sc = single crochet
– hdc = half double crochet
– tc = treble crochet
– dc2tog = double crochet two together (decrease)
– 2dc in next st = two double crochets in same stitch (increase)
UK crocheters should remember that “double crochet” in US terms equals “treble” in UK.
Practice Key Techniques
Before starting your wave blanket, ensure you are comfortable with these foundational skills:
– Double crochet (dc): YO, insert hook, YO pull up loop, YO pull through 2, YO pull through 2
– Decrease (dc2tog): Forms the valleys of the wave, worked over two stitches to reduce width
– Increase (2dc in same st): Builds the peaks, placed strategically to widen the fabric
– Back loop only (BLO): Insert hook only into the back loop of each stitch to create stretch and texture
These techniques are the foundation of all wave patterns. Practice them until they feel automatic.
Pick the Right Wave Pattern for Your Skill Level
Classic Ripple Pattern
The Classic Ripple (also known as Teal Tempest Style) creates deep, textured ripples using back loop only technique on alternating rows.
Best for: Intermediate crocheters wanting pronounced wave definition
Foundation chain: Multiple of 17 + 3 (example: ch 139 for a 36″ lapghan)
This pattern uses back loop only (BLO) on alternate right-side rows to enhance wave definition. The 4-row repeat creates the signature undulating effect.
Why it works: The BLO rows stretch more than regular dc, causing the peaks to rise and the valleys to sink naturally.
Lazy Wave Pattern
The Lazy Wave Pattern offers a softer, more relaxed wave that is perfect for beginners and stash-busting projects.
Best for: Beginners and those using scrap yarn
Foundation chain: Multiple of 12 + 3 (example: ch 147 for ~36″ width)
This pattern features low-profile waves built from repeating 12-stitch units. No BLO is required, just dc, sc, and dc2tog. The stitch sequence repeats every 12 stitches, making it easy to count and track.
Pro tip: Everything is in sets of 12. Count your repeats, not individual stitches, to stay on track.
Wistful Wave Pattern
The Wistful Wave Pattern produces symmetrical, balanced waves with a simple repeating row.
Best for: Meditative crocheting with consistent results
Foundation chain: Multiple of 16 + 3 (example: ch 179 for ~50″ width)
Simple and elegant, this pattern repeats the same row throughout. No special techniques are required, just consistent increases and decreases every 16 stitches.
Simple Wave Pattern
The Simple Wave Pattern offers quick, defined waves with minimal complexity, perfect for first-time wave makers.
Best for: Beginners wanting immediate results
Foundation chain: ch 128 (not based on standard multiple)
This pattern uses paired decreases (dc2tog, dc2tog) and paired increases (2dc in next two stitches) for clear peaks and troughs. No BLO, no hdc, just dc and shaping.
Long Wave Stitch
The Long Wave Stitch uses alternating stitch heights to create flowing, reversible fabric.
Best for: Shawls, lightweight throws, and reversible projects
Foundation chain: Multiple of 14 + 2 (example: ch 30 for swatch)
This technique uses alternating stitch heights (sc → hdc → dc → tc) to create elongated waves. The gradual rise and fall of stitch heights produces soft, natural-looking waves that work beautifully in two-row stripes.
Start Crocheting Your Blanket
Chain the Correct Number
Always chain based on your chosen pattern’s multiple to ensure symmetry:
– Classic Ripple: multiple of 17 + 3
– Lazy Wave: multiple of 12 + 3
– Wistful Wave: multiple of 16 + 3
– Long Wave: multiple of 14 + 2
For example, a 36″ lapghan using Lazy Wave would be ch 147 = (12×12)+3. Chain loosely. Tight chains pull the fabric and distort the first row.
Work the First Row Correctly
Most patterns begin with dc in the 4th chain from hook (ch 3 counts as first dc). Then follow the increase/decrease sequence:
– Increases (2dc) build peaks
– Decreases (dc2tog) form troughs
– Skipped stitches help transition between them
Keep tension even. Do not tighten dc2tog too much, or the fabric will pucker.
Maintain Pattern Alignment
Misaligned waves usually come from these common mistakes:
– Wrong chain count
– Misplaced increases or decreases
– Forgotten turning chain
Use stitch markers to mark the start of each repeat. For example, in Lazy Wave, place a marker every 12 stitches. Count your stitches every few rows to catch errors early.
Manage Color Changes Like a Pro
Change Colors at the End of a Row
Do it during the last yarn-over of the final stitch for a seamless join:
1. Complete the last dc until two loops remain
2. YO with new color and pull through
3. Drop old color and continue with new
No knots needed. The join is secure and hidden.
Plan Your Color Sequence
Popular options for wave blankets include:
– Block stripes: 6-8 rows per color for bold bands
– Alternating 2-row stripes: Great for scrap yarn projects
– Gradient fade: Use cake yarn or fade from dark to light
– Ocean theme: Aqua, teal, gray, white combinations
For a balanced look, mirror your sequence (example: A-B-C-D-C-B-A). When using multiple colors, keep tails attached and weave in later. Fewer ends to manage means faster finishing.
Finish Your Wave Blanket with Professional Results
Fasten Off and Weave in Ends
Cut yarn, leaving a 6″ tail. Pull through loop to secure. Use a tapestry needle to weave in all ends along same-color sections, in the direction of the stitches, for at least 2-3 inches. Trim excess after blocking.
Block the Blanket
Blocking evens out ripples and sets the final shape. For acrylic yarn, steam blocking is best. Hold iron slightly above fabric. Do not press. Pin to measurements on a flat surface and let cool completely before removing pins.
Some wave blankets stretch significantly when blocked, up to 10-15% longer. Account for this when planning your final dimensions.
Add a Border (Optional)
Many wave blankets look best unfinished, letting the waves speak for themselves. If you prefer a clean edge, work 1 sc in each stitch around all sides, place 3 sc in each corner, and on ends work 2 sc per row end. Join with slip stitch.
Avoid stiff borders. They can restrict the beautiful drape of your wave blanket.
Troubleshoot Common Wave Blanket Problems
Waves Look Uneven
Cause: Inconsistent tension or miscounted stitches
Fix: Use stitch markers and count every repeat. Practice dc2tog with even pressure.
Edges Curl
Cause: Natural ripple behavior
Fix: Block the blanket. Pins will hold edges flat during drying.
Pattern Misalignment
Cause: Wrong starting chain multiple
Fix: Double-check before starting. Re-count if waves look off.
Peaks Too Sharp
Cause: Too many increases concentrated in one stitch
Fix: Choose a pattern that spreads increases over multiple stitches, like Lazy Wave.
Yarn Runs Out Mid-Row
Cause: Poor yardage estimate
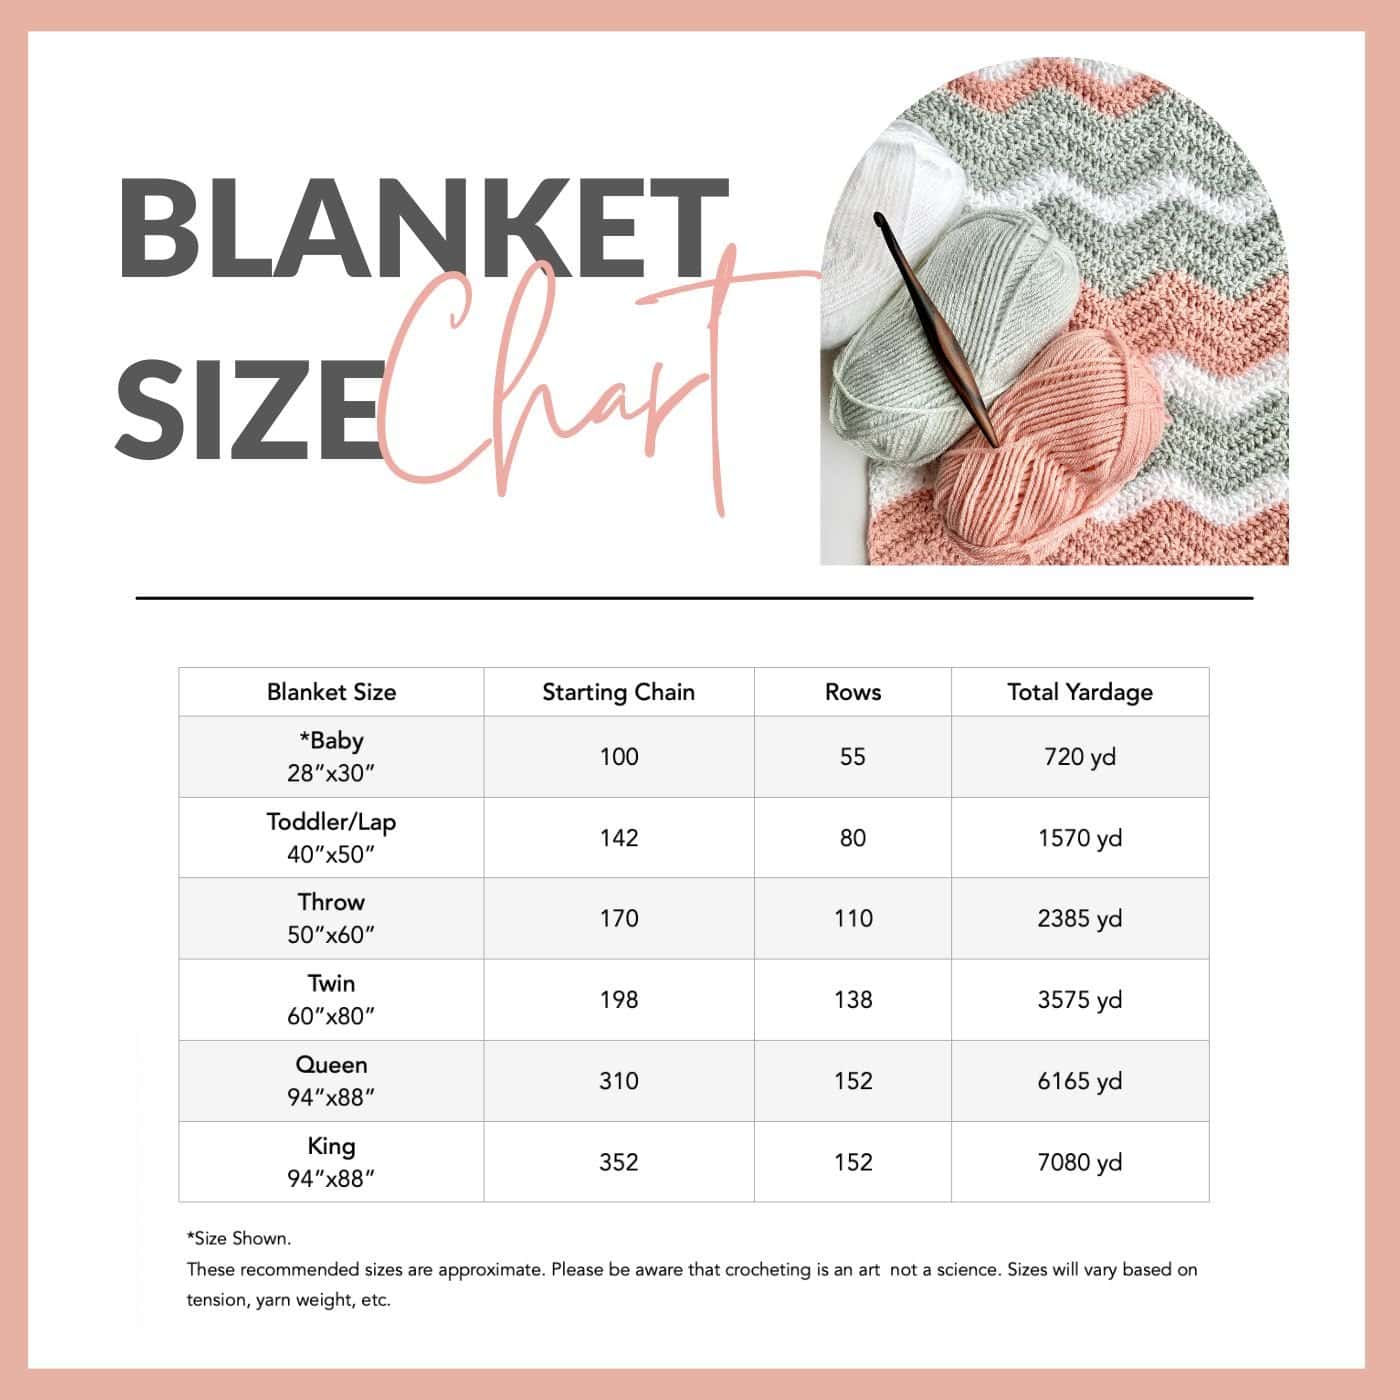
Fix: Use the sizing chart and buy extra skeins. Always purchase one extra per color.
Customize Your Wave Blanket Design
Experiment with Yarn Textures
Try different fibers for unique effects:
– Chenille for ultra-soft baby blankets
– Cotton for breathable summer throws
– Velvet for luxe lapghans
– Variegated yarn for organic color flow
Play with Color Themes
Create mood with these palette ideas:
– Ocean waves: Blues, teals, whites
– Sunset: Coral, peach, gold
– Rainbow: Bold multicolor
– Monochrome: Light-to-dark gray or beige
Adjust Size for Any Use
From lovey to king bed, here are standard sizes:
– Baby blanket: 36″ x 40″ (ch 139 for Classic Ripple)
– Lapghan: 36″ x 48″
– Queen throw: 95″ x 109″ (ch 360)
– King blanket: 118″ x 109″
Use the sizing chart to estimate yardage and chain count for your desired dimensions.
Personalize with Embellishments
Add a personal touch with:
– A name in surface crochet
– Birth date with duplicate stitch
– A heart or star motif in contrasting color
These details make a cherished, meaningful gift.
Key Takeaways for Crocheting Your First Wave Blanket
Creating a beautiful wave blanket comes down to three essential elements. First, choose the right pattern for your skill level, whether Classic Ripple for defined texture or Lazy Wave for easier construction. Second, maintain consistent tension throughout, using stitch markers to keep your increases and decreases properly aligned. Third, block your finished piece to bring out the full depth of your waves.
Now grab your hook, pick your yarn, and start crocheting your first ripple. The waves are waiting, and that feeling of wrapping up in your own handmade creation is absolutely worth the effort.
Frequently Asked Questions About Crocheting a Wave Blanket
What is the easiest wave pattern for beginners?
The Lazy Wave Pattern is the easiest for beginners. It uses a simple 12-stitch repeat with no back loop only work, making it forgiving and easy to track. The Simple Wave Pattern is also beginner-friendly, using only dc stitches with paired increases and decreases.
How do I know how much yarn to buy for my wave blanket?
Yardage depends on your blanket size. A baby blanket (36″ x 40″) needs approximately 1,094 yards, while a queen-size throw (95″ x 109″) requires about 7,782 yards. Always buy at least one extra skein per color to avoid dye lot issues.
Why are my wave blanket edges curling?
Curling is natural behavior for ripple patterns. The increases and decreases create tension that pulls edges inward. Steam blocking with pins will flatten the edges and set your blanket to its final dimensions.
Can I use a different yarn weight for wave blanket patterns?
Yes, but you must adjust your hook size accordingly. For DK weight yarn, hold two strands together to match worsted thickness. For lighter baby yarn, use a 4.5mm hook instead of the standard 5.5-6.5mm.
Do I need to block every wave blanket?
Blocking is highly recommended for wave blankets. It evens out the ripples, flattens curled edges, and gives your blanket a professional finished look. Steam blocking works well for acrylic yarn.

