
Restless nights, racing thoughts, and the inability to truly relax are struggles many people face daily. A weighted quilt offers a natural solution by applying gentle, even pressure across the body, a technique known as Deep Pressure Stimulation (DPS) that helps calm the nervous system. This pressure can boost serotonin and melatonin levels while reducing stress hormones, making it easier to fall asleep and stay asleep.
Learning how to make a weighted quilt at home saves money compared to retail prices of $100 to $300 or more. It also lets you fully customize the size, weight, fabric, and fill to match your specific comfort needs. This guide walks you through every phase of the project, from calculating the correct weight to choosing materials, sewing the quilt, and maintaining it for years of reliable use.
Calculate the Right Weight for Your Weighted Quilt
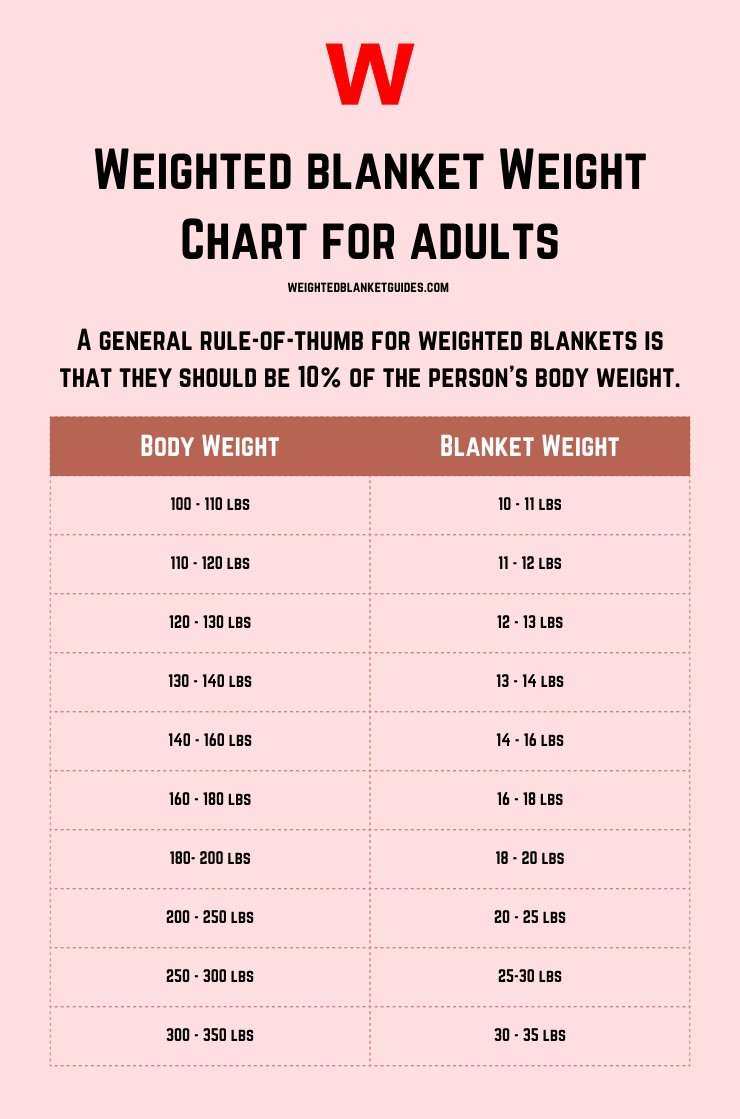
Apply the 10% Body Weight Rule
The most widely accepted guideline recommends that a weighted quilt weigh about 10% of the user’s body weight. This range provides effective pressure without restricting breathing or movement. For example, a 150-pound adult typically needs a 15-pound quilt.
Some sources suggest a range of 5% to 12%, especially for children or those new to weighted therapy. Lap-only quilts can be slightly heavier. Always confirm the user can remove the blanket independently without help.
Factor in Fabric and Batting Weight
The fill weight is not the final weight. Fabric, batting, and binding add roughly 1 to 2 pounds depending on materials chosen. If your target is 10 pounds total, plan for about 8.5 to 9 pounds of fill and let the rest come from the shell.
Choose the Right Size and Grid Layout
Match Dimensions to the User
A weighted quilt should cover the body without hanging far over the bed edges. A good rule is to make it slightly larger than the user’s shoulder width and height.
For children, consider sizing up to extend usability. One builder sized a quilt for a 4-year-old using measurements from their 6-year-old sibling, adding growth room while keeping the child safe.
Plan the Grid Pattern
To keep weight evenly distributed, divide the quilt into small squares between 3 and 5 inches. Smaller squares prevent shifting, while larger ones are easier to fill but may create uneven pressure.
Calculate the Number of Squares
For a 42-inch by 31-inch quilt using 3-inch squares:
– Width: 42 ÷ 3 = 14 squares across
– Height: 31 ÷ 3 ≈ 10.3, rounded to 11 squares down
– Total: 14 × 11 = 154 squares
Convert target fill weight to ounces: 5 lbs = 80 oz. Divide 80 ÷ 154 to get about 0.52 oz (16 g) per square. Write this down, because you will weigh each section during filling.
Select Safe, Durable Materials
Pick a Comfortable Outer Fabric
The outer shell must withstand stress from constant weight and movement. Choose tightly woven, durable fabrics such as cotton, minky, fleece, flannel, microfiber, denim, or tapestry upholstery. Cotton works well for hot sleepers, while minky or fleece adds warmth for cold climates.
Many builders use two different fabrics for top and bottom, such as printed cotton on the front and minky on the back, for both visual appeal and tactile comfort. Always pre-wash and dry fabric to prevent shrinkage later.
Choose the Best Weighting Fill
Your fill determines cost, feel, washability, and safety. Here is a quick comparison:
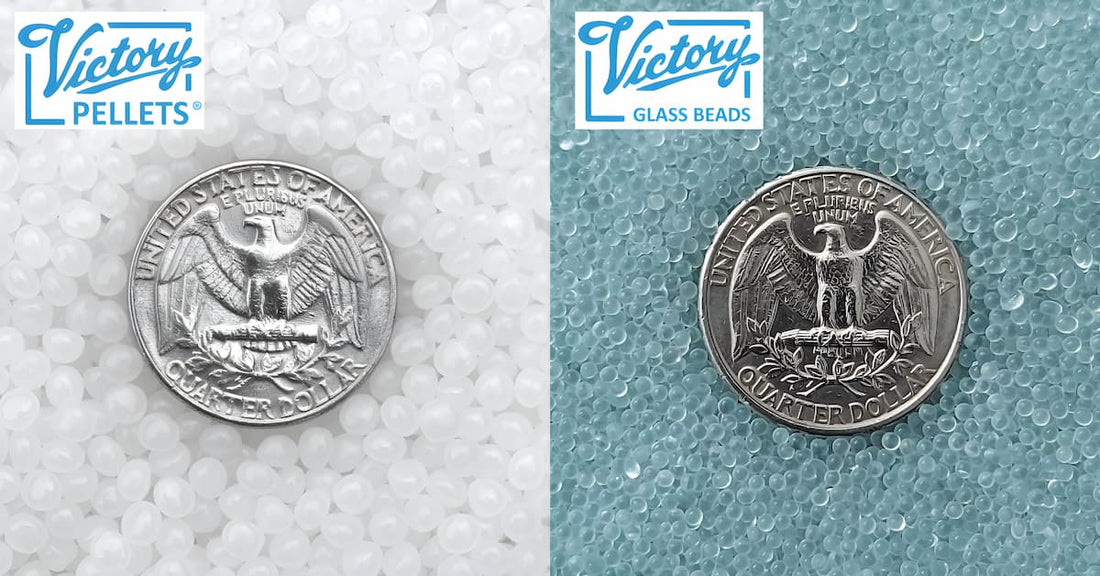
- Plastic Poly Pellets: Affordable, washable, non-toxic, slightly noisy
- Micro Glass Beads: Dense, quiet, long-lasting, more expensive
- Rice or Flax Seed: Natural, aromatic with lavender, not washable
- Heavy Fabric Layers: No loose fill, simple, but bulky
For most DIY projects, plastic pellets offer the best balance of cost, safety, and performance.
Add Buffering and Structural Layers
Add a palm-sized amount of poly-fil to each square to cushion pellets and prevent lumps. Use tulle or muslin to create internal tubes or pockets that contain the fill, reducing risk if seams fail. Binding strips about 2.5 inches wide help finish raw edges neatly.
Gather Essential Tools
Before you begin, assemble the following:
- Sewing machine (heavy-duty recommended)
- Digital kitchen scale with gram and ounce settings
- Funnel or scoop for pouring pellets
- Fabric marker or chalk
- Measuring tape and ruler
- Safety pins or clips for basting
- Wire hanger bent into a spacing guide
- PVC pipe (optional, for pushing poly-fil deep)
- Size 14 or 16 needle, strong enough to pierce thick layers
Build With the Column-Row Method
This is the most popular technique: sew a grid into the quilt layers, then fill each channel.
Layer and Baste the Quilt
- Lay backing fabric right side down on the floor and tape edges to keep it taut.
- Place batting on top if using it for warmth.
- Lay quilt top right side up, aligning edges.
- Pin all layers together every 4 to 6 inches with safety pins. Avoid spray basting, as it will not hold under weight.
Sew the Shell and Vertical Columns
- Sew three sides shut: top, bottom, and one long edge. Leave one long edge open for filling.
- Trim corners, turn right-side out, and press flat.
- Fold the open edge inward by half an inch, press, and pin closed for a clean finish.
- Topstitch the three sewn sides for extra strength.
Mark vertical lines every 3 to 5 inches across the width using a bent wire hanger as a spacing guide. Sew these lines from the bottom up, stopping 1.5 inches from the top to leave a gap for filling.
Fill and Seal Each Section
- Start with the first column. Calculate total fill: for example, 11 rows × 0.52 oz = 5.7 oz per column.
- Place a pin horizontally just below the first horizontal mark (3 inches from bottom).
- Pour pellets into the column through the open top.
- Gently shake to settle fill to the bottom.
- Add a small handful of poly-fil.
- Remove the pin as you sew across the mark with tight, short stitches (1.5 mm).
- Repeat: pin next section, fill, add poly-fil, sew.
Work your way up each column, sealing one square at a time. After all columns are filled, sew the final 1.5-inch gaps at the top to close the grid.
Finish the Edges
Bind the quilt with fabric strips using standard quilting techniques, or fold and topstitch the edges for a simpler finish.
Try the Tube or Insert Method
This method reduces needle breakage and leak risk by pre-packing the weight.
Make Tulle Tubes
- Cut tulle into strips matching column width (such as 5 inches) and quilt height plus 3 inches.
- Fold in half lengthwise, sew sides and bottom to create a tube.
- Fill with pellets in 3 to 5 inch sections, sewing across each segment.
- Insert the completed tube into a quilt channel.
- Baste top and bottom of the tube to the backing fabric.
- Fold excess backing over ends and sew shut.
Use Muslin Pockets
- Cut muslin squares slightly smaller than the quilt grid.
- Fill each with pre-weighed pellets.
- Whipstitch or machine-sew closed.
- Drop into quilt channels before sewing horizontal lines.
This method protects your needle and makes future repairs easier.
Prevent Common Problems
Stop Needle Breakage
Needles snap when they hit dense clusters of pellets. Always add poly-fil to cushion beads. Pin below the seam line, not through the fill. Use smaller stitches for stronger seams. Avoid sewing directly over pellet clusters, or switch to the tube method if issues persist.
Ensure Even Weight Distribution
Weigh every square rather than eyeballing the fill. Use a consistent grid size between 3 and 5 inches. Shake the column after filling to settle pellets before sewing.
Reduce Heat Build-Up
Choose breathable cotton instead of minky or fleece. Skip the batting layer. Use micro glass beads, which pack tighter and trap less air. Consider a lighter weight of 8 to 10% if the user feels overheated.
Maintain and Extend Lifespan
Clean Safely
Quilts with plastic or glass beads can be machine washed cold on a gentle cycle inside a mesh bag. Air dry or tumble dry low, but never use high heat. Do not wash quilts filled with rice, flax, or other natural materials.
Use a Removable Cover
Make the weighted quilt as a duvet insert and add a zippered, washable cover. This protects the inner quilt, allows style changes over time, and makes cleaning much easier. Attach snaps or ties inside the corners to keep the insert from shifting.
Inspect Regularly
Check seams monthly for loose threads, small holes, or signs of wear. A single leak can scatter beads, posing a choking hazard especially around children.
Optimize for Special Needs
Support Sensory Sensitivities
For users with autism or ADHD, test fabrics first. Some dislike soft textures, while others avoid stiff or noisy ones. Use minky, fleece, or brushed cotton for softness. Avoid stiff denim if sound or texture is a trigger. Let the user help choose the print or color.
Adapt for Children
Never use weighted quilts for infants or children under 2 years old. Cap weight at 10% of body weight and ensure the child can remove it independently. Add an ID label with the child’s name and fill type in case of loss. Consider lap-sized versions for school or car use.
Compare DIY vs. Store-Bought Weighted Quilts

| Factor | DIY Weighted Quilt | Store-Bought |
|---|---|---|
| Cost (Toddler) | About $50 | $120 to $250 |
| Customization | Full control over size, weight, fabric | Limited options |
| Washability | Depends on fill choice | Often machine washable |
| Safety | Depends on construction quality | Tested and certified |
| Time Required | 3 to 6 hours including filling | Instant |
Even with higher-quality materials, DIY remains 60 to 80% cheaper than retail.
Frequently Asked Questions About Weighted Quilts
What weight should a weighted quilt be for an adult?
A weighted quilt for an adult should weigh about 10% of the user’s body weight. A 150-pound adult typically needs a 15-pound quilt. Some experts recommend a range of 5% to 12%, with 10% being the most common starting point.
Can you machine wash a weighted quilt?
Yes, if the quilt uses plastic pellets or glass beads, it can be machine washed cold on a gentle cycle inside a mesh laundry bag. Air dry or tumble dry low. Quilts filled with rice, flax, or other natural materials cannot be washed.
How much does it cost to make a weighted quilt at home?
A toddler-sized weighted quilt costs about $50 in materials, including fabric and 5 pounds of pellets. Adult sizes cost more due to larger fabric and fill requirements, but DIY remains 60 to 80% cheaper than retail options priced at $100 to $300 or more.
Are weighted quilts safe for children?
Weighted quilts are not safe for infants or children under 2 years old due to suffocation and choking risks. For older children, keep weight at 10% of body weight or less, ensure the child can remove it independently, and inspect seams regularly for leaks.
What is the best fill for a weighted quilt?
Plastic poly pellets are the most popular choice because they are affordable, washable, non-toxic, and easy to work with. Micro glass beads are denser and quieter but more expensive. Natural fills like rice or flax seed are not washable and may attract pests.
How do you keep pellets from shifting in a weighted quilt?
Divide the quilt into a grid of small squares (3 to 5 inches) and sew horizontal and vertical lines to create individual compartments. Weigh each section carefully and add poly-fil to lock pellets in place. Smaller squares reduce shifting better than larger ones.
Final Takeaways for Making Your Own Weighted Quilt
Learning how to make a weighted quilt gives you full control over weight, size, fabric, and fill while saving significant money compared to retail prices. The three most important factors for success are accurate weight calculation, a consistent grid pattern, and safe material choices. Always pre-wash fabric, weigh every section precisely, and inspect seams regularly to keep the quilt safe and durable.
Start by gathering your materials, calculating your target weight, and planning your grid layout. Sew one column per day to avoid burnout, and keep leftover pellets on hand for future repairs. With careful planning and attention to detail, your finished weighted quilt will provide years of calming, therapeutic comfort.

