
You’ve spent hours piecing the top, basting the layers, and quilting every stitch. Now you face the final hurdle: binding. A sloppy edge can undo all your hard work, while a clean, tight finish transforms your quilt into something that looks store-bought. Learning how to bind a quilt properly is the difference between a project that frays after a few washes and a heirloom that lasts generations.
This guide covers everything you need to know. You’ll learn how to choose the right binding type, calculate fabric requirements, miter perfect corners, and join ends invisibly. Whether you prefer the slow tradition of hand stitching or the speed of machine binding, these methods will help you finish strong.
Pick the Right Binding Type for Your Project

Choose Single or Double Fold Binding
Double fold binding is the industry standard for most quilts. You fold a fabric strip in half lengthwise, wrapping two layers around the quilt’s raw edge for maximum durability. Cut strips at 2 ¼ inches wide for a balanced finish on both front and back.
Single fold binding uses a flat strip with no lengthwise fold. It works best for small projects like placemats, mini quilts, or pouches without batting. Cut these strips at 1 ¼ inches. Single fold reduces bulk but offers less protection over time.
Decide Between Straight Grain and Bias Cuts
Cut straight grain binding parallel to the selvage for quilts with square corners and straight edges. It’s stable, efficient, and uses less fabric.
Cut bias binding at a 45-degree angle for quilts with curves or scalloped edges. The diagonal stretch lets the binding ease smoothly around curves without puckering. Bias also resists fraying better, though it requires more fabric and creates more waste.
Pre-made bias tape with picot or decorative edges works well for specialty finishes.
Calculate Binding Length and Cut Accurate Strips
Measure the Quilt Perimeter
Calculate the perimeter by doubling the length and width, then adding 10 to 20 inches for corners and end joining. The extra length gives you room to maneuver when joining the final seam.
For a quilt measuring 60 inches by 70 inches, the perimeter is 260 inches. Add 20 inches for a total binding length of 280 inches.
Determine Strip Count and Width
Divide your total binding length by the usable width of fabric, which is typically 40 to 42 inches. Some wider bolts yield up to 52 inches.
Using 280 inches divided by 40 inches gives you 7 strips. Always round up to ensure you have enough. Cut each strip 2 ¼ inches wide across the full width of fabric for double fold binding.
Trim excess batting and backing from the quilt edges before you begin. Use a rotary cutter and long ruler to align everything with the quilt top for even tension later.
Join Binding Strips with Diagonal Seams
Align Strips in an L Shape
Place two strips perpendicular to each other with right sides together, forming an L. Overlap the corners so the fabric edges intersect cleanly.
Sew a Diagonal Line
Draw a line from the bottom-left corner to the top-right corner of the overlap. Sew directly along this line.
Trim the excess fabric, leaving a ¼ inch seam allowance. Press the seam open to reduce bulk. Repeat until all strips form one continuous binding strip.
Diagonal seams distribute stress better than straight seams and reduce bulk at the joins. This method keeps your binding flat and flexible around corners.
Press and Fold the Binding Strip
Fold Lengthwise with Wrong Sides Together
Bring the raw edges of the continuous strip together, folding it in half lengthwise. The right side of the fabric faces outward while the wrong sides touch inside the fold.
Press with Starch for Crispness
Run a hot iron along the entire length to create a sharp center crease. Apply light starch while pressing to help the binding hold its shape. Starched binding resists stretching during sewing and creates cleaner edges.
Press with an up-and-down motion rather than sliding the iron. Sliding stretches bias binding and distorts the fold.
Sew Binding to the Quilt Front by Machine
Start in the Middle of a Side
Begin on the bottom edge, away from any corner. Leave a 6 to 10 inch tail of binding loose at the start point.
Align the raw edge of the binding with the raw edge of the quilt top. The folded edge of the binding should face toward the center of the quilt. Sew with a ¼ inch seam allowance and backstitch at the beginning to lock the seam.
Pause at Each Corner
Sew toward the corner and stop exactly ¼ inch from the raw edge. Backstitch to secure, then lower the needle into the fabric and lift the presser foot.
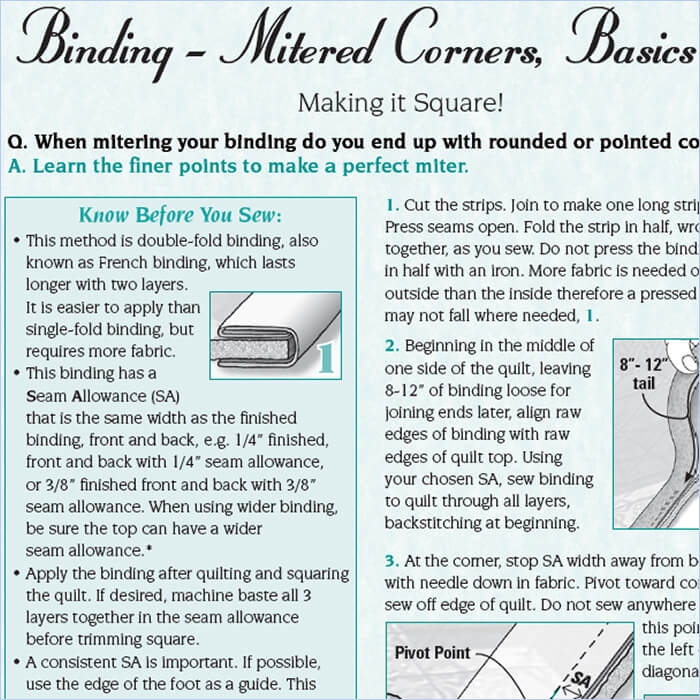
Rotate the quilt 45 degrees away from your sewing direction. Fold the binding strip straight up to create a diagonal crease at the corner. Fold the binding back down along the next side, aligning raw edges. This creates a neat 45-degree miter on the front.
Start sewing from the very edge of the quilt and continue down the next side. Repeat for all four corners.
Master Mitered Corners for Sharp Edges
Mark the Stopping Point Clearly
Always mark the ¼ inch stopping point before reaching the corner. Guessing leads to uneven miters and bunched fabric. Use a ruler or erasable marker to identify the exact spot.
Press Folds with a Clapper
Finger press the fold before sewing, then use a wooden clapper to set the crease. Crisp folds produce sharp miters that look professional on both sides of the quilt.
If the back miter looks bulky after folding, trim the seam allowance of the front miter before wrapping the binding over. This reduces bulk without affecting the front appearance.
Join Binding Ends Without a Visible Seam

Stop 10 to 15 Inches from the Starting Tail
Backstitch and cut your threads, leaving a gap before you reach where you began. This space gives you room to work when joining the two loose tails.
Overlap and Mark a Diagonal Join
Lay both tails flat on your work surface. Overlap them by about 5 inches. Unfold the left tail completely. Unfold the right tail and lay it at a 45-degree angle on top of the left tail, right sides together.
Make sure the crease line of the right tail aligns perfectly with the edge of the left tail. Draw a diagonal line across the overlap and sew directly on the line.
Verify, Trim, and Finish
Pull the binding straight before trimming to confirm it lies flat without tension. Trim the excess fabric with a ¼ inch seam allowance and press the seam open.
Fold the binding back into its original folded position. Finish sewing the remaining gap to the quilt with a ¼ inch seam allowance.
Hand Stitch the Binding to the Back
Fold Binding Over and Secure
Turn the quilt over and fold the binding over the machine stitching so the edge just covers the seam line. Use quilting clips to hold the binding in place. Fold miters neatly on the back corners.
Use a Ladder or Blind Hem Stitch
Thread a fine, long needle (size 8 or 10) with 80-weight cotton thread. Knot the end and hide the knot under the binding layer.
Follow these steps for each stitch:
– Bring the needle up through the binding edge
– Take a tiny bite of the quilt backing directly opposite
– Insert the needle back into the binding fold a short distance ahead
– Travel inside the fold before exiting again
– Repeat with even spacing
Stitches should be invisible from the front of the quilt.
Secure Corners and Tie Off
At each corner, fold the binding into a clean miter and secure with cross-stitches or small anchoring stitches. When you reach the end, run the thread through several back stitches, tie a secure knot, and trim the excess.
Keep hand thread under 24 inches long to prevent tangling and knotting.
Alternative: Machine Bind for Speed and Durability
Method 1: Attach to Front, Topstitch the Back
Sew the binding to the front using a ¼ inch seam allowance, mitering corners and joining ends as described above. Press the binding away from the quilt, then flip it to the back and cover the stitch line.
Pin or clip generously. From the front, topstitch in the ditch where the binding meets the quilt. Use thread that matches the binding on top and thread matching the backing in the bobbin. The needle should catch the binding edge on the back.
Method 2: Attach to Back First (Beginner-Friendly)
Sew the binding to the quilt back with a ¼ inch seam, mitering corners as you go. Wrap the binding over to the front, covering the stitch line.
Topstitch from the front, positioning the needle just inside the binding edge. A walking foot helps feed all layers evenly. Bump the needle position 2 to 3 spots right for precision. This method lets you see exactly where you are stitching.
Troubleshoot Common Binding Problems
Corners Look Bulky or Uneven
The cause is usually an inconsistent seam allowance or a poorly folded miter. Mark the ¼ inch stop point clearly with a ruler before sewing. Press folds crisply with a clapper before stitching. If the back miter is bulky, trim the front seam allowance before folding over.
Binding Puckers or Ripples
Uneven feeding of layers causes most puckering. Use a walking foot to keep all layers moving together. Press seams open when joining strips. Starch the binding before folding to add body. Avoid pulling or stretching the binding while sewing.
Gaps or Exposed Edges on the Back
The binding may not be folded far enough over the raw edge. When hand stitching, ensure the fold just covers the machine stitch line. Use clips to maintain even tension. For machine topstitching, sew close enough to catch the back edge securely.
Choose Thread and Needle for Each Technique
Match Thread to Your Fabric and Finish
Cotton thread pairs well with cotton quilts for consistent shrinking and aging. Use 50-weight cotton for everyday machine stitching. Choose 80-weight cotton for invisible hand stitches. For decorative big stitch binding, use 30-weight or 50-weight thread with a size 16 or 18 needle.
Select the Right Needle
Fine, long needles work best for blind hem stitches. Heavy needles like chenille or tapestry create the visible utility look of big stitch binding. Keep hand thread under 24 inches to prevent tangling.
Pro Tips for a Professional Finish
Use Striped Binding to Hide Imperfections
Stripes create visual guides that mask slight stitch irregularities. Align your topstitching with a stripe for consistent results across the entire quilt.
Trim Quilt Edges Before Binding
Use a rotary cutter and long ruler to trim excess batting and backing flush with the quilt top. Even edges create even tension when you attach the binding.
Practice Corner Folds on Scrap Fabric
Before starting on your quilt, practice mitering on a fabric scrap. Building muscle memory on scraps prevents costly mistakes on your finished project.
Slow Down at Corners and Joins
Rushing leads to crooked miters and mismatched seams. Pause at each corner, fold carefully, and restart with precision. Patience at these critical points separates amateur work from professional results.
Quick Reference: Binding Specifications
| Component | Standard | Notes |
|---|---|---|
| Double fold width | 2 ¼ inches | Most common, balanced finish |
| Narrow binding | 2 inches | Less bulk, thin batting |
| Wide binding | 2 ½ inches | Bold, decorative edge |
| Single fold width | 1 ¼ inches | Small projects, no batting |
| Seam allowance | ¼ inch | Critical for accuracy |
| Corner stop | ¼ inch from edge | Ensures even miter |
| Starting tail | 6 to 10 inches | Loose for final joining |
| Joining gap | 10 to 15 inches | Space to join ends |
| Machine thread | 50 weight | Standard sewing thread |
| Hand thread | 80 weight | Invisible finish |
| Big stitch thread | 30 to 50 weight | Decorative, visible |
Frequently Asked Questions About Binding a Quilt
What is the best binding width for a quilt?
The most common binding width is 2 ¼ inches for double fold binding. This width creates a balanced finish showing about ½ inch on both front and back. Use 2 inches for less bulk with thin batting, or 2 ½ inches for a wider, more decorative edge.
How much binding do I need for my quilt?
Measure the perimeter of your quilt (2 × length + 2 × width), then add 10 to 20 inches for corners and joining ends. For a 60 by 70 inch quilt, the perimeter is 260 inches. Adding 20 inches gives you 280 inches of total binding needed.
Should I use bias or straight grain binding?
Use straight grain binding for quilts with square corners and straight edges. It is stable and uses less fabric. Choose bias binding for quilts with curved or scalloped edges. The 45-degree cut allows the binding to stretch and ease around curves without puckering.
Can I bind a quilt entirely by machine?
Yes. Sew the binding to the front or back of the quilt first, then topstitch from the opposite side. Use a walking foot to feed layers evenly. Match your top thread to the binding and bobbin thread to the backing for the cleanest result.
How do I fix puckered binding?
Puckering usually comes from uneven feeding or stretched binding. Use a walking foot to keep layers moving together. Press seams open when joining strips. Starch the binding before folding to add body. Avoid pulling the binding while sewing.
What thread should I use for hand binding?
Use 80-weight cotton thread for invisible hand binding. It blends into the fabric and creates nearly undetectable stitches. Pair it with a fine, long needle (size 8 or 10) for the best results.
Final Thoughts on Binding Your Quilt
Binding is where craftsmanship meets durability. Accurate measuring, clean strip joins, precise miters, and the right thread choice transform a homemade quilt into a professional heirloom. Whether you choose the meditative pace of hand stitching or the efficiency of machine binding, these techniques ensure a strong, beautiful edge.
Your next step is simple: gather your tools, cut your strips, and bind that quilt. With each project, your corners get sharper and your joins get cleaner. Before long, finishing the binding becomes the most satisfying part of the entire quilting process.

