
You’ve inherited a handmade quilt, a baby blanket stitched with love, or a military flag that deserves honor. Simply folding it away feels wrong, but draping it over a couch leads to dust, fading, and wear. Framing a blanket transforms sentimental textiles into lasting wall art while protecting them from damage.
This guide covers everything from selecting the best framing style and materials to mounting techniques that won’t damage delicate fabric. You’ll learn how to choose between invisible magnetic floating, top-and-bottom support systems, and conservation-grade acid-free mounting, each suited to different blanket types and budgets.
Choose the Right Blanket Type for Framing
Not all blankets are frame-ready. The fabric’s thickness, structure, and sentimental value determine the best framing approach.
Quilts and Tapestries: Ideal Candidates
Handmade quilts, vintage tapestries, and embroidered throws are perfect candidates for framing. Their flat, stable weaves hold shape well and showcase intricate stitching. These pieces often carry emotional weight, making preservation essential.
Use acid-free materials and UV-protective glazing to prevent yellowing and fading. Since many are irreplaceable, professional conservation framing is recommended for antiques.
Crocheted Afghans and Knit Throws: Need Support
Loosely knitted or crocheted blankets can stretch or sag over time. If framing one, add horizontal support bars at top and bottom to distribute weight evenly.
For DIY projects, consider shadowbox frames with deep rabbets to avoid compressing bulky yarns. Lightweight acrylic glazing prevents added stress on delicate fibers.
Flags and Commemorative Textiles: High Emotional Value
Military, school, or retirement flags are frequently framed as tributes. Use top-and-bottom frame attachment to keep them taut without creasing.
Because fibers degrade over decades, consult a conservator before cleaning. Never wash vintage flags. Dry vacuuming with a mesh screen is safer.
Avoid Thick or Synthetic Blankets
Chunky knit throws and fleece blankets are too thick for standard frames. They compress under glass, distorting texture and risking mold if trapped moisture cannot escape.
If you must frame them, build a custom deep shadowbox with spacers. But consider alternative displays like blanket ladders or wall rods instead.
Pro Tip: Test thickness by pressing your palm into the folded blanket. If it exceeds half an inch, standard framing will not work.
Pick a Framing Method That Fits Your Needs

The way you mount the blanket defines durability, appearance, and reversibility. Choose based on skill level, budget, and how precious the textile is.
Use Magnetic Floating for Invisible Mounting
This modern DIY method makes blankets appear to float inside a deep frame with no visible clips, pins, or stitching.
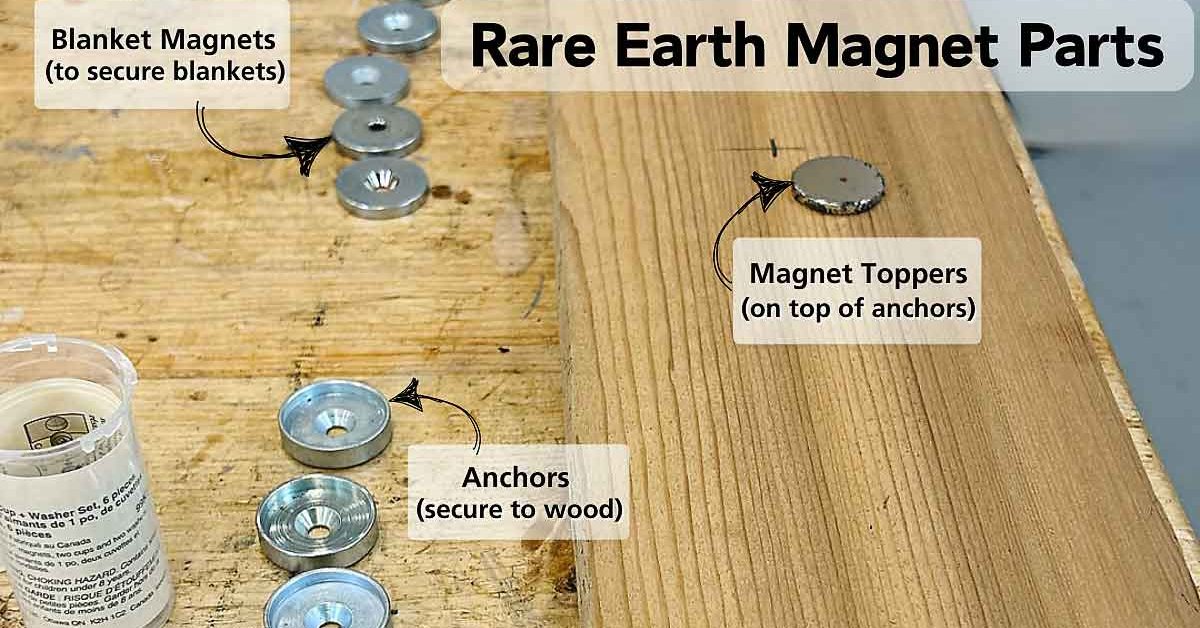
Neodymium magnets with 90 lb pull force are glued to the back panel. Metal washers are sewn into the reverse edge of the blanket. When placed in the frame, magnets pull through the fabric, holding it securely but gently.
Benefits include no damage to the blanket surface, easy removal for cleaning or rotation, and a clean gallery-style look.
Critical Upgrade: Standard washers often fail. Use larger, thicker washers for better magnetic contact.
This method works best for modern quilts, lightweight tapestries, and DIYers with basic woodworking tools.
Install Top and Bottom Frame Support for Heavy Blankets
Professionals use this system for large or dense textiles. The blanket is attached at both top and bottom edges using hidden bars or rods.
Adding bottom support costs 20 to 30 dollars more but prevents sagging, which is essential for heirlooms.
Visual Cue: If the blanket droops more than 1 inch after hanging, it needs dual support.
Mount on Acid-Free Board for Conservation
For irreplaceable textiles, this museum-grade method wraps the blanket around a rigid foam core.
Materials needed include 3/16 inch acid-free foam board, muslin wrapping fabric, acid-free linen tape, dressmaker pins, and an X-Acto knife.
The formula for materials is simple. Foam core size equals blanket size plus two times mat width. Wrapping fabric size equals foam core size plus 12 inches.
Process steps include pinning the blanket to muslin and stitching edges, centering the assembly on the foam board, folding muslin over the back and securing with linen tape, sealing the back with acid-free paper, and wrapping in Grafix Picture Wrap before inserting into the frame.
This method allows future conservators to remove and restore the textile safely.
Expert Note: Never staple or glue directly to the blanket. Always use reversible attachments.
Build a Shadowbox Frame (DIY Method)
Creating your own frame gives full control over size, wood type, and finish, ideal for oversized or uniquely shaped blankets.
Gather Essential Materials
You will need hardwood boards like walnut, oak, or maple, quarter-inch plywood for the back panel, wood glue and pocket-hole screws, custom wood plugs to match the species, spray lacquer, and a French cleat for wall mounting.
Cut and Assemble the Frame
Measure interior dimensions and cut four sides to fit your blanket. Use mitered or butt joints and ensure 90 degree angles.
Route a quarter-inch deep groove along the inner edge of each side to hold the plywood flush and strengthen the joint.
Join corners with pocket holes. Drill two pocket holes per end, apply wood glue, insert screws, then fill holes with color-matched wood plugs. Sand smooth after drying.
Optionally add a signature corner detail by routing a quarter-inch square notch at each corner.
Attach the French cleat by mounting one cleat to the frame back and the mating piece to the wall. Cut the wall cleat 1 inch shorter than the frame width to allow plus or minus 1 inch horizontal adjustment. This ensures perfect leveling even on uneven walls.
Time Estimate: 2 to 3 hours for experienced builders.
Mount the Blanket Securely
How you attach the textile determines long-term stability. Poor mounting leads to sagging, puckering, or detachment.
Install Magnets with Dual Adhesive
For magnetic floating, strong bonding is critical.
First, scuff surfaces lightly to improve grip. Sand magnet bases and plywood contact points.
Position magnets evenly, placing them 6 to 8 inches apart near frame edges. Avoid center placement unless supporting heavy fabric.
Glue in two stages. Apply cyanoacrylate glue for instant tack first, then reinforce with epoxy resin for permanent hold. Let cure 24 hours before mounting.
Sew upgraded washers using larger metal washers at least half an inch diameter on the blanket’s reverse. Stitch securely with heavy-duty thread.
Align and press into place starting from one edge, pressing gently to engage all magnets.
Warning: Do not use hot glue or double-sided tape. These fail under tension.
Use Sewn Attachment for Conservation Mounting
Never pin or staple valuable textiles directly.
Instead, sew the blanket to muslin fabric first. Pin the muslin-wrapped assembly to the foam board. Fold excess muslin over the back and secure with acid-free linen tape.
This method is fully reversible and prevents fiber stress.
Select Glazing and Matting Wisely

Glass or acrylic protects the blanket but can cause glare or UV damage if chosen poorly.
Compare Glazing Types
Standard glass works for small frames in low-light areas but is heavy, reflective, and offers no UV protection.
Acrylic suits large pieces and kids’ rooms because it is lightweight and shatter-resistant, but it scratches easily.
UV-protective acrylic blocks 99 percent of UV rays and is best for heirlooms in sunny rooms, though it has a slight tint.
Museum glass offers anti-reflective coating and UV-blocking with highest clarity, but it is expensive.
Must-Do: Always use spacers or mat board to keep glazing from touching fabric.
Choose Acid-Free Mat Board
Matting adds visual balance and prevents edge staining.
Width should be 1.5 to 3 inches, wider for large blankets. Colors include white, black, cream, or custom-dyed to match the blanket. Black core adds contrast behind light fabrics.
Rule of Thumb: The mat should frame the blanket, not dominate it. If the border feels heavier than the textile, go narrower.
Pro Tip: Have the mat inscribed with a name, date, or message for personalized tribute displays.
Prepare the Blanket Before Framing
Skipping prep risks trapping dirt, mold, or wrinkles, problems that worsen over time.
Clean Gently Without Washing
Never machine-wash or dry-clean heirloom textiles unless advised by a conservator.
Lay blanket flat on a clean surface. Use a soft brush or microfiber cloth to remove surface dust. For lint, use a sticky roller, never tape. Remove loose threads with tweezers.
Caution: If staining is present, consult a professional. Improper cleaning can set stains or weaken fibers.
Remove Wrinkles Safely
Ironing can melt synthetic fibers or flatten delicate embroidery.
Turn blanket reverse side up. Place a cotton pressing cloth over the area. Use cool iron setting with no steam. Press lightly without dragging.
For stubborn creases, try hanging in a steamy bathroom for 15 minutes, then lay flat to dry.
Hang and Maintain the Display
Even the best frame fails if placed in the wrong spot or ignored over time.
Avoid Harmful Locations
Direct sunlight fades colors in months. Bathrooms and basements have high humidity that breeds mold. Fireplaces and radiators create dry heat that degrades fibers.
Best spots include hallways, bedrooms, and living rooms with LED lighting, which produces low heat and minimal UV.
Dust and Inspect Regularly
Set a calendar reminder to inspect annually.
Check for fading or discoloration, loose magnets or tapes, warped frame or cleat, and mold spots, especially in humid climates.
Clean by wiping frame with dry microfiber cloth. Dust glass with anti-static cleaner. Never spray liquid near the blanket.
Longevity Tip: Rotate displayed blankets every 6 to 12 months to reduce light exposure.
When to Choose Professional Framing
While DIY works for modern or practice pieces, some blankets demand expert handling.
Hire a Pro If the Blanket Is Antique or Irreplaceable
The blanket is antique, fragile, or irreplaceable. It has historical or monetary value. You lack tools for precise joinery or finishing. The size exceeds 72 inches wide.
Professionals use pressure mounting, custom spacers, and archival-grade adhesives that home kits cannot match.
Cost Range: 35 dollars for small top-only mounting to 205 dollars or more for large dual-support framing.
Compare DIY vs. Professional
DIY costs 20 to 100 dollars in materials and takes 2 to 5 hours. Best for practice and modern quilts.
Professional costs 35 to 205 dollars or more with no time required from you. Best for heirlooms and large pieces.
Recommendation: Frame a less valuable blanket first to test your technique.
Troubleshoot Common Problems
Even careful projects encounter issues. Here is how to fix them fast.
Blanket Sags or Detaches
Cause is weak magnetic contact or small washers. Fix by upgrading to larger washers and increasing magnet count to one every 6 inches.
Magnets Fall Off Wood
Cause is poor adhesion. Fix by using dual-bond method with CA glue and epoxy, and scuff surfaces first.
Fabric Puckers During Mounting
Cause is uneven tension. Fix by pinning gradually from center outward and using wrapping fabric 12 inches larger than core.
Frame Will Not Hang Level
Cause is misaligned French cleat. Fix by ensuring wall cleat is 1 inch shorter than frame and using a level during install.
Glare on Glass
Cause is standard glazing in bright light. Fix by replacing with UV-protective acrylic or museum glass.
Frame Too Shallow
Cause is inadequate rabbet depth. Fix by choosing a shadowbox frame with at least 1 inch depth.
Creative Display Ideas
Go beyond single-piece framing to tell a deeper story.
Create a Gallery Wall
Frame multiple quilt blocks in identical shadowboxes for a cohesive look.
Mix Media
Combine a framed blanket corner with photos, letters, or military insignia in one large display.
Use Personalized Mats
Engrave names, dates, or quotes like “Grandma’s Hands, 1952” for emotional impact.
Try Seasonal Rotation
Swap framed throws with holidays. Plaid works for Christmas, pastels for spring.
Consider Upholstered Frames
For a modern look, stretch fabric over wood and staple the back with no glass needed.
DIY Hack: Build blanket ladders from 2x4s to drape multiple throws below framed pieces.
Key Takeaways for Framing Your Blanket Successfully
Framing a blanket successfully requires choosing the right method for your textile type. Quilts and tapestries work best with conservation mounting, while lighter throws suit magnetic floating systems.
Material quality matters for longevity. Always use acid-free foam board, UV-protective glazing, and reversible mounting methods to preserve heirlooms properly.
Whether you build a sleek shadowbox with invisible magnets or trust a pro with conservation mounting, the goal remains the same. Protect the past, display the love, and honor the craft.
Start small, learn the techniques, and turn sentiment into art that lasts.
Frequently Asked Questions About Framing Blankets
What is the best way to frame a handmade quilt?
The best way is conservation-grade mounting using acid-free foam board and reversible linen tape. This method protects delicate fibers while allowing future restoration.
Can you frame a chunky knit blanket?
Standard frames compress chunky knits. Build a custom deep shadowbox with at least 1 inch rabbet depth and use spacers to prevent fabric contact with glass.
How much does professional blanket framing cost?
Professional framing costs range from 35 dollars for small pieces to 205 dollars or more for large dual-support framing, depending on blanket size and materials.
Does framing a blanket damage the fabric?
Proper mounting methods do not damage fabric. Use sewn attachments or magnetic systems rather than staples or glue. Always use reversible techniques for valuable textiles.
How do you prevent a framed blanket from sagging?
Prevent sagging by using top-and-bottom support for heavy blankets, upgrading to larger washers with magnetic mounting, and ensuring even tension when attaching to the backing board.
Where should you hang a framed blanket?
Hang in hallways, bedrooms, or living rooms away from direct sunlight, high humidity, and heat sources. Use LED lighting to minimize UV exposure.

