
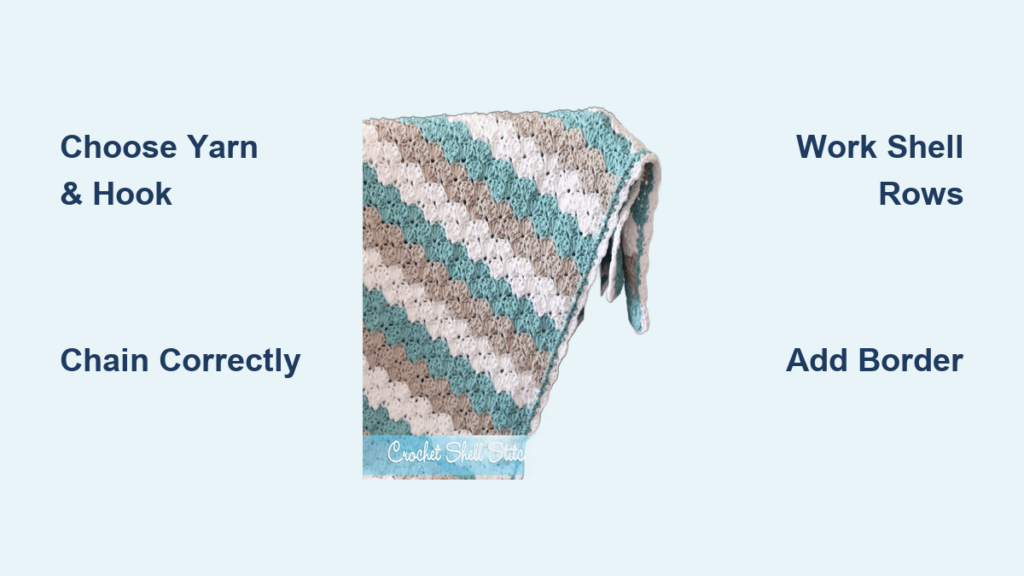
Nothing beats the cozy elegance of a handmade shell stitch blanket. Whether you’re crocheting a gift for a newborn, sprucing up your living room, or looking for a relaxing project that grows beautifully row by row, the shell stitch blanket is a perfect choice. This classic pattern uses clusters of double crochets to form scalloped shells that repeat across each row, creating a rhythmic, drapey fabric that’s both decorative and durable.
The shell stitch is beginner-friendly, reversible, and surprisingly forgiving. Once you lock into the rhythm of 5 double crochets, skips, and single crochets, the blanket practically crochets itself. In this guide, you’ll learn how to choose the right yarn and hook, start with the correct foundation chain, work the core pattern, customize your size, add a polished border, and fix common mistakes so you can create a stunning blanket with confidence.
Choose the Right Yarn and Hook for Your Blanket
Pick a Soft, Washable Yarn
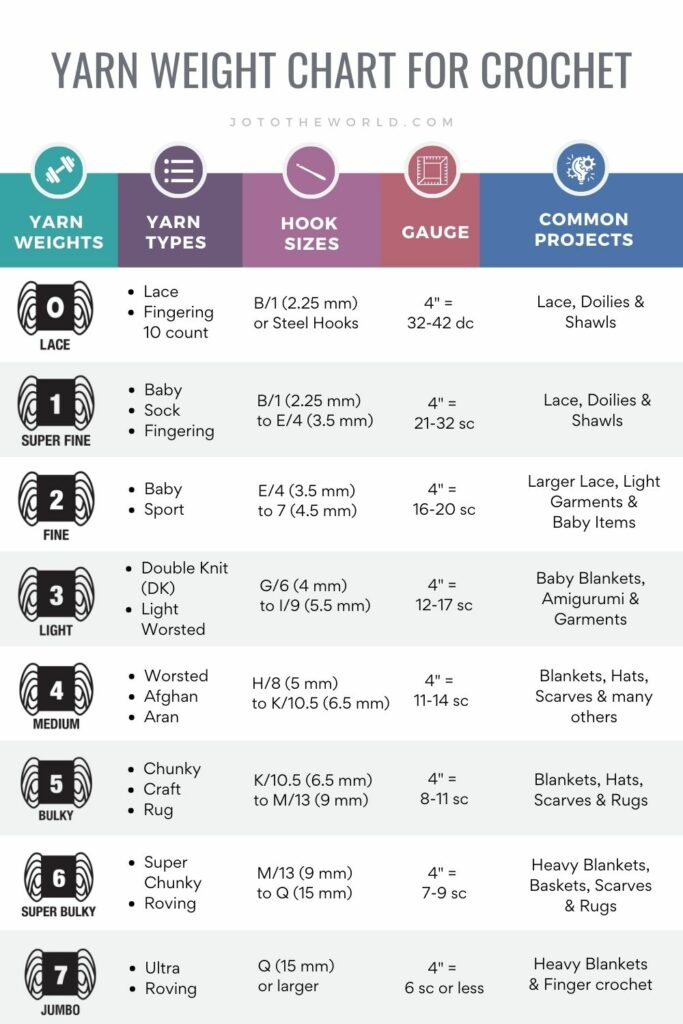
Yarn choice directly affects the drape, texture, and durability of your shell stitch blanket. For a baby blanket or frequently used throw, opt for soft, machine-washable fibers.
Consider these yarn options:
• Cotton blends like Bernat Softee Cotton offer crisp stitch definition and excellent drape
• Acrylic like Red Heart Super Saver is affordable, soft, and ideal for cozy throws
• Cotton-bamboo blends like Lion Brand Coboo are silky and breathable
Use DK (3-weight) or worsted (4-weight) yarn for balanced thickness and workability.
Pro Tip: If you want vibrant color changes without extra work, use variegated yarn for maximum visual impact.
Select the Correct Hook Size
Match your hook to your yarn weight for even tension and smooth shells. The right hook prevents the fabric from curling, puckering, or gapping.
| Yarn Weight | Recommended Hook |
|---|---|
| DK (3-weight) | 5.0 mm (H) |
| Worsted (4-weight) | 5.5 mm (I) |
Always make a 4″ x 4″ swatch first. This helps you adjust hook size if your fabric feels too tight or too loose. The shell stitch should flow beautifully.
Warning: A too-tight foundation chain pulls edges inward. Make your foundation chain slightly looser than your normal tension.
Start with the Correct Foundation Chain
Use the Right Chain Formula
The shell stitch repeats every 6 stitches, so your foundation chain must follow a mathematical pattern to keep shells aligned perfectly.
Choose one of these formulas based on your pattern version:
• Multiples of 6 + 2 — most common formula (example: chain 140 equals 6×23 = 138 + 2)
• Multiples of 6 + 1 — used in all-scatch foundation rows
• Multiples of 5 + 4 — for patterns starting with 2 dc
Rule of Thumb: Each 6-stitch repeat adds about 1.75 inches in width. Need a 40″ wide blanket? Divide 40 by 1.75 to get approximately 23 repeats, then calculate 6×23 = 138, plus 2 equals chain 140.
Chain Tips for Success
• Use a hook one size larger for the foundation chain to prevent tight edges
• Count your chain stitches twice before starting Row 1
• Mark the first and last chain with a stitch marker to avoid miscounting
Master the Shell Stitch Pattern
Build the Core Shell: 5 DC Cluster
The shell stitch is a group of 5 double crochets worked into a single stitch or space. This creates the signature scalloped peak that makes the pattern so recognizable.
Key techniques to remember:
• Skip 2 stitches on either side of the shell to create necessary space
• Single crochet (sc) in the center of the shell below anchors the next row
• Chain 3 at the start of a row counts as the first double crochet unless specified otherwise
The magic happens when shells are offset between rows, forming a flowing wave pattern that looks beautiful on both sides.
Follow the Row-by-Row Instructions
Start with Row 1: Base of Single Crochets
Most patterns begin with a solid row of single crochets to stabilize the foundation. This base row sets the rhythm where each sc becomes the anchor point for a shell in Row 2.
For multiples of 6 + 2 (most common approach):
1. Chain 164 for a 35″ wide blanket
2. Single crochet in the 2nd chain from hook
3. Skip 2 chains, 5 double crochets in next chain, skip 2 chains, single crochet in next chain
4. Repeat across, ending with single crochet in the last chain
5. Chain 3, turn
For multiples of 6 + 1:
1. Chain 146
2. Single crochet in each chain across
3. Turn (no turning chain needed)
Work Row 2: First Shell Row
Now the pattern begins to pop with those beautiful scalloped edges taking shape.
Version A (from +2 foundation):
1. 2 double crochets in first single crochet
2. Skip 2 double crochets, single crochet in next double crochet, skip 2 double crochets, 5 double crochets in next single crochet
3. Repeat across, ending with 3 double crochets in the last stitch
4. Chain 1, turn
Version B (+1 foundation):
1. Single crochet in first stitch
2. Skip 2 stitches, 5 double crochets in next stitch, skip 2 stitches, single crochet in next stitch
3. Repeat, ending with single crochet in the last stitch
4. Chain 3, turn
Visual Cue: You should see a V-shape forming between shells. The single crochet sits in the valley while the 5 double crochets form the peak.
Work Row 3: Offset the Shells
This row locks in the wave pattern by working shells over the valleys of the previous row.
- 1 single crochet in first double crochet
- Skip 2 double crochets, 5 double crochets in single crochet, skip 2 double crochets, 1 single crochet in double crochet
- Repeat across, ending with single crochet in the top of the turning chain
- Chain 3, turn
The alternating rhythm is now established. Even rows (2, 4, 6) place shells over single crochets while odd rows (3, 5, 7) offset them.
Repeat Rows 2 and 3
Once you’ve completed Row 3, simply repeat Rows 2 and 3 until your blanket reaches the desired length. End on a shell row (Row 2) for a clean, scalloped edge before adding a border.
Pro Tip: The pattern is self-correcting. Minor tension hiccups fade as you continue. Just keep the sequence consistent and the pattern will work itself out.
Customize Your Blanket Size and Shape
Adjust Width Easily
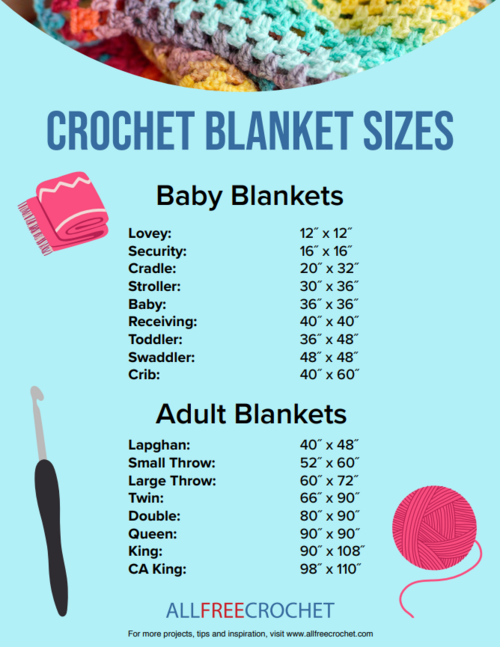
Use this formula to calculate your starting chain: Chain equals (6 multiplied by number of repeats) plus adjustment.
| Blanket Size | Width | Starting Chain |
|---|---|---|
| Baby | 30″ | 109–146 |
| Crib | 35″ | 164 |
| Lap | 40″ | 170+ |
| Throw | 50″ | 200+ |
Example: For a 50″ wide throw, divide 50 by 1.75 to get approximately 29 repeats. Calculate 6×29 = 174, then add 2 for a starting chain of 176.
Control Length with Row Count
• 60 rows equals approximately 30″ long (baby size)
• 80–100 rows equals approximately 50″ (throw size)
Measure every 10 rows with a tape measure and fold corner to corner to check for squareness.
Tip: Place stitch markers every 20 rows to track your progress and maintain even edges.
Add a Polished Border

Choose a Border Style
A border finishes your blanket with professionalism and flair. Pick one that matches your skill level and style preferences.
Simple Sc + Ch-2 Corners
This approach is clean, classic, and beginner-friendly.
Round 1:
1. Join new color with single crochet
2. Work single crochet evenly around the entire blanket
3. At each corner, place (single crochet, chain 2, single crochet) in the same stitch
4. Join with slip stitch
Round 2:
1. Single crochet in each stitch
2. Work (single crochet, chain 2, single crochet) in each chain-2 space from the previous round
3. Join with slip stitch, fasten off, weave in ends
Why It Works: The chain-2 puff corners add subtle dimension without bulk.
Shell Stitch Border (Matching Pattern)
This keeps your design cohesive and continuous with the main pattern.
- Turn after the last row
- Work shell stitch pattern evenly down each side, across the bottom, and up the opposite side
- At corners, use 5 double crochets or 1 single crochet to mark turns
- Rotate blanket as you work around
- Join with slip stitch, weave in ends
Pro Tip: Place stitch markers at each corner to keep spacing even.
Three-Round Decorative Border
For a more structured, finished look, work three rounds.
Round 1:
• For each shell: double crochet, half double crochet, single crochet (center), half double crochet, double crochet
• At corners: 3 half double crochets
Round 2:
• Single crochet in each stitch
• 3 single crochets in each corner stitch
Round 3:
• [Half double crochet, chain 1, half double crochet] in next stitch, skip 1 stitch — repeat around
• 3 half double crochets in each corner
Result: A textured, framed edge that highlights each shell beautifully.
Change Colors and Add Variety
Stripe with Color Changes
Create bold or subtle stripes by changing color every 2 rows.
• At the end of a row, pull the new color through the last yarn over of the final stitch
• Carry yarn up the side if changing every few rows
• Use a contrasting border color (like cream on gray) for a polished finish
Try Stitch Variations
Once you’ve mastered the standard shell, experiment with these variations:
• Taller shells — use treble crochet for a lacy, open fabric
• Shorter shells — use half double crochet for a denser, cozier texture
• Reverse shell stitch — work shells from right to left for a mirrored ripple
• Vary shell count — try 3 double crochets or 7 double crochets per shell for different density
Fun Idea: Alternate 5 dc and 3 dc shells for a varied rhythm and visual interest.
Fix Common Mistakes
Prevent Curling Edges
Cause: Tight foundation chain or inconsistent tension
Fix:
• Start with a looser chain
• Block finished blanket by pinning flat, misting with water, and allowing to air dry
• Use a larger hook for the foundation row
Avoid Miscounted Shells
Cause: Skipping wrong stitches or adding extras
Fix:
• Count every 3–4 shells as you work
• Use stitch markers between shells
• Double-check first and last stitch of each row
Stop Holes Between Shells
Cause: Loose tension or skipped anchor stitches
Fix:
• Maintain even yarn tension throughout
• Ensure single crochet is worked into the center double crochet of the shell below
• Use a slightly smaller hook if gaps persist
Keep Sides Straight
Cause: Inconsistent turning or starting in the wrong stitch
Fix:
• Always begin in the correct first stitch (often the top of chain-3 or first double crochet)
• Use a stitch marker on the first and last stitch of each row
• Check alignment every few rows
Finish Strong and Care for Your Blanket
Weave in Ends Securely
Use a tapestry needle to weave ends along the back of stitches. For variegated yarn, weave into similar color zones to hide the tails. Leave a 3–4 inch tail before trimming after securing.
Block for a Professional Look
Blocking is especially effective on cotton or cotton-blend blankets.
• Lay flat on a towel or blocking mat
• Pin corners and edges to shape
• Lightly mist with water and let dry completely
Result: Even stitches, open shells, and flat edges that look professionally made.
Wash and Maintain Properly
Always check the yarn label, but follow these general rules:
• Machine wash cold on gentle cycle
• Tumble dry low or lay flat to dry
• Avoid high heat which can damage acrylic or shrink cotton
Tip: Wash before gifting to soften the fabric and check for color bleeding.
Final Tips for Success
• Start small — make a 12″ swatch to test pattern and tension before committing to the full blanket
• Use good lighting — helps you see stitch centers clearly and avoid mistakes
• Relax — the shell stitch is meant to be meditative, so enjoy the rhythm
• Personalize — add a name, choose nursery colors, or make it gender-neutral with grays and creams
Frequently Asked Questions About Shell Stitch Blankets
How long does it take to make a shell stitch blanket?
A baby-size blanket typically takes 8–12 hours for beginners, while a throw-size blanket may take 20–30 hours. Time varies based on your speed, tension, and blanket size.
What is the best yarn for a shell stitch blanket?
Cotton blends like Bernat Softee Cotton or Lion Brand Coboo offer excellent stitch definition and drapability. Acrylic options like Red Heart Super Saver are affordable and machine-washable, making them ideal for everyday use.
Can beginners make a shell stitch blanket?
Yes. The shell stitch pattern is beginner-friendly because it uses basic stitches (single crochet and double crochet) in a simple repeat. Once you understand the 5 dc cluster and the offset rhythm, the pattern becomes intuitive.
How do I stop my shell stitch blanket from curling?
Start with a looser foundation chain, use a larger hook for the first row, and block your finished blanket by pinning it flat, misting with water, and allowing it to air dry completely.
Is the shell stitch reversible?
Yes. The pattern creates a beautiful texture on both sides, making it fully reversible. Either side can be displayed as the “right” side.
How do I calculate how many chains I need for my desired width?
Each 6-stitch repeat adds approximately 1.75 inches. Divide your desired width by 1.75 to find the number of repeats, multiply by 6, then add 2 (or 1 depending on your pattern version) for your starting chain count.
Key Takeaways for Making a Shell Stitch Blanket
The shell stitch blanket is more than a project. It is a legacy piece that brings warmth and beauty to any home. With soft yarn, a simple repeat, and a touch of care, you will create something that lasts for years.
Remember these core points. Choose a washable yarn in your favorite color. Use the multiples of 6 formula for your foundation chain. Work Rows 2 and 3 in alternating sequence until reaching your desired length. Add a border for a polished finish.
Now grab your hook, pick your favorite color, and start crocheting. Your perfect blanket is just a few rows away.

