Imagine turning an entire year of weather into a colorful quilt you can wrap around yourself. A temperature quilt pattern transforms daily high and low temperatures into a visual timeline, where each fabric color represents a specific temperature range. Over 365 days, your sewing machine becomes a data recorder, stitching together a personalized story of seasons, storms, and sunshine. This approach works whether you live in Minnesota or Arizona, and the finished quilt serves as both a functional textile and a meteorological keepsake.
By the end of this guide, you will know how to choose a color scale, estimate fabric needs, manage daily sewing routines, and finish a quilt that tells a story no graph can match. Whether you select a simple half square triangle design or a detailed house block, the result will be a one-of-a-kind heirloom rich with personal meaning.
Set Your Temperature Scale
Before cutting a single piece of fabric, you need a data-driven color plan. A well-designed scale ensures your quilt accurately reflects your local climate and prevents you from running out of key colors mid-project.
Choose Your Climate Range
Start by researching historical weather for your location using Timeanddate.com or Wunderground.com. Look up average highs and lows from the past year to define your total range.
• Cold climates (like Minnesota): May need -20°F to 90°F
• Temperate zones (like Oregon): Often 30°F to 85°F
• Hot regions (like Arizona): Could span 40°F to 115°F
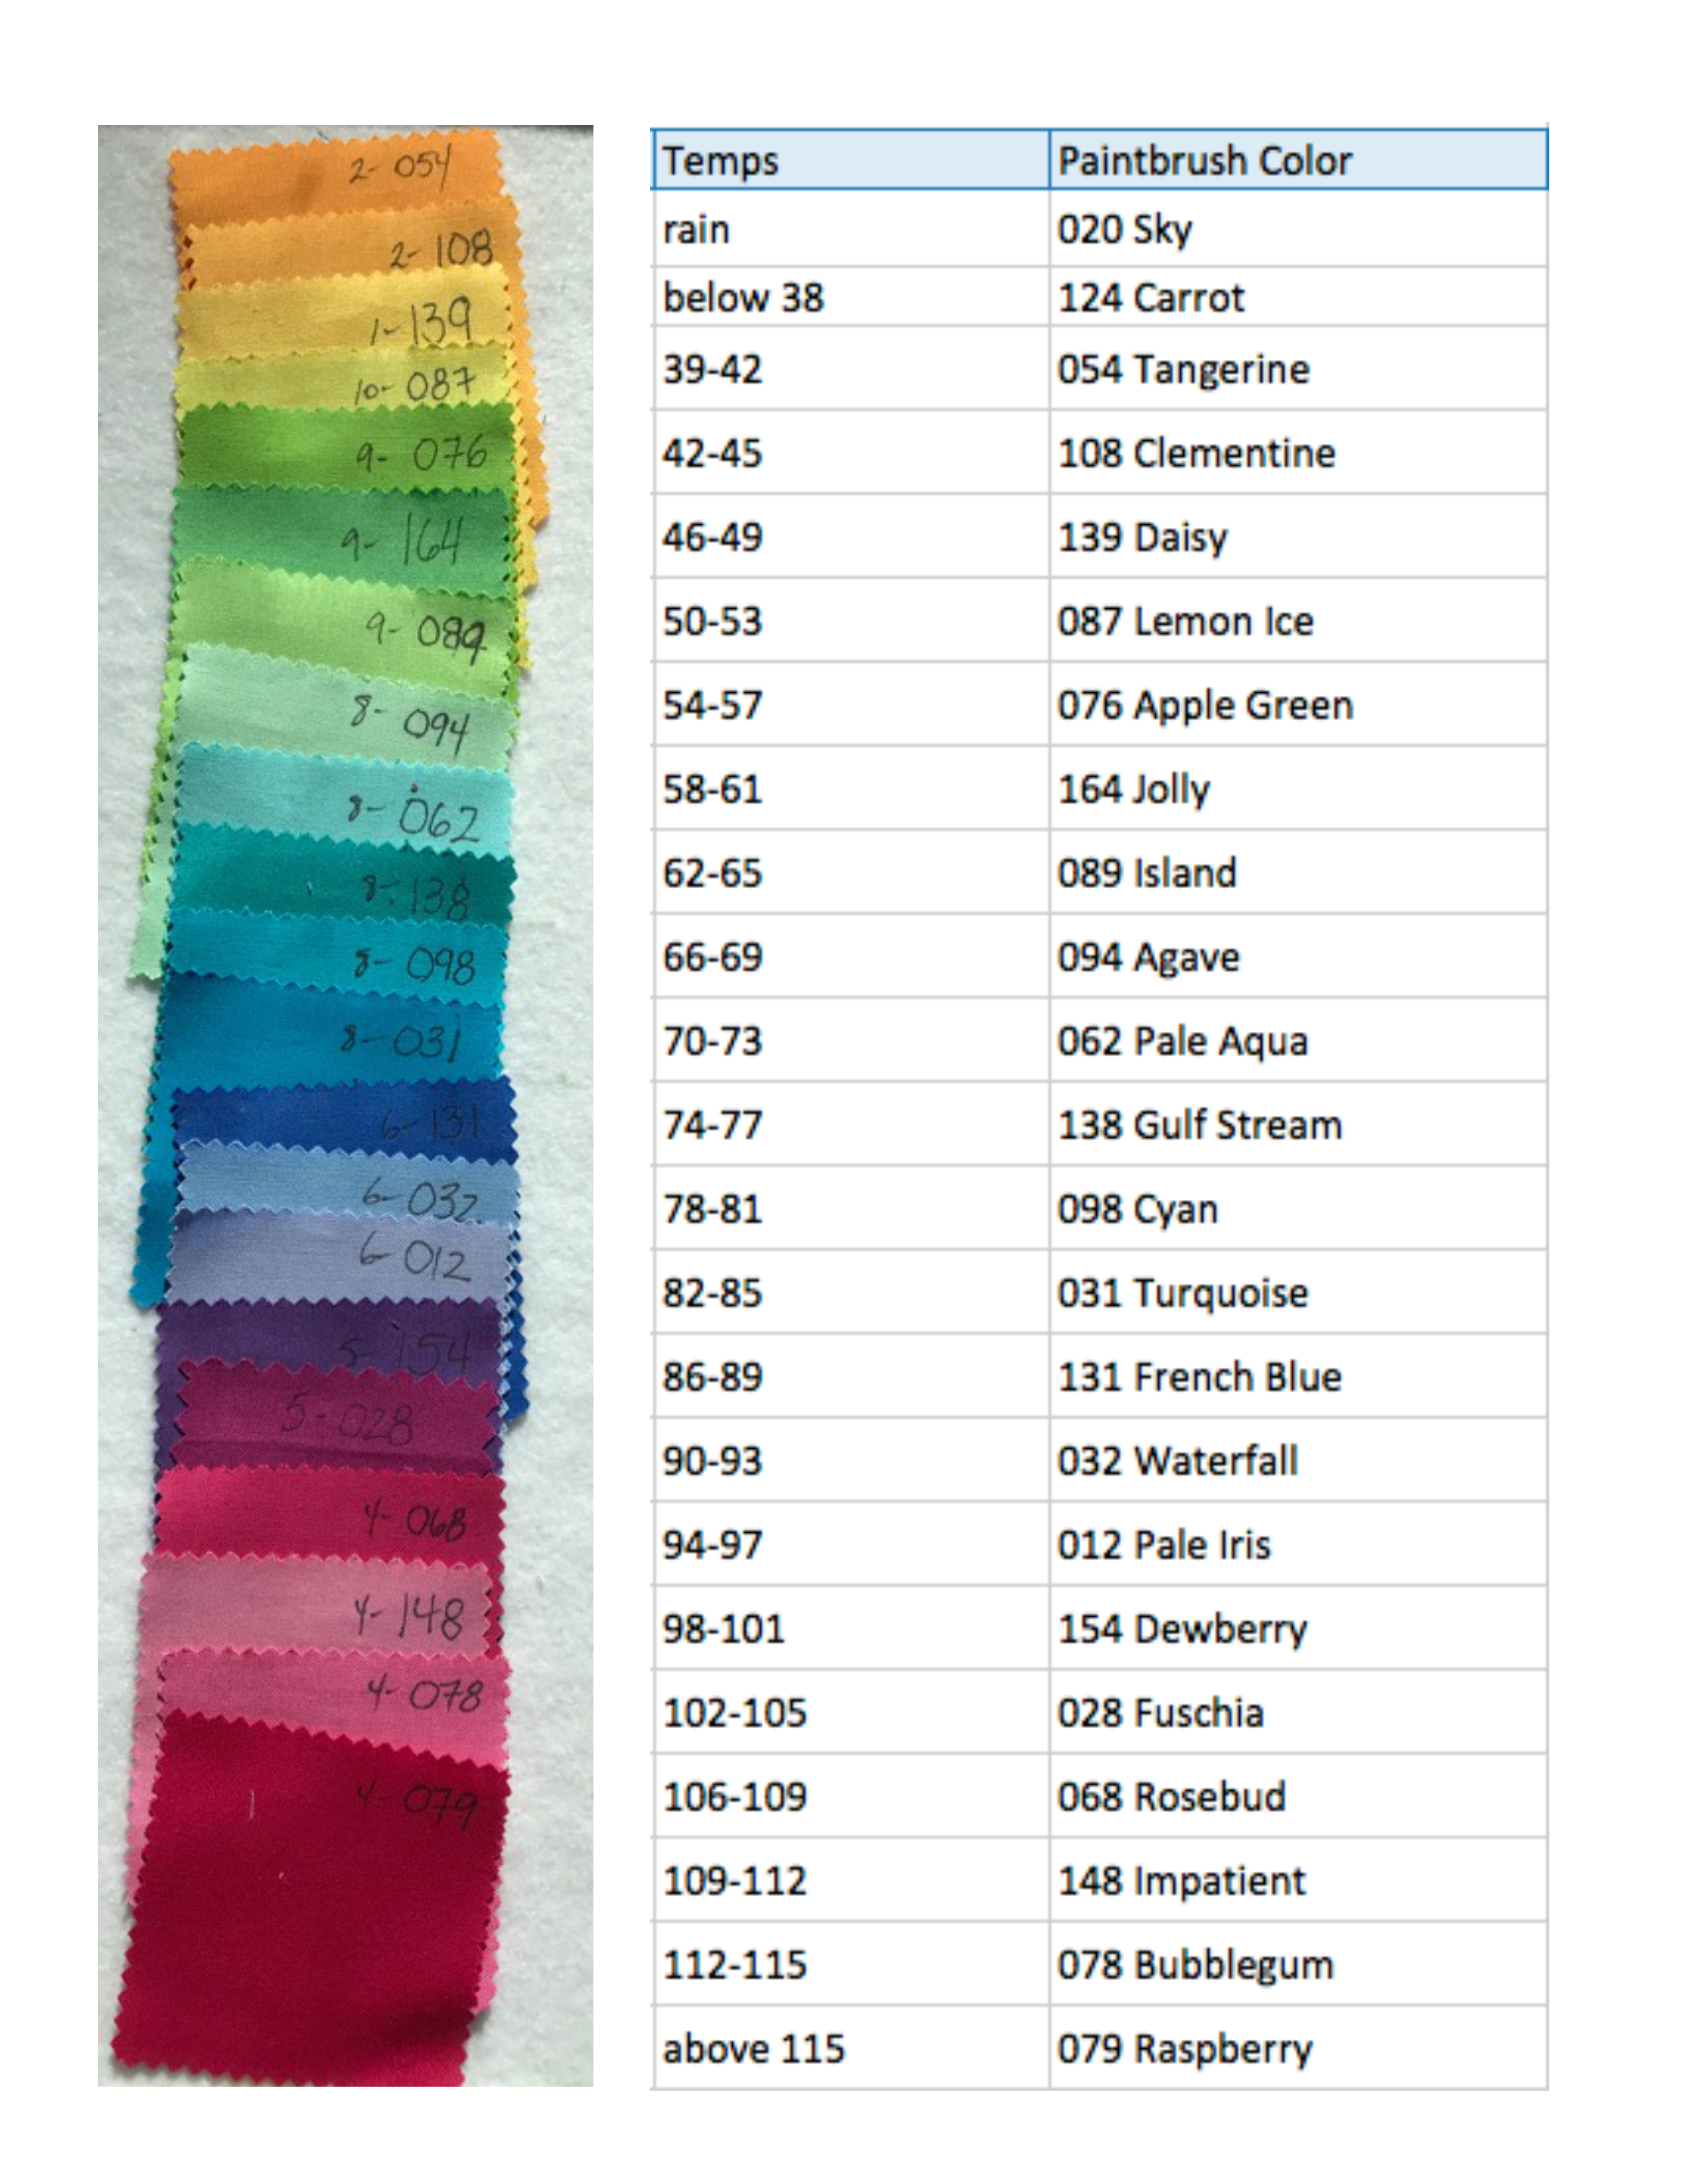
Most quilters use 5°F increments, resulting in 20 to 24 fabric colors. For metric users, 3°C intervals (like the BERNINA method) work well and match a 20-fabric palette.
Assign Colors to Temperatures
Use a thermal gradient for intuitive reading:
• Blues and purples for the coldest days
• Teals and grays for freezing to 40°F
• Soft greens for the 50s and 60s°F
• Yellow and gold for the 70s and 80s°F
• Bright orange or red for 90°F and above
Pro Tip: Pick colors you love, not just ones that fit the gradient. One quilter regretted choosing a dull green for 55°F because it became the most-used fabric after a cool summer.
Create a Fabric Key Sheet
Make a master worksheet with:
• Temperature ranges listed in order
• Assigned fabric swatches (1.5″ x 6″) glued or taped in place
• Notes on precipitation symbols or special days
Keep this visible during sewing. Make a backup copy in case it gets lost or damaged.
Select Your Block Pattern

The block design shapes your daily workflow and final look. Simpler patterns save time and reduce errors over 365 days of repetitive sewing.
Half Square Triangles (HST)
Best for beginners
Each block represents one day.
• Top triangle: Daily high temperature
• Bottom triangle: Daily low temperature
• Size: 5″ unfinished (4.5″ finished)
This pattern works because it requires only two fabric choices per day, sews quickly in batches, and creates a modern, pixelated effect.
Warning: Press seams consistently to avoid wavy edges after 365 blocks. Maintaining an exact 1/4″ seam allowance is critical.
Flying Geese Configuration
Ideal for storytelling
Each “goose” represents one day.
• Body: High temperature
• Wings: Low temperature
• Direction: Up for rain or snow, down for dry conditions
Arrange geese in vertical columns by month. The upward or downward tilt adds instant weather context without extra symbols.
Note: Templates often require printing at 90% scale to fit standard block sizes. Always check the 1″ test square before cutting.
House Block Design
Most detailed option
Each house represents one day.
• Roof: Daily high temperature
• Walls: Daily low temperature
• Door: Day of the week
• Sky: Cloudy, sunny, or windy conditions
• Extra stitching: Holidays or storms
This option works best for advanced quilters who want a narrative quilt. It is time-consuming but rich in data layers.
Choose and Organize Fabrics

Your fabric choices make or break the visual impact. Hand-dyed solids or batiks work best because busy prints distract from the temperature patterns.
Buy Smart: Quantity Tips
You cannot predict how many 80°F days you will have, but you can plan strategically.
• Mid-range temps (50 to 75°F): Buy ½ to 1 yard each because these get used most
• Extremes (below 30°F or above 90°F): Buy fat quarters since they occur less often
• Reorder-friendly lines: Choose brands like Cherrywood Fabrics or Moda Bella Solids
Real quilter feedback: Even with careful planning, 60% of participants needed to reorder at least one color mid-year because weather patterns proved unpredictable.
Pre-Cut for Daily Ease
Spend one weekend prepping all your fabric.
1. Cut all fabric into 5″ squares (for HSTs)
2. Sort into labeled bins from coldest to hottest
3. Store in a rotating organizer for quick access
Now your daily task becomes simple: pick two fabrics and sew one HST block.
Daily Sewing and Tracking

Consistency beats perfection. Whether you sew daily or in batches, keep momentum going throughout the year.
Daily Workflow (5 Minutes)
- Check yesterday’s high and low on Timeanddate.com
- Find matching fabrics on your key sheet
- Sew one HST block
- Log the data in a spreadsheet or journal
Skip a day? No problem. Fill in later using historical data from major weather databases.
Batch Sewing (Weekly)
For busy schedules, try this approach:
• Sundays: Sew 7 blocks at once
• Saturday nights: Prep the week’s fabrics
• Use chain-piecing for speed
You still finish on time with less daily pressure.
Add Weather Details
Enrich your quilt with extra meaning.
• Rain or snow: Use silver or white fabric in the low temperature triangle
• Holidays: Sew a red star or green tree into the block
• Extreme days: Add a black border around the hottest or coldest days
One quilter used dark gray fabric for Hurricane Ian, and now it serves as a family conversation piece.
Assemble Rows by Month

Do not wait until year-end to sew blocks together. Build as you go to avoid a massive final assembly project.
Monthly Column Layout
Arrange blocks in vertical columns where each column represents one month.
• January: Far left
• December: Far right
• Top to bottom: Day 1 to day 31
This layout clearly shows seasonal shifts from left to right across the finished quilt.
Sew Rows Early
After each month, sew its blocks into a strip. Press seams flat and store rolled with a label.
• Benefit: Avoids a 365-block assembly nightmare
• Bonus: Watch your quilt grow month by month
Tip: Use a leader-ender to chain-piece blocks and save thread throughout the year.
Fix Layout Gaps and Extras
Most grids do not divide evenly into 365 days. Here is how to handle leftovers gracefully.
Handle Extra Blocks
If your layout is 19×19 (361 blocks), you will have 4 extra days. Consider these options:
• Add a “Grand Finale” row on top or bottom featuring all 20+ color strips in order
• Include the year’s highest temperature as the largest block
• Include the year’s lowest temperature as the smallest block
• Sew extras into the backing as a surprise layer
Fill Missing Days
Missed more than a week of sewing? Try these solutions:
• Use neutral filler blocks in light gray
• Mark with “?” or “N/A” in your log
• Stitch a memo patch explaining the gap
Transparency adds charm to the finished piece.
Finish with Data-Rich Quilting
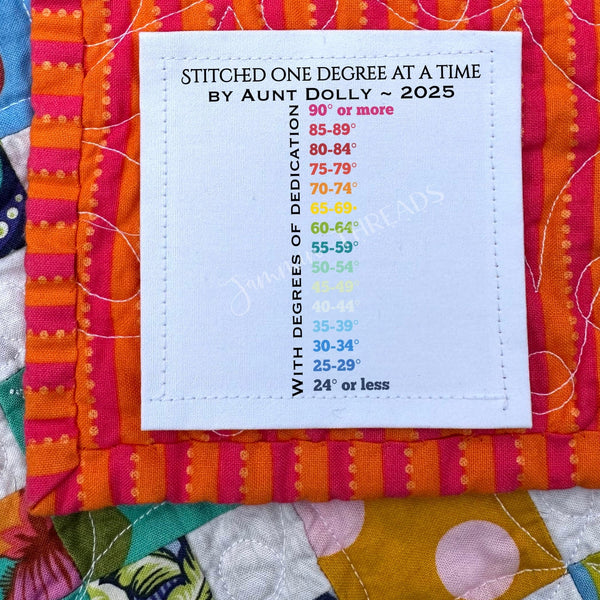
Make your quilt readable and durable with thoughtful finishing techniques.
Quilt the Legend On
Instead of hiding the key on the back, integrate it into the front.
• Stitch numbers onto color strips: “60°F”, “75°F”
• Embroider words like “Rain”, “Snow”, or “90°F+”
• Add a flower key where the center shows high temp and petals show low temp
Now anyone can read your weather story at a glance.
Choose Thematic Designs
Select quilting motifs that match your climate.
• Clouds: For a sky theme
• Waves: For coastal climates
• Stippling: Neutral and fast for large throws
Use edge-to-edge patterns on a longarm machine to save hours of hand quilting.
Bind and Label
Finish your quilt professionally.
• Binding: Machine-sew the front, then hand-stitch the back for a clean finish
• Label: Include the year (like “2024”), location (like “Portland, OR”), fabric sources, and pattern name
This turns your quilt into a future heirloom with full provenance.
Maintain and Display
Your temperature quilt is both art and archive. Treat it with care to preserve it for decades.
Washing Tips
Follow these guidelines to prevent damage:
• Cold water only
• Mild detergent (no bleach)
• Air dry or use low heat
• Test for bleeding on fabric scraps first
High-contrast blocks can run, especially hand-dyed fabrics.
Storage for Pauses
If you need to pause your project:
• Store pre-cut squares in ziplock bags by color
• Label each bag with its temperature range
• Keep the master key in a waterproof sleeve
You can resume anytime without confusion.
Display Ideas
Show off your finished work:
• Hang on a quilt rack near a window
• Drape over a couch as a conversation starter
• Use as a bed topper in guest rooms
One quilter shared: “It is not just a quilt; it is my year in color.”
Frequently Asked Questions About Temperature Quilt Patterns
What is the best temperature quilt pattern for beginners?
The half square triangle (HST) design works best for beginners. Each block requires only two fabric choices representing the daily high and low temperatures, sews quickly in batches, and creates a modern pixelated look without complex piecing techniques.
How many fabric colors do I need for a temperature quilt pattern?
Most quilters need 20 to 24 fabric colors. Using 5°F increments across a typical 0°F to 100°F range requires 21 distinct fabrics. The BERNINA method uses 3°C intervals across a -23°C to +36°C range, also resulting in 20 colors.
Where can I find free temperature quilt pattern downloads?
Several sources offer free patterns. Fat Quarter Shop provides a free “Cottage Temperature” PDF pattern with cutting diagrams. Canuck Quilter Designs offers a free pattern via newsletter signup. WeAllSew and BERNINA provide extensive free guides, worksheets, and quilt-along structures.
How do I handle missed days when sewing a temperature quilt?
Use historical weather data from Timeanddate.com or Wunderground.com to fill in gaps retroactively. Alternatively, use neutral filler blocks in light gray, mark missed days with “?” or “N/A” in your log, or stitch a memo patch explaining the absence.
What is the standard size for a finished temperature quilt?
Finished sizes vary based on block dimensions and layout. A typical throw size measures around 57.5″ x 71.5″ (like the Cottage Temperature pattern). A 19×19 layout of 6-inch finished blocks yields a massive 114″ x 114″ quilt top before quilting shrinkage.
Can I use a temperature quilt pattern to track weather in Celsius?
Yes, the BERNINA Temperature Quilt-Along uses 3°C intervals across a range of -23°C to +36°C. This matches a 20-fabric color palette and works perfectly for metric-based weather tracking in any location.
Key Takeaways for Starting Your Temperature Quilt Pattern
A temperature quilt pattern transforms an entire year of weather data into a meaningful textile keepsake. The most important decisions happen before you start sewing: choose a temperature scale that matches your climate, select a block pattern that fits your skill level, and purchase fabrics strategically with extra yardage for mid-range temperatures.
Consistency matters more than perfection. Whether you sew one block daily or batch a week’s worth on Sundays, keep momentum throughout the year. Build rows monthly to avoid an overwhelming final assembly, and integrate your legend directly onto the quilt front for maximum readability.
Your next step is simple: pick your first two fabrics based on yesterday’s high and low temperatures, sew one block, and begin your journey from January 1 to December 31. One degree, one stitch at a time, you will create a functional heirloom that tells a story no graph can match.