
Imagine turning your favorite old t-shirts, each carrying a story, into a cozy blanket you can wrap yourself in for years to come. Whether those shirts represent sports seasons, family vacations, graduation milestones, or military service, a no-sew shirt blanket lets you preserve those memories in a soft, usable keepsake without ever touching a sewing machine. This guide shows you exactly how to make a shirt blanket without sewing using simple techniques like tying, fabric glue, and iron-on adhesives that anyone can master.
Perfect for beginners, families with kids, or anyone looking to upcycle sentimental tees, this project combines creativity with practicality. You will learn how to cut cleanly, plan your layout, and assemble a durable blanket using only household tools and affordable store-bought supplies. With methods ranging from rustic fringe-knotting to professional-looking fusible webbing, you can choose the approach that fits your time, skill level, and desired finish.
Gather Essential Materials for Your Shirt Blanket
Choose the Right T-Shirts
Select 12 to 22 clean, dry t-shirts made of cotton or cotton blend for best results. Larger adult-sized shirts yield more usable fabric, especially if they feature graphics or logos you want to highlight. Avoid shirts with large holes, stains, or thinning fabric. One 12×12 inch square per shirt is typical, usually cut from the front panel. For a double-sided blanket, use both front and back pieces, but only with adhesive assembly methods.
You will need to gather these essential tools:
- Rotary cutter and self-healing cutting mat with grid lines for precision cuts
- Sharp fabric scissors as an alternative to rotary cutting
- Ruler or measuring tape at least 24 inches long
- Washable fabric marker or chalk for marking cut lines
- Cardboard or paper template cut to your chosen block size
- Iron and ironing board for fusible methods
- Safety pins or clips to hold pieces in place during layout
Pick a Soft Backing Fabric
Use fleece as the most popular backing material because it is soft, stretch-resistant, and easy to work with. Polar fleece or anti-pill fleece both work well. Flannel or cotton also work but may wrinkle more over time. Cut the backing 2 to 3 inches larger than your final blanket size to allow for edge finishing. Choose neutral or complementary colors like gray, navy, or black to let your shirt designs stand out.
Get Adhesive and Bonding Supplies
For adhesive assembly methods, you will need fusible webbing such as HeatnBond Lite, Wonder Under, or Pellon 805 SoftFuse. These products apply with heat to bond t-shirt squares to backing permanently. For fabric glue assembly, choose flexible, machine-washable options like Aleene’s Fabric Fusion, Dritz Stitch Witchery, or Odif USA 505 Spray. Optional but recommended is fusible interfacing to stabilize stretchy knit fabric and prevent distortion during handling and bonding.
Plan Your Blanket Layout
Decide Final Size and Block Count
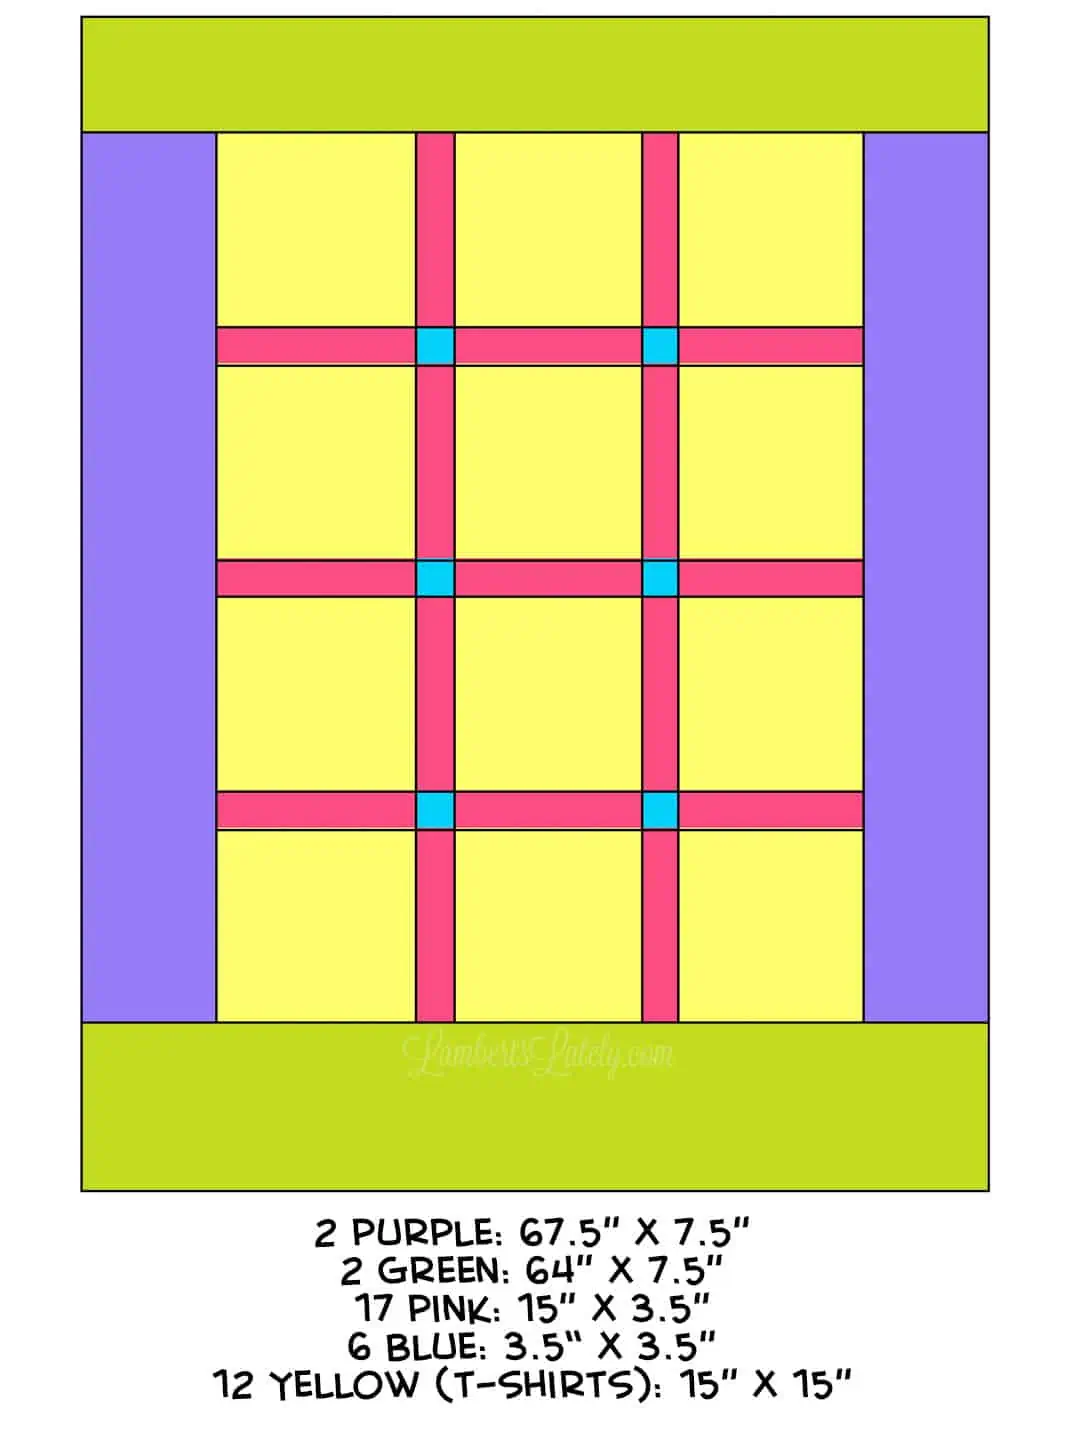
Most no-sew shirt blankets are 48×60 inches, which is a standard throw size. This fits a 4×5 grid of 12-inch squares, requiring 20 shirts. Smaller lap blankets at 36×48 inches need 12 to 16 shirts, while larger queen-sized blankets at 60×80 inches require 25 to 35 shirts.
| Block Size | Grid Layout | Total Shirts | Final Size |
|---|---|---|---|
| 12×12 in | 4×5 | 20 | 48×60 in |
| 14×14 in | 4×4 | 16 | 56×56 in |
| 10×10 in | 5×6 | 30 | 50×60 in |
The 12×12 inch block size offers the best balance of design space and material efficiency. This size allows you to showcase graphics while maintaining manageable pieces for cutting and assembly.
Arrange Shirts Creatively
Lay out all cut squares on the floor or a large table before bonding anything. Use safety pins or clips to hold position temporarily. Consider these layout approaches for your blanket.
Chronological order works well for memory blankets, arranging shirts from childhood to graduation or other life milestones. Thematic grouping collects all sports, schools, or travel shirts together. Color gradient creates a rainbow or ombre flow across your blanket. Symmetrical design places your favorite shirt in the center with mirrored sides. Random mix provides a casual, eclectic look if you prefer spontaneity over structure.
Take a photograph of your layout once you are satisfied. This reference photo helps you reassemble everything correctly if pieces get disturbed during the bonding process.
Prepare T-Shirt Squares Correctly
Pre-Wash and Iron All Shirts
Wash and dry all shirts before cutting to prevent future shrinking or color bleeding. Iron them if wrinkled because smooth fabric cuts cleaner and bonds more securely. This step is essential for achieving professional-looking results.
Remove Seams and Collars
Lay each shirt flat with the inside facing out. Cut off the sleeves, collar, and side seams to create a flat panel for cutting. Smooth out any wrinkles or stretching before marking your cut lines.
Cut Uniform Blocks
Place your 12×12 inch template over the graphic area of each shirt, centering the design. Trace around the template with your washable marker. Cut just outside the traced line to allow for trimming.
Use a rotary cutter and grid mat for precision cuts. Stack multiple shirts together to cut several squares at once, but avoid stretching the fabric while cutting.
Apply fusible interfacing to the back of each square if you want to prevent puckering. Place the shiny side down on the wrong side of the fabric, cover with parchment paper, and iron for 10 to 15 seconds per square. This stabilizes stretchy knit and creates cleaner bonds.
Choose Your No-Sew Assembly Method
Tying Fringes Method
The tying method creates a chunky, textured blanket by knotting fringed edges of t-shirt squares together. This approach requires no glue or iron and is perfect for beginners, kids, and fast weekend projects.
Cut your shirt squares 14×14 inches to yield a 12×12 inch visible area after trimming. Cut 1-inch squares from each corner to remove seam bulk. Cut 3-inch-long slits every 1 inch along all four sides, creating about 11 to 12 fringes per side. Stack multiple squares together when cutting fringes for consistency.
To knot rows together, place two squares side by side with right sides facing up. Tie adjacent fringes using a double-X knot by crossing strips to form an X, pulling the top strip under and through, and repeating for a second knot. Continue across the entire seam. Repeat this process for all pairs to form full rows.
To connect rows vertically, flip the second row upside down. Align its top fringes with the bottom fringes of the first row and tie using the same double knot method. Continue until all rows are joined.
For the final touch, attach a fleece backing with overhang by cutting fleece 2 to 3 inches larger than your panel. Fringe the fleece edges and tie the t-shirt fringes to the perimeter fringes. The knots will be hidden underneath for a clean look.
Fusible Webbing Iron-On Method
This method produces a smooth, quilt-like blanket with no visible knots or glue lines. It uses heat-activated adhesive to permanently bond t-shirt blocks to backing.
Cut fusible webbing slightly smaller than your squares, around 11.5×11.5 inches for 12-inch blocks. Place the webbing shiny side down on the wrong side of each t-shirt square. Cover with parchment paper and iron for 10 to 15 seconds per square following product instructions. Peel off the paper backing once the adhesive is activated.
Lay your fleece backing on a flat surface with the wrong side facing up. Arrange your bonded squares in your planned layout with edges touching tightly. Cover the entire blanket with parchment paper and iron each square again, applying firm even pressure to bond them to the backing.
Add a thin line of flexible fabric glue along edges after fusing for extra hold and durability. This hybrid approach combines the strength of fusible webbing with additional adhesive security.
Fabric Glue Assembly Method
Fabric glue allows for repositioning before the glue sets, making it ideal for small blankets or partial repairs. Use flexible, machine-washable glue for best results.
Apply fabric glue in a zig-zag or grid pattern to the back of each square. Press firmly onto your backing fabric and hold for 30 seconds or clip with binder clips. Allow the blanket to cure for 24 hours before handling or washing. Optional reinforcement with fusible webbing creates hybrid strength for longer-lasting results.
Use moderate glue amounts to avoid seepage. Wipe any excess immediately with a damp cloth.
Finish Edges Without Sewing
Use Iron-On Bias Tape
Cut double-fold bias tape to fit each side, adding 2 inches for corners. Fold the tape at 45 degrees at corners for a mitered look. Place the tape over raw edges, cover with parchment paper, and iron in place. The fusible adhesive melts and bonds the fabric. This method provides a clean finish in under 30 minutes.
Fold and Glue Fleece Hem
Cut your backing 2 to 3 inches larger than the t-shirt panel. Fold the edge over the front by 1/2 to 1 inch. Secure with fabric glue or fusible webbing and press under books or clamps until dry, which takes 2 to 4 hours. This creates the softest finish with no hard edges.
Attach Decorative Trim
Apply flexible fabric glue around the perimeter and press grosgrain ribbon or satin tape into place. Clamp with clothespins or books until completely dry. This approach works best for personalized borders featuring school colors, team names, or other custom elements.
Customize Your Shirt Blanket Design
Add Sashing Between Blocks
Cut 2 to 3 inch strips of neutral fabric like black fleece and place them between your shirt squares. Bond with fusible webbing or fabric glue. This creates a quilted appearance and helps hide minor size inconsistencies between blocks.
Include Labels or Patches
Attach a fabric label with a name, graduation year, military branch, or travel destinations using iron-on adhesive or fabric glue. This personalizes your blanket and makes it a meaningful gift or heirloom.
Create Double-Sided Blankets
Sandwich your shirt blocks between two fleece layers by applying fusible webbing to both sides. Press the top layer down and iron to secure. This approach is ideal for military homecomings, retirement gifts, or any project where you want designs visible from both sides.
Ensure Durability and Washability
Compare Method Longevity
The tying method with double knots lasts 3 to 5 years with high wash resistance when properly secured. Fusible webbing provides 4 to 6 years of durability with proper care and excellent edge stability. Glue-only assembly lasts 2 to 3 years with moderate wash resistance. The hybrid approach combining fusible webbing with fabric glue lasts 5 or more years with very high wash resistance and excellent edge stability.
For heirloom-quality blankets, use fusible webbing combined with edge binding for maximum longevity.
Wash and Care Properly
Wash your blanket in cold water on a gentle cycle using mild detergent. Turn the blanket inside out with the fleece facing outward to protect knots or bonds. Avoid bleach and fabric softener. Dry flat or tumble dry on low heat. Iron on low heat with a pressing cloth, avoiding direct contact with adhesive areas.
High heat or wringing can loosen bonds, so handle your blanket gently during washing.
Troubleshoot Common Issues
Fabric puckering occurs when stretchy knit fabric warps during bonding. Prevent this by applying fusible interfacing before cutting or bonding your squares.
Adhesive seepage happens with too much heat or glue. Always use parchment paper between your iron and fabric, and apply even pressure throughout.
Blocks lifting after washing indicates weak edge bonding. Reinforce with fabric glue along edges or re-iron the edges to restore the bond.
Uneven fringes result from freehand cutting. Stack your squares and use a rotary cutter on a grid mat for consistent results.
Knots coming loose happen when using single knots or loose tension. Always use the double-X knot and add a small drop of fabric glue to secure if needed.
Key Takeaways for Making a Shirt Blanket Without Sewing
A no-sew shirt blanket transforms sentimental t-shirts into a cozy, memory-filled keepsake that requires no sewing experience. Choose the tying method for a rustic, textured look that involves family members in the creation process. Choose fusible webbing for a smooth, professional finish suitable for gifting. Choose fabric glue for small projects or repairs where repositioning matters.
Gather quality materials including a rotary cutter, self-healing mat, fusible webbing or fabric glue, and soft fleece backing. Plan your layout by determining final size, selecting block count, and arranging shirts in a meaningful pattern. Prepare squares by pre-washing, removing seams, and cutting uniform blocks with stabilized fabric.
Finish edges using bias tape, folded fleece hems, or decorative trim for a polished look. Care for your blanket properly by washing in cold water, avoiding high heat, and handling gently to maximize lifespan. With the right tools, planning, and techniques, your shirt blanket will last for years while carrying unmatched personal significance.
Frequently Asked Questions About Making a Shirt Blanket Without Sewing
How long does it take to make a no-sew shirt blanket?
Most no-sew shirt blankets require 8 to 20 hours total depending on size and method. The tying method takes 8 to 15 hours, while fusible webbing takes 6 to 12 hours. The most time-consuming steps are cutting, fringing, and knotting if using the tying approach.
What is the most durable no-sew method?
The hybrid approach combining fusible webbing with fabric glue provides the highest durability at 5 or more years. Fusible webbing alone lasts 4 to 6 years, while the tying method lasts 3 to 5 years with proper double-knotting technique.
Can I use any type of glue for a shirt blanket?
Use only flexible, machine-washable fabric glue designed for textiles. Products like Aleene’s Fabric Fusion, Dritz Stitch Witchery, or Odif USA 505 Spray work well. Standard craft glue becomes stiff when dry and will not withstand washing.
How many shirts do I need for a standard throw blanket?
A standard 48×60 inch throw blanket using 12×12 inch blocks in a 4×5 grid requires approximately 20 shirts. Smaller lap blankets need 12 to 16 shirts, while larger queen-sized blankets require 25 to 35 shirts.
Can kids help make a shirt blanket?
Yes, the tying method is particularly suitable for children. Kids can help cut fringes and tie knots with adult supervision. The simple double-X knot is easy to learn, and many families complete blanket projects together over a weekend.
Will the blanket survive machine washing?
Yes, properly made no-sew blankets survive machine washing when cared for correctly. Wash in cold water on gentle cycle, avoid bleach and fabric softener, and tumble dry on low heat. Fusible webbing and double-knotted ties provide the best wash resistance.

