
If you have ever admired a cozy, cloud-like blanket covered in soft, dimensional squares, you have seen a puff quilt in action. Also called a bubble, biscuit, or cloud quilt, this modern project creates stunning texture using surprisingly simple sewing techniques. Unlike traditional quilts that sandwich a single batting layer between top and backing, a puff quilt uses individually stuffed fabric blocks that form three-dimensional puffs.
Learning how to make a puff quilt takes patience, especially for larger sizes, but requires only basic skills like straight seams and hand-tying. Whether you raid your scrap bin or buy curated charm packs, this project adapts to any style. In this guide, you will learn how to cut, assemble, stuff, and finish a puff quilt from start to finish, with expert tips to avoid common pitfalls.
Choose Your Block Size
The first decision when planning how to make a puff quilt is choosing your block size. This choice controls the number of pieces you cut, the total project time, and the final texture.
Small Blocks (4″ Finished)
- Top Squares: 5″ x 5″ or 4.5″ x 4.5″
- Base Squares: 4.5″ x 4.5″ or 4″ x 4″
- Best For: Baby (36″x40″) or throw (52″x64″) quilts
- Total Blocks: 90 (baby), 208 (throw), 540 (twin)
Small blocks create a dense, uniform puff effect that works beautifully for gradient or scrap designs. They take longer to assemble but offer maximum design flexibility.
Large Blocks (7″ Finished)
- Top Squares: 8.5″ x 8.5″
- Base Squares: 7.5″ x 7.5″
- Best For: Fast projects or lap-sized quilts
- Example: 4×4 layout equals 16 blocks, finishing around 30″x30″
Large blocks drastically reduce cutting and sewing time. Each puff looks more dramatic and is easier to stuff, making this size perfect for a weekend project.
Pro Tip: Cut fabric into strips first, then sub-cut into squares. This method is faster and more accurate than cutting individual pieces one at a time.
Gather Materials and Tools
You do not need advanced equipment, but the right supplies make a noticeable difference in quality and ease.
Fabric Requirements
- Top Squares: Cotton, linen, or quilting cotton in your chosen colors. Fat quarters, charm packs, or yardage all work.
- Base Squares: White cotton, muslin, or neutral fabric. These stay hidden, so scraps are perfect.
- Backing Fabric:
- Cotton: Requires piecing for larger quilts. Use 1 yard for baby size and 3 yards for throw size.
- Minky: Dimpled minky feels soft and stretchy, and it removes the need for batting. Great for year-round use.
- Binding: 1/2 yard of cotton or 2 to 3 packs of premade binding for baby to throw size. Optional if you plan to use self-binding.
Stuffing and Batting
- Fiberfill: Polyester fiberfill (such as PolyFil) is the standard choice. Use less for a plush feel and more for firmness.
- Amount: Around 36 oz for a throw size. Buy two 12-oz bags to be safe.
- Per Block: A light handful or about 4 heaping soup bowls for 8.5″ blocks.
- Batting (Optional): Thin cotton batting like Quilter’s Dream adds warmth and smooths the back. Skip this layer if you use minky.
Essential Tools
- Rotary cutter, quilting ruler, and cutting mat
- Sewing machine with a 1/4″ foot and a walking foot (critical for thick layers)
- Curved safety pins or basting spray
- Embroidery needle and floss for tying
- Scissors, straight pins, and painter’s tape for floor basting
Warning: Never skip the walking foot. It prevents fabric layers from shifting when you sew through stuffed rows.
Cut All Fabric Squares
Before you sew a single seam, cut every piece. Accurate cutting saves significant time later.
Cutting Strategy
- Sort fabrics by color, especially for ombre designs.
- Cut strips to match your top square size (such as 5″ wide).
- Sub-cut strips into squares using a ruler.
- Repeat for base squares using your neutral fabric.
Total Counts by Size
| Size | Top Squares | Base Squares | Total Cuts |
|---|---|---|---|
| Baby | 90 | 90 | 180 |
| Throw | 208 | 208 | 416 |
| Twin | 540 | 540 | 1,080 |
Pro Tip: Label your rows as you cut (such as “Row 1” or “Row 2”) to keep your design order intact.
Assemble Puff Blocks

Each puff starts as two squares stitched on three sides, then stuffed through the open fourth side.
Sew Three Sides with Pleats
- Place the top square right side up over the base square. Align the top-right corners first.
- Begin sewing with a scant 1/4″ seam along one side.
- After a few stitches, align the bottom-right corners. The excess top fabric will billow out.
- Pinch the center of the excess into a single pleat, fold it toward the block center, and sew over it.
- Stop 1/4″ from the corner, pivot with the needle down, and repeat for the next side.
- Leave the fourth side completely open for stuffing.
- Backstitch at the start and end of every seam to reinforce.
Repeat this process for all your blocks. Chain-piecing helps you save time.
Pleat Consistency Tips
- Make all pleats face the same direction (such as all clockwise).
- Keep pleats centered on each side.
- Press lightly if needed, but never flatten the puff.
Stuff and Join Rows
Two methods exist for stuffing: stuff all blocks first, or stuff row by row. The row-by-row method is far easier for most makers.
Row-by-Row Workflow (Recommended)
- Lay Out Rows: Arrange unstuffed blocks in your chosen pattern, such as an ombre gradient.
- Stuff First Row:
– Insert fiberfill into each block.
– Adjust firmness: softer feels cozier, firmer looks more defined.
– Pinch the open edge closed with a pleat.
– Sew shut with a scant 1/4″ seam and backstitch. - Attach Second Row:
– Place the second row (unstuffed) right sides together with the first (stuffed) row.
– Open sides of the second row must face outward.
– Nest seams by pressing adjacent block seams in opposite directions to reduce bulk.
– Pin at every seam and the center of blocks to prevent shifting.
– Sew with a 1/4″ seam using your walking foot. - Repeat: Stuff the second row, attach the third, and continue until complete.
Hand Position Tip: Hold stuffed puffs flat with your left hand while sewing to prevent skewing.
Why Not Stuff All First?
- Creates too much bulk early in the process
- Hard to align and feed through a home machine
- Increases risk of uneven tension and popped seams
Prepare the Quilt Sandwich

Now attach the completed puff top to your backing and optional batting.
Layering Order
- Backing: Place face down on a flat surface. Tape edges with painter’s tape.
- Batting (if using): Smooth over the backing. Trim 1″ larger than the puff top.
- Puff Top: Place face up on top.
Skip the batting entirely if you chose minky backing.
Basting Methods
- Basting Spray: Lightly spray between layers. Best for smooth fabrics.
- Safety Pins: Use curved pins every 2 to 3 puffs. Secure corners and edges first.
- Alternative: Pre-quilt the backing and batting with straight lines before adding the puff top.
Goal: Prevent any shifting during the tying stage.
Secure Layers with Hand Tying
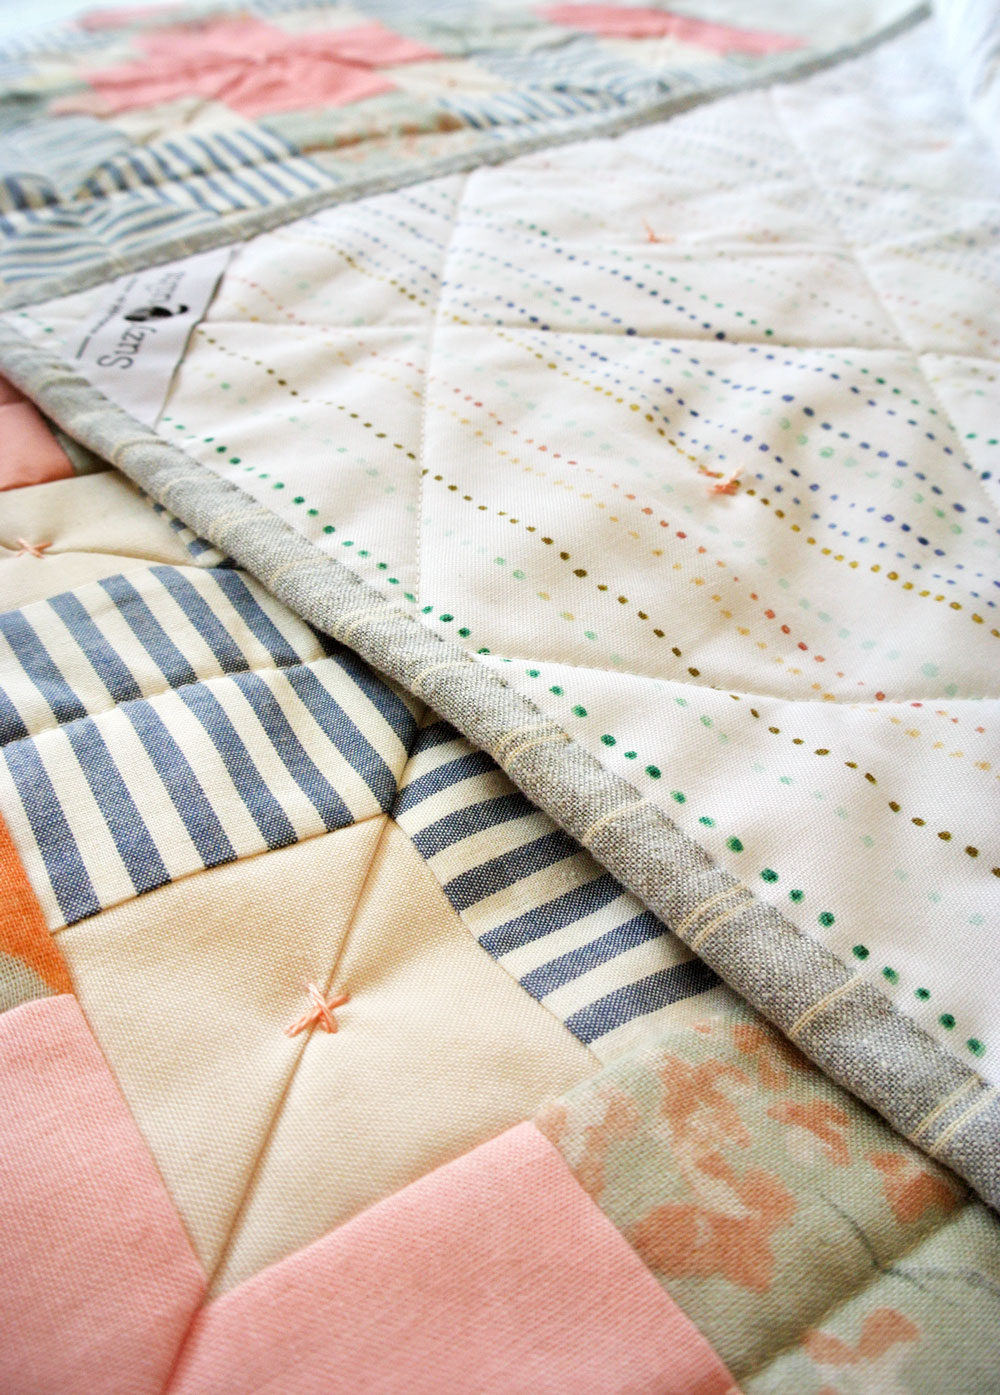
Machine quilting through puffs is difficult. Hand tying is the traditional and most effective method.
How to Tie the Quilt
- Thread an embroidery needle with 18 to 24″ of floss. Do not knot the end yet.
- Insert the needle from the back, emerging at a four-puff intersection (the valley).
- Push the needle back down through the same spot or diagonally to form a small “X.”
- Pull the thread through, leaving two tails on the back.
- Tie a triple square knot for durability.
- Trim tails to 3/8″ to 1/2″ (leave longer for a decorative look).
Tying Pattern
- Tie at every intersection for maximum stability.
- For a lighter look, skip every other junction.
- Use color-matched floss to blend with ombre or scrap tops.
Warning: Do not pull too tight. Over-tightening flattens puffs or pops knots.
Finish with Binding
Encase the raw edges neatly using one of two methods.
Traditional Binding
- Trim batting and backing to match the puff top edges.
- Attach bias tape (premade or self-cut) to the front with a 1/4″ seam.
- Fold to the back and hand-stitch (blind stitch) or machine-stitch in the ditch.
Self-Binding (Vintage Style)
- Sew a 1/4″ seam around the entire quilt through all layers.
- Trim backing and batting so the backing extends 1″ beyond the top.
- Trim batting flush with the puff top edge.
- Fold the backing over the front, enclosing the raw edge.
- Fold again and stitch down by hand or machine.
- Miter the corners by folding diagonally for a clean finish.
Pro Tip: Use contrasting thread for a decorative edge, or match thread for an invisible look.
Troubleshoot Common Issues
Even experienced sewers face challenges. Here is how to fix the most common problems.
Skewed Seams When Joining Rows
- Cause: Fabric stretching under the weight of puffs.
- Fix: Hold puffs flat with your left hand while sewing. Always use a walking foot.
Excessive Bulk at Intersections
- Cause: All seams folded in the same direction.
- Fix: Nest seams by pressing adjacent block seams in opposite directions before sewing rows together.
Pleats Not Lining Up
- Cause: Inconsistent pleating technique.
- Fix: Always center the pleat and fold toward the block center. Use the same direction for every block.
Overstuffed, Stiff Quilt
- Cause: Too much fiberfill per block.
- Fix: Use a light handful per block. Softer stuffing creates a cozier quilt.
Thread Showing on Back
- Cause: Bobbin thread visible between puffs.
- Fix: Use bobbin thread that matches your backing fabric.
Customize Your Design

Puff quilts are highly adaptable. Try these popular variations.
Ombre or Gradient Look
- Sort fabrics from light to dark in one color family (such as rust, cream, and caramel).
- Arrange blocks in rows to create a smooth transition.
- Use multi-colored floss for tying to blend with changing hues.
Minky Backing Option
- Pros: Soft, warm, no batting needed, lighter weight.
- Cons: Stretchy; use clips instead of pins. Avoid heat to prevent crushing the pile.
- Tip: Sew with wrong sides together to minimize stretching.
Fast-Track Large Blocks
- Use 8.5″ top squares with 7.5″ base squares.
- A 4×4 quilt (16 blocks) finishes around 30″x30″.
- Great for baby gifts or testing color combinations.
Maintain and Care for Your Quilt
With proper care, a puff quilt can last for decades.
Washing Tips
- Machine wash on a gentle cycle with cold water.
- Use mild detergent. Never use bleach.
- Tumble dry on low or air dry flat.
- Hand tying helps prevent layer shifting during washing.
Long-Term Durability
- Backstitch all block seams during construction.
- Use triple knots when tying.
- Store flat or folded. Avoid hanging, which stretches puffs over time.
Frequently Asked Questions About Puff Quilts
How long does it take to make a puff quilt?
A baby size takes around 15 to 20 hours, while a twin can require 30+ hours. Most of the time goes into cutting squares and stuffing blocks. Listening to audiobooks or podcasts helps many makers stay engaged through the repetitive steps.
Can beginners learn how to make a puff quilt?
Yes, beginners can absolutely learn how to make a puff quilt. The project uses only straight seams and basic hand tying. The three-dimensional puffs also hide minor stitching imperfections, making this one of the most forgiving quilting projects available.
Do I need a sewing machine to make a puff quilt?
A sewing machine speeds up the process significantly, especially for joining rows. You can hand-sew the entire project, but it will take much longer. For the tying step, you only need an embroidery needle and floss by hand.
How much fiberfill do I need for a throw-size puff quilt?
A throw-size puff quilt requires slightly less than 36 ounces of polyester fiberfill. Since fiberfill is often sold in 12-oz bags, buying two bags gives you enough with a small cushion. For twin size, just under two large bags is typical.
What is the best fabric for a puff quilt top?
Quilting cotton is the most popular choice because it holds shape well and comes in countless colors. Linen also works for a more textured look. Avoid slippery or stretchy fabrics for the top, as they are harder to pleat and stuff evenly.
Can I wash a puff quilt in the washing machine?
Yes, you can machine wash a puff quilt on a gentle cycle with cold water and mild detergent. Tumble dry on low or air dry flat. The hand-tied knots keep layers from shifting, but always avoid bleach and harsh agitation.
Final Thoughts on Starting Your First Puff Quilt
Learning how to make a puff quilt rewards you with a cozy, heirloom-quality blanket that doubles as decor. The forgiving construction hides small mistakes, and the repetitive process becomes almost meditative once you find your rhythm. Whether you choose soft pastels, bold scraps, or a smooth ombre gradient, your finished quilt will reflect every stitch you invested.
Start with a small baby size to build confidence, then scale up to a throw or twin once you master the pleating and stuffing technique. Gather your fabrics, sharpen your rotary cutter, and set aside a long weekend. Your cloud-like creation will be worth every moment spent at the sewing machine.

