
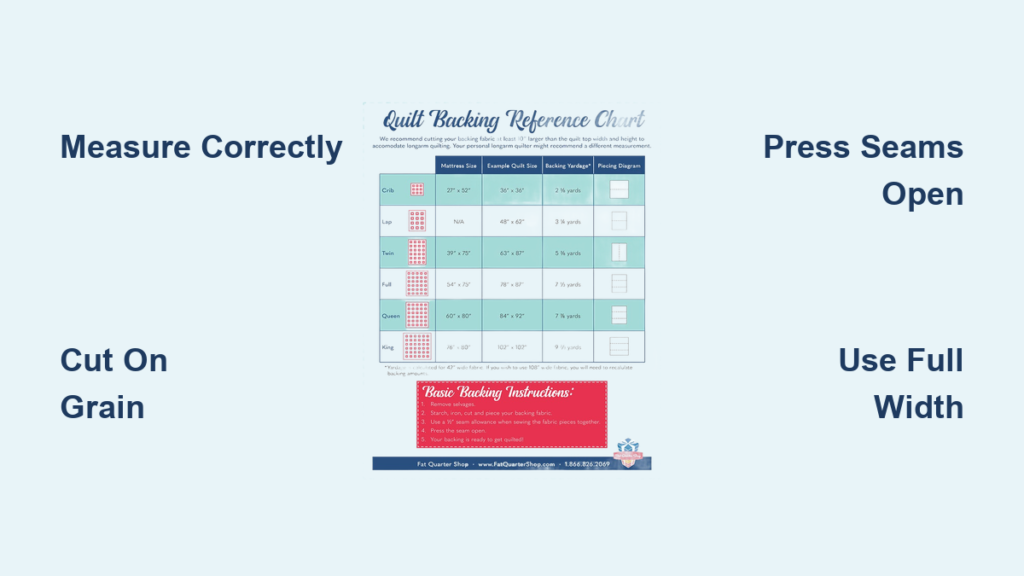
You’ve spent weeks piecing your quilt top with care and precision. Now comes the backing. Many quilters treat this step as an afterthought, but a poorly constructed backing can ruin even the most beautiful top. Knowing how to piece a quilt backing properly ensures a flat, durable finish that holds up to washing and years of use.
The biggest mistake quilters make? Cutting corners on the backing. Your backing must be larger than the top, perfectly square, and built to withstand tension during quilting. For most quilts beyond a small baby size, that means piecing. In this guide, you will learn how to piece a quilt backing that meets professional standards, minimizes waste, and avoids common pitfalls like puckering or seam failure.
Calculate Your Backing Size Before Cutting
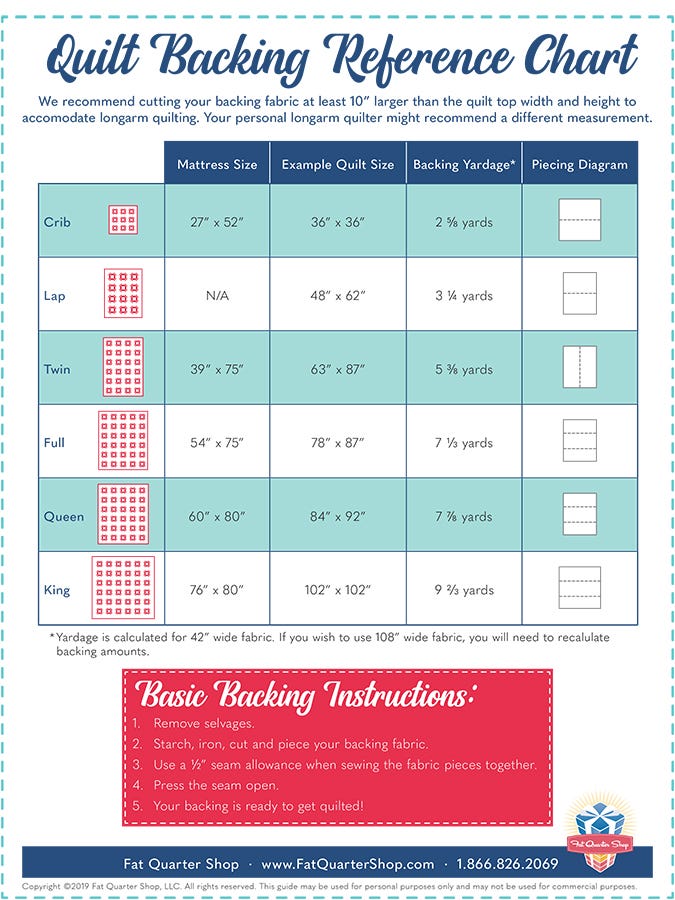
Add 8 to 10 Inches All Around
Before you cut any fabric, determine your exact backing dimensions. The standard rule is to add 8 to 10 inches to both the width and height of your finished quilt top. This gives you 4 to 5 inches of excess fabric on every side, which accounts for quilting shrinkage, frame tension, and final trimming.
For example, if your quilt top measures 60 inches by 72 inches, your backing must be at least 68 inches by 80 inches. Never cut smaller than this. If your longarm quilter specifies different requirements, follow their guidelines first.
Account for Longarm Machine Needs
Longarm quilters need consistent overhang to load your quilt smoothly. A backing that is too small will pucker, while one that is not square will skew the entire project. Always confirm overage needs before piecing. Even when quilting at home, the 8-inch rule serves as your safety margin.
Plan for Directional Prints
If your fabric features a one-way design like arrows, text, or vertical stripes, you will need extra yardage to orient the pattern correctly across seams. Factor this into your initial calculations. Buying a little extra fabric now prevents frustration mid-project.
Choose Fabric That Performs
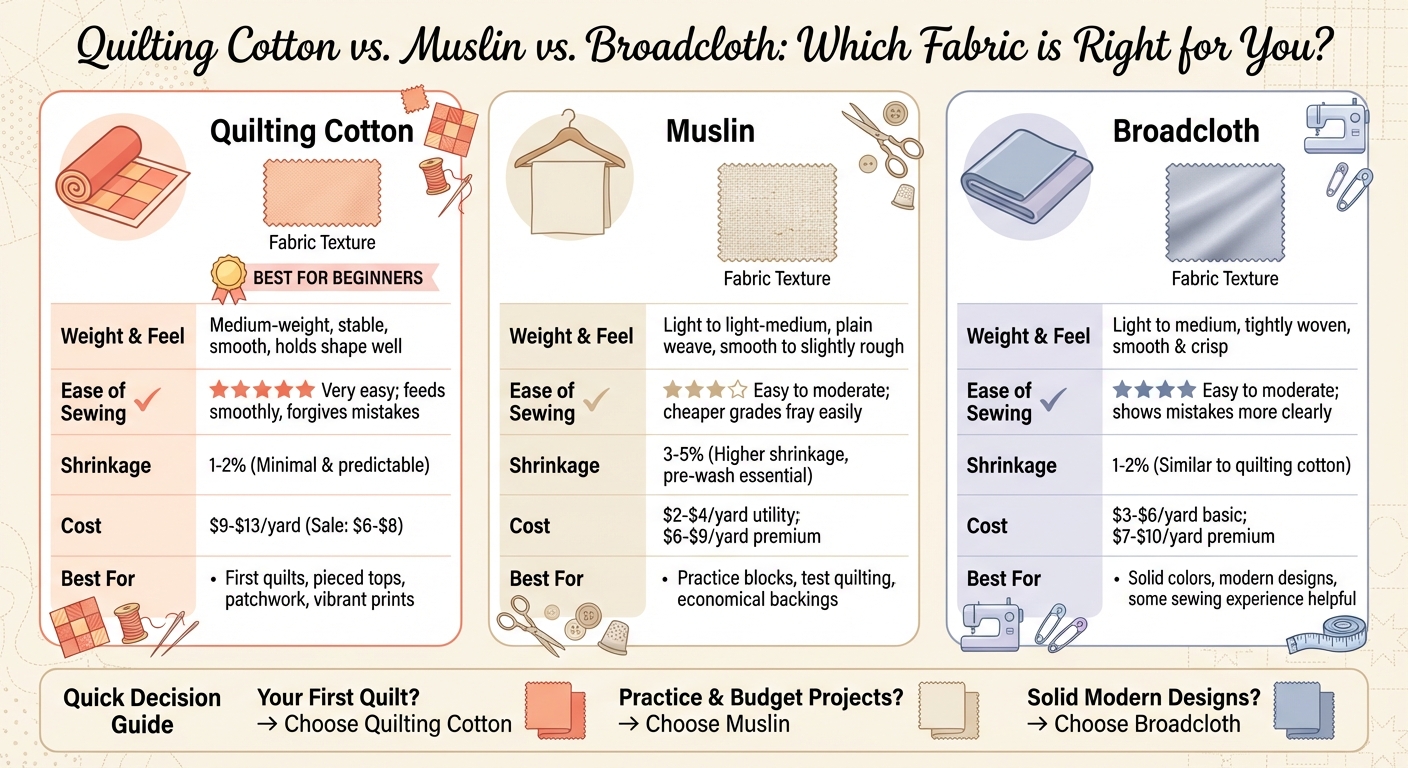
Select Quality Quilting Cotton
Choose 100 percent quilting cotton from a reputable shop. These fabrics are tightly woven, stable, and pre-shrunk after washing. Avoid bargain cottons or apparel-weight fabrics because they stretch, tear, or shrink unevenly.
Consider Wide-Back Fabric Options
For twin, queen, or king-sized quilts, 108-inch wide-back fabric eliminates seams entirely. While more expensive per yard, you use less total fabric and skip piecing altogether. This option works well for twin and queen sizes. For king quilts, standard 44-inch fabric remains practical due to length limitations of wide-back bolts.
Avoid Stretchy Materials for Beginners
Minky, fleece, and jersey knits add coziness but introduce significant stretch. These require special handling, including stabilizing during loading, walking feet, and careful tension control. Stick to stable cottons until you gain experience with stretchy backs.
Cut Panels on the Straight Grain
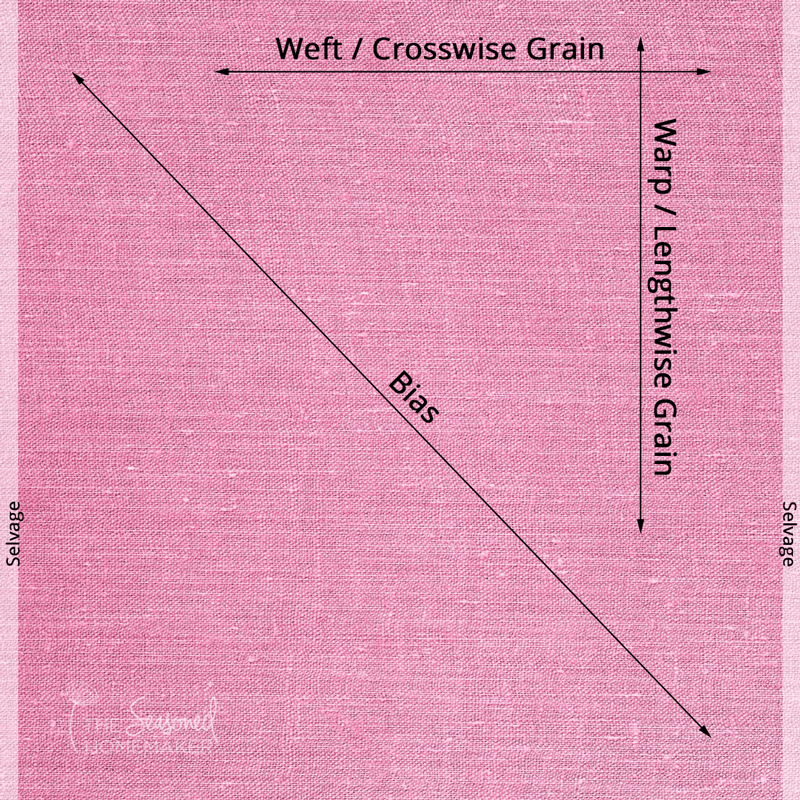
Find the True Grain
Every piece must be cut on the straight of grain, which runs parallel to the selvage. Cutting on the bias causes the fabric to stretch under tension, leading to wavy seams and tucks during quilting.
To ensure accuracy, snip into the selvage edge and rip the fabric along the grain line. Use this clean rip as your guide for squaring up. This method reveals the true grain far more accurately than the printed edge.
Remove All Selvages
Selvages are tightly woven and do not shrink like the rest of the fabric. If left in the seam, they cause puckering after washing. Always trim selvages before sewing. If a piece is too narrow to remove them entirely, make relief cuts every 3 inches along the selvage edge to allow even shrinkage.
Select the Right Piecing Method

Two-Piece Seam for Most Projects
For quilts slightly wider than 44 inches, use two full-width-of-fabric panels sewn together vertically.
Steps:
1. Cut two panels, each measuring WOF by quilt height plus 8 inches.
2. Place right sides together and align edges.
3. Sew with a 1/2-inch seam allowance.
4. Press the seam open to reduce bulk.
This method works well for lap, twin, and some queen-sized backs.
Three-Piece Method to Save Fabric
When your required width is only slightly over 44 inches, using two full WOF strips creates waste. The three-piece method solves this problem.
Say your backing needs to be 50 inches wide by 70 inches tall, with WOF at 44 inches. The remaining width equals 50 minus 44 plus 2 inches for seam allowance, which equals 8 inches.
Cut:
– Panel A: 44 inches by 70 inches (full width)
– Panel B: 8 inches by 44 inches (uses leftover length)
– Panel C: 8 inches by 28 inches (remaining height)
Assemble:
1. Sew Panel B and Panel C together along the 8-inch edge

