

If you’ve ever ended up with a twisted, lumpy duvet after a 10-minute wrestling match, you’re in good company. Studies show roughly 80% of people find this task frustrating, and most give up on getting it right. The truth is, learning how to put a quilt cover on correctly takes less than a minute once you know the right method.
A quilt cover (also called a duvet cover) protects your comforter, adds style to your bedroom, and makes seasonal swaps simple. The trick is choosing the right technique for your setup, then following a few key steps. This guide covers three proven methods, common mistakes to avoid, and quick fixes for lumpy corners. By the end, you’ll have a smooth, hotel-quality bed every single time.
Choose the Right Quilt Cover for Your Insert
Before you attempt any method, make sure your cover and insert actually fit. Size mismatches cause most of the frustration people experience.
Match Insert to Cover Exactly
Your duvet insert and cover should share the same dimensions, or the cover can run 2 to 3 inches larger to allow for fill thickness. A cover that’s too small forces you to compress the insert, creating lumps and stressing the seams. A cover that’s too large lets the duvet slide around, leaving empty corners and a sloppy look.
Always check the label. A “queen” insert needs a “queen” cover, since sizing standards vary between brands.
Look for Interior Corner Ties
The best duvet covers include internal fabric loops or ribbons at each corner. These tie to matching loops on the duvet insert, locking everything in place overnight. Without ties, your comforter will drift, twist, or bunch toward one side.
If your cover lacks ties, sew in your own using ribbon or strong string. The Clip Method also works as a temporary fix during setup.
Pick a Fabric That Glides Smoothly
Material choice affects how easily the duvet slides into the cover:
- Cotton percale: Crisp, breathable, moderate friction
- Cotton sateen: Silky and smooth, easiest for shake-in methods
- Linen: Cool and natural, may need extra smoothing
- Synthetic blends: Often slick, ideal for fast techniques
Smoother fabrics reduce resistance and speed up the process, especially with the Gravity Method.
Prep Your Bed Before You Start
A little setup saves time and prevents mid-process disasters.
Lay Everything Flat
Spread the duvet insert flat across the bed. Smooth out any wrinkles or folds. If the insert is thick, fold it in half lengthwise for easier handling.
Turn the Cover Inside Out
Flip the quilt cover completely inside out before doing anything else. The zipper or button closure should face inward toward the duvet. This single step is what makes every method work, since it lets you grab corners through the fabric.
Pro Tip: Wash and dry your covers inside out. They’ll come out of the dryer already prepped, saving you a step.
Method 1: The Gravity Flip for Speed
This fast, strength-based technique uses shaking and gravity to pull the cover over the duvet. It works best for lightweight inserts and people with good arm reach.
Grab the Top Corners Through the Fabric
Stand at the foot of the bed. Reach both arms into the open end of the inside-out cover. Slide your hands all the way to the far closed corners. Grasp the inside corners of the cover firmly through the fabric.
Keep your grip tight. You’ll need to hold these points steady through the shake.
Match Cover Corners to Duvet Corners
With your hands still inside the cover, grab the top two corners of the duvet insert through the fabric. Hold both cover corners and duvet corners together as one unit.
Shake and Let Gravity Do the Work
Lift the entire assembly off the bed. Shake hard. One, two, three shakes. Gravity pulls the cover downward over the duvet like a wave.
After a few seconds, the cover should be about three-quarters of the way on. Lay it on the bed, tuck in the bottom corners by hand, then zip or button closed.
Pro Tip: Always do this over the bed so the duvet doesn’t crash to the floor mid-shake. For larger beds, stand sideways to maximize reach.
Method 2: The Burrito Roll for Solo Setup
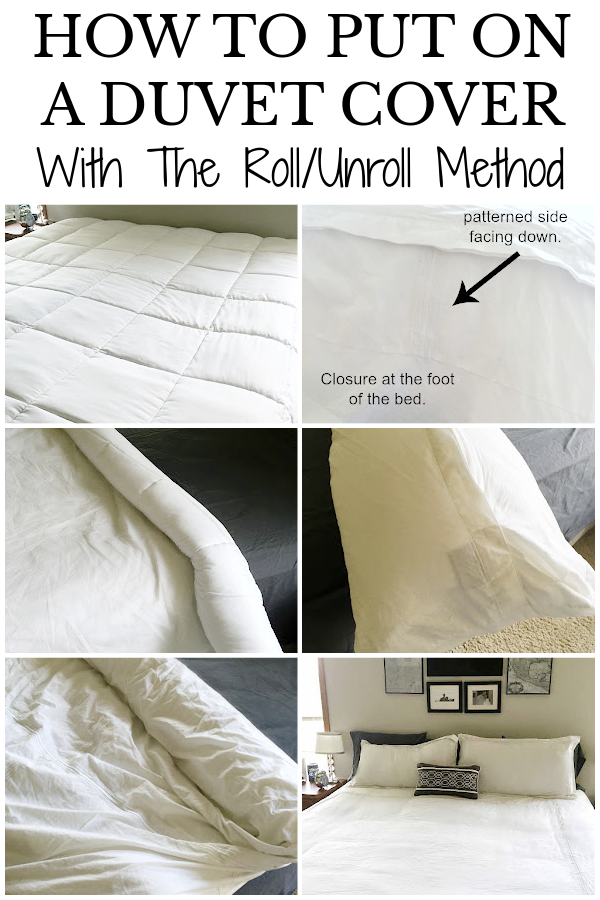
This is the most reliable method for one person. It rolls the duvet and cover together like a burrito, eliminating slips and wrinkles entirely.
Position the Cover with Opening at the Foot
Spread the inside-out duvet cover flat on the bed. Place the opening (zipper or button side) at the foot of the bed.
Smooth out wrinkles so the edges align perfectly with the mattress.
Layer the Duvet and Align All Corners
Lay the duvet insert directly on top of the inside-out cover. Match all four corners precisely: top left to top left, bottom right to bottom right.
Misalignment here causes twisting later. Take an extra second to adjust before rolling.
Roll Tightly from Head to Foot
Starting at the head of the bed (the closed end), tightly roll both layers together toward the foot. Keep the roll compact and even, similar to rolling a sleeping bag.
Stop when you reach the opening at the foot. You now have a “bed burrito” sitting on your mattress.
Flip the Cover Over the Roll
Reach into the open end of the cover. Grab the end of the roll and pull the cover’s opening over it. Keep pulling until the entire roll sits inside the right-side-out cover.
Think of unrolling a sock over your hand. The fabric turns right-side out as it moves.
Unroll Back Toward the Head
Slowly unroll the burrito back toward the head of the bed. As you unroll, the duvet slides smoothly into place inside the cover.
Once fully unrolled, give it a light shake and fluff. Zip or button the bottom closed.
Why it works: Rolling locks the duvet and cover together, preventing shifting. No shaking needed, which makes it perfect for heavy winter duvets.
Method 3: The Clip Method for Heavy Duvets

Ideal for solo users or thick comforters. Clips hold corners in place so you don’t have to grip anything during the process.
Position Cover with Opening at the Head
Lay the duvet cover on the bed, inside out, with the opening at the head of the bed (opposite of the Burrito Method).
Place the duvet on top with corners perfectly aligned.
Clip the Top Corners First
Reach into the opening and find the top corner of the cover. Grab the matching duvet corner through the fabric. Pull both layers back out through the opening.
Clip them together with a sturdy clothespin, hair elastic, or bulldog clip. Repeat for the other top corner.
Both top corners are now secured outside the cover.
Thread and Clip the Bottom Corners
Stay at the head of the bed. Reach through the opening all the way to the bottom corner of the cover. Find the duvet’s bottom corner and pull both layers back out through the top opening.
Clip them together. Repeat for the final corner.
All four corners are now clipped and pulled out through the top.
Pull Corners to the Bed Edges
Move to the foot of the bed. Grab the clipped bottom corners and pull them toward the foot of the mattress. Then go to each side and pull the top clips toward the head corners.
As you pull, the duvet feeds smoothly through the cover.
Once fully extended, remove the clips from inside the cover and zip shut.
Best for: Heavy down duvets, king sizes, or anyone who hates holding corners while shaking.
Match the Method to Your Situation

Not every technique works for every person. Use this table to pick the right approach.
| Your Situation | Best Method | Why It Works |
|---|---|---|
| Alone, no help | Clip Method | No holding, no shaking; clips do the work |
| Hate wrinkles | Burrito Roll | Guaranteed smooth, even fit |
| Fast changes | Gravity Method | Under 60 seconds once mastered |
| Small bed (twin or single) | Inside-Out Flip | Arms can span width easily |
| Heavy winter duvet | Burrito or Clip | Less lifting, more control |
Fix Common Problems in Seconds
Even with the right method, issues pop up. Here’s how to solve them fast.
Duvet Won’t Lie Flat
Unzip halfway and shake the insert while holding the top corners. Let gravity settle it. Re-zip slowly.
Corners Are Empty
The duvet shifted. Unzip, reach in, and tug each corner into place. Smooth edges before closing.
Cover Is Twisted
Undo the zipper and rotate the duvet inside until seams align. Use the Burrito Method next time to prevent this.
Cover Feels Too Tight
You likely have a size mismatch. Check dimensions on the label. If the cover is just slightly small, try inserting the duvet in a warm room. Fabric expands slightly with heat.
Final Touches for a Hotel-Quality Bed
Now that the cover is on, polish the look.
Smooth and Fluff the Duvet
Run your hands from the center outward to remove wrinkles. Gently fluff the duvet so it fills the corners fully.
Tuck or Drape the Edges
For a snug, classic look, tuck the foot and sides under the mattress. For a relaxed, modern style, drape the top edge over like a blanket.
Rotate Covers Seasonally
Switch covers with the seasons. Light cotton for summer, flannel or velvet for winter. It’s an easy way to refresh your room without buying new bedding.
Wash Covers Every Few Weeks
Aim to wash quilt covers every 2 to 4 weeks. Follow care labels. Most cotton covers are machine-washable on a gentle cycle.
Frequently Asked Questions About Putting a Quilt Cover On
What Is the Fastest Way to Put a Quilt Cover On?
The Gravity Method is the fastest once you master it. It takes under 60 seconds and requires only a few hard shakes. The Burrito Method takes slightly longer but produces smoother results with less effort.
Can One Person Put a Quilt Cover On Alone?
Yes. The Burrito Roll and Clip Method are both designed for solo setup. The Clip Method is especially helpful for heavy duvets, since clips hold corners in place while you work.
How Do I Stop My Duvet from Bunching Inside the Cover?
Use interior corner ties to lock the insert to the cover. If your cover lacks ties, sew in ribbons or use the Clip Method during setup as a temporary fix. Always align corners precisely before rolling or shaking.
Why Does My Quilt Cover Twist After I Put It On?
Twisting usually happens when corners are misaligned before you start. Use the Burrito Method, which keeps both layers locked together during the process. You can also rotate the insert inside the cover until seams line up.
How Often Should I Wash My Quilt Cover?
Wash your quilt cover every 2 to 4 weeks, or more often if you sweat at night or have allergies. Most cotton and synthetic covers are machine-washable on a gentle cycle. Always check the care label first.
What Size Quilt Cover Should I Buy?
Buy a cover that matches your insert exactly, or one that’s 2 to 3 inches larger to accommodate fill thickness. A cover that’s too small creates lumps. A cover that’s too large lets the duvet slide around inside.
Key Takeaways for Putting a Quilt Cover On the Right Way
Learning how to put a quilt cover on doesn’t require special skills, just the right method for your setup. Start by confirming your cover and insert match in size, and look for interior ties to prevent shifting. Choose the Gravity Method for speed, the Burrito Roll for solo precision, or the Clip Method for heavy duvets. Always align corners before you begin, and smooth out wrinkles as a final step.
Try the Burrito Method on your next bedding change. It works for nearly every bed size and duvet weight, and you’ll likely never go back to wrestling with your quilt cover again.

