
You’ve finished your handmade blanket and now face the final step that separates a homemade project from a professional creation. Attaching blanket binding encases raw edges, prevents fraying, and adds a polished border that makes your work look store-bought. Whether you are finishing a cozy baby blanket, a quilt, or a fleece throw, learning how to attach blanket binding correctly ensures your project lasts through years of use and washing.
This guide walks you through every step of the process. You will learn how to prepare your fabric, choose the right binding, create crisp mitered corners, join the ends seamlessly, and finish the back for a clean look on both sides.
Prepare Your Fabric for Binding
Before attaching binding, your blanket needs proper preparation to ensure a smooth finish.
Pre-Wash Natural Fabrics
Wash cotton, flannel, or blended fabrics before sewing to prevent post-binding shrinkage. Use warm water and tumble dry, then press flat with an iron. Do not pre-wash synthetic fabrics like fleece, minky, or coral fleece because this can cause pilling and reduce softness.
Cut Edges Straight and Square
Use a rotary cutter, self-healing mat, and grid ruler to trim all sides evenly. Check for square corners with a quilting square or ruler. Remove any uneven selvages or distorted edges that could cause problems later.
Layer and Stabilize the Blanket
For double-sided blankets, place the layers wrong sides together and pin or clip every 6 inches to prevent shifting. Stabilize edges with a basting stitch, zigzag, or serged seam, especially on loosely woven fabrics. Complete all appliqué, embroidery, or quilting before adding binding.
Choose and Prepare the Binding
Selecting the right binding and preparing it properly sets the stage for success.
Select the Right Binding Type
Pre-made satin or rayon binding is ideal for beginners because it is fray-resistant, pre-folded, and ready to use. Custom-cut cotton binding offers the best control for matching prints or working with curved edges. Polyester binding is the most durable option and withstands repeated washing without fading or fraying.
Calculate Binding Length
Add all four sides of your blanket to find the perimeter. For example, a 60″ × 70″ blanket has a 260″ perimeter. Add 15″ extra for seam allowances and joining, giving you 275″ total. Divide by 40″ (standard fabric width) and round up to determine how many strips you need if making custom binding.
Iron and Refold Pre-Made Binding
Unfold slightly and press out factory creases with a warm iron. Use a pressing cloth on polyester to avoid melting or shine. Refold so the wider side is down because this will go against the back of the blanket. Use clips instead of pins to avoid snagging slippery satin.
Attach Binding to the First Side
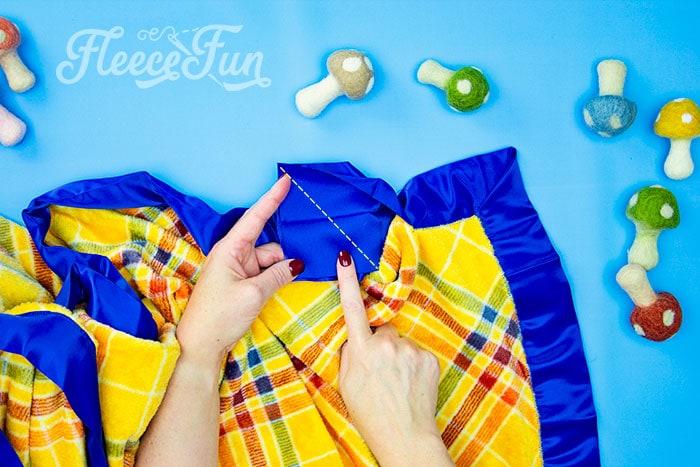
Begin with the first side, leaving room for a seamless end join.
Position Binding Correctly
Lay the blanket flat and slide the binding under one edge with the wider side down. Align the fabric edge with the inner fold of the binding. Leave 1″ to 2″ of excess binding at the starting corner for later joining. Fold the binding up and over the front edge and clip every 3 to 4 inches to secure.
Critical: Do not start sewing at the corner. Begin 6 inches in from the first corner to allow space for joining the ends.
Stitch with the Right Settings
Your stitch choice impacts durability, flexibility, and appearance.
Use a Wide Zigzag Stitch
A wide zigzag stitch is best for fleece, minky, and thick fabrics because it allows stretch and prevents popping. Recommended settings are width 3.5 to 6 (wider for thicker fabrics) and length 1.4 to 3.5 mm. Overlap stitches half on the fabric and half on the binding for secure attachment.
Straight Stitch for Cotton Binding
Use a 2.0 to 2.5 mm stitch length with a 1/4″ seam allowance for precise alignment. This works well with custom-cut cotton binding or for hand-stitched finishes.
Sew the First Three Sides
Start 6 inches from the corner and backstitch to lock stitches. Sew with a consistent zigzag, overlapping stitches half on fabric and half on binding. Stop 6 inches before the end of the fourth side, lift the needle, and move to corner mitering.
Pro Tip: Use a walking foot for fleece or minky to prevent the layers from shifting during sewing.
Create Crisp Mitered Corners

Mitered corners give your blanket a professional, square finish.
Fold Corners Correctly
Sew to within 1/4″ to 1/2″ of the corner and stop with the needle down. Open the binding and fold it up at 90° so it lies flat along the next edge. Re-fold it over the next side to create a diagonal crease. On the back, fold the binding into a neat triangle that aligns with the stitched edge. Pin securely on both front and back layers.
Resume Stitching
Begin sewing at the top of the fold, not the edge. Backstitch and continue along the next side, ensuring stitches catch both layers.
Warning: Misaligned folds cause puckering or gaps. Pin carefully and check both sides before sewing.
Join Binding Ends Seamlessly
A clean end join makes the binding look continuous with no visible seam.
Hidden Seam Method for Pre-Made Binding
After stitching three sides and part of the fourth, stop about 6 inches from the end. Fold the unattached section out of the way. Go to the starting side and trim the loose end 1/4 inch beyond the blanket edge. Return to the last side and trim the remaining binding 1/4 inch beyond the edge. Open both ends and place them right sides together. Sew a 1/4″ seam, press the seam to one side, and refold the binding. Pin along the final side and resume stitching, sewing over the joined seam. Complete the last mitered corner and the final stretch, overlapping your starting stitches. Backstitch and trim threads.
Alternative Burned Edge Join
Trim the unsewn end to 2″. Lightly pass a lighter over the raw edge to melt and seal (for polyester only). Fold under 2″ and wrap around the existing binding. Secure with zigzag or hand stitch.
Finish the Back Side
The final step ensures a clean, durable finish on both sides.
Fold Binding to the Back
After stitching the front, press the binding away from the center. Fold it over so the edge completely covers the machine stitching. The raw edge should be fully enclosed.
Secure with Invisible Stitching
Machine stitch-in-the-ditch involves sewing directly in the groove where the binding meets the blanket from the front. The top thread disappears into the ditch while the bobbin catches the folded edge on the back. Use a stitch length of 2.5 mm and an edging foot for accuracy. This method is best for fast, durable finishes on everyday blankets.
Hand blind stitching uses a fine needle and matching thread. Insert the needle under the fold, then into the blanket edge, creating a hidden ladder. Pull tight after every few stitches. This method is best for heirloom quilts, gifts, or show pieces.
Pro Tip: Use silk or fine polyester thread for strength and invisibility when hand stitching.
Troubleshoot Common Problems
Even experienced sewers face issues. Here is how to fix them fast.
Puckering on Fleece
Puckering happens when fabric stretches during sewing. Use a walking foot, clip frequently, and avoid pulling the fabric while stitching.
Gaps at Corners
Gaps occur when the miter fold is inaccurate. Measure 1/4 inch from the edge before folding and pin both front and back layers securely.
Binding Too Tight or Loose
This usually results from uneven feeding or incorrect length calculation. Add 15″ extra when calculating length and use diagonal seams for smooth joins.
Visible Seam on Front
Poor alignment in the ditch causes visible seams. Use a guide foot, stitch slowly, and ensure the fold on the back is even.
Raw Edges Showing
Incomplete coverage leaves raw edges exposed. Press binding before final stitching and ensure it fully covers the seam.
Expert Note: Avoid heavy-duty thread because it creates visible holes and looks bulky. Stick to 50-weight cotton or polyester.
Adapt Techniques for Different Fabrics
Different fabrics require different approaches for best results.
Fleece and Coral Fleece
Do not pre-wash these fabrics because it prevents pilling. Remove lint by shaking outdoors and using a lint roller. Slight wrinkling is normal because satin has no stretch while fleece does.
Minky and Plush Fabrics
Use a walking foot and longer stitch length of 2.5 mm. Cut binding 3″ wide for full coverage on these thick fabrics. Clip every 2 to 3 inches to prevent shifting.
Cotton Quilts
Pre-wash the quilt top and batting before binding. Cotton binding lies flat and is ideal for hand-stitched finishes. Press seams flat for crisp corners.
Design and Aesthetic Tips
Make your binding enhance, not hide, your design.
Mind the Border Width
Binding typically covers 2″ of the edge. Narrow borders of 1 to 3″ may be hidden by the binding. Use 6″ borders so 4″ remain visible if you want the border design to show.
Match Color and Dye Lot
Pinks, blues, and neutrals vary widely between dye lots. Buy all binding from the same dye lot and test in natural light before sewing.
Choose the Right Texture
Satin provides a luxe sheen great for gifts. Rayon is soft and silky, ideal for baby quilts. Cotton is durable and pressable, perfect for traditional quilts.
Final Touches for a Professional Finish
Elevate your blanket with these finishing steps.
Press for Polish
Lightly press the binding with a warm iron and pressing cloth. Avoid high heat on polyester because it can melt or create shine.
Reinforce for Safety
For baby blankets, add extra zigzag or hand stitches at corners and seams. This prevents loosening and eliminates choking hazards.
Add Decorative Stitches
Use a blanket stitch, zigzag, or decorative machine stitch for a handmade touch. This is great for personalization.
Burn Raw Edges
For synthetic bindings, lightly singe cut ends with a lighter to prevent fraying without sewing.
Final Tip: Always test your stitch and tension on scrap fabric before starting the final project.
Step-by-Step Checklist
- Pre-wash fabric (if cotton or flannel); cut to size
- Layer front and back; stabilize edges
- Iron binding; refold with wider side down
- Position binding on first side, leave 1″ overhang
- Begin stitching 6″ from corner; use wide zigzag
- Stop 6″ before end of fourth side
- Miter each corner with aligned folds front and back
- Trim start and end binding 1/4″ beyond edge
- Join ends with 1/4″ seam (right sides together); press
- Attach final section; complete last miter
- Sew final stretch, overlapping starting stitches
- Fold binding to back; secure with stitch-in-the-ditch or blind stitch
- Clip corners, press, and trim threads
Frequently Asked Questions About Attaching Blanket Binding
What is the best stitch for attaching blanket binding?
A wide zigzag stitch is recommended for most fabrics because it provides flexibility and security. Use width 3.5 to 6 and length 1.4 to 3.5 mm depending on fabric thickness. For cotton or custom binding, a straight stitch with 2.0 to 2.5 mm length works well.
How do I calculate how much binding I need for my blanket?
Measure all four sides of your blanket and add them together. Add 15″ extra for seam allowances and joining the ends. For example, a 60″ × 70″ blanket needs 260″ + 15″ = 275″ of binding.
Can I use regular thread for blanket binding?
Use 50-weight cotton or polyester thread for the best balance of strength and subtlety. Avoid heavy-duty thread because it creates visible holes and looks bulky on finished projects.
Why is my binding puckering when I sew?
Puckering happens when the fabric stretches during sewing, especially with fleece and minky. Use a walking foot to feed layers evenly, clip frequently to prevent shifting, and avoid pulling the fabric while sewing.
Do I need to pre-wash my blanket fabric before adding binding?
Pre-wash natural fabrics like cotton and flannel to prevent shrinkage after binding is attached. Do not pre-wash synthetic fabrics like fleece, minky, or coral fleece because this can cause pilling and reduce softness.
Key Takeaways for Attaching Blanket Binding
Attaching blanket binding is a skill that combines precision and patience. Start with proper fabric preparation by pre-washing natural fabrics while avoiding pre-wash for synthetics. Use a wide zigzag stitch and walking foot for stretchy fabrics to prevent puckering and shifting. The key to professional results lies in creating crisp mitered corners and seamless end joins. Whether you choose machine stitching in the ditch or hand blind stitching, ensure the back fully covers the raw edge for a clean finish. With the right techniques, your blanket will have a store-bought appearance that lasts for years.

