
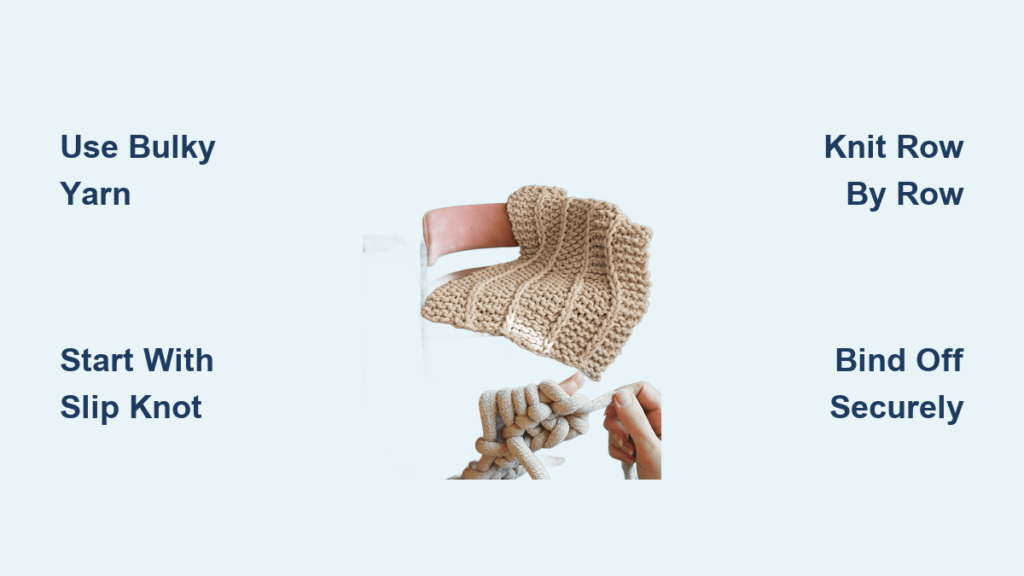
Imagine curling up with a soft, chunky knit blanket you made yourself, without any needles, hooks, or prior crafting experience. This is entirely possible using only your hands, bulky yarn, and scissors. The technique relies on hand-based knitting where your fingers replace traditional tools, pulling loops through loops to build a dense, plush fabric identical in appearance to store-bought luxury throws.
This no-needle method is perfect for beginners, kids, and anyone who wants a cozy DIY project that delivers professional-looking results in just a few hours. Whether you’re making a lap throw, oversized blanket, or a gift for a loved one, this guide walks you through every step from choosing the right yarn to securing the final stitch.
Choose the Right Yarn for Your Blanket
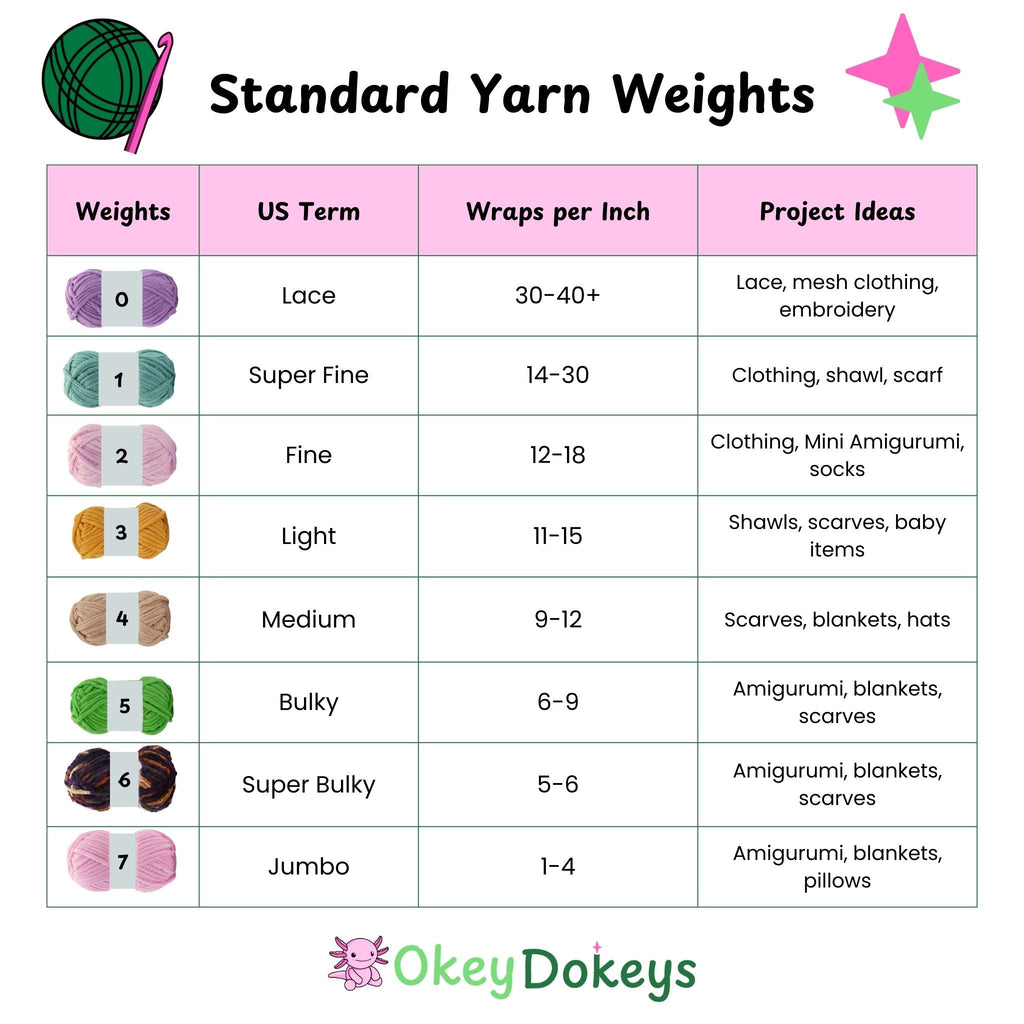
Selecting the correct yarn is critical for achieving that thick, plush look. The wrong type will take much longer and deliver disappointing results.
Pick Super Bulky or Jumbo Yarn
Use #6 super bulky or #7 jumbo yarn for a thick, warm, and fast-knitting blanket. These weights create the signature chunky texture that makes hand-made blankets indistinguishable from high-end retail versions.
Best Yarn Brands for No-Needle Blankets
Several brands have proven themselves among crafters making blankets without needles.
Couture Jazz by Premier Yarns offers super bulky weight with minimal shedding and excellent durability. It maintains its structure through repeated washing and use.
Bernat Blanket Big provides jumbo weight yarn that is widely available at major retailers and machine washable. It frequently goes on sale, making it budget-friendly for larger projects.
Balapet Yarn delivers premium softness that testers rated higher than Bernat alternatives. It works exceptionally well for modern décor throws in versatile colors like sage green.
Inspirations Bernat Blanket Extra Thick offers extra squishy texture and can be found at Walmart and Joann Fabric stores.
Loop Yarn features a pre-looped design that simplifies construction for children or quick gift projects.
Yarn Types to Avoid
Avoid wool roving as it sheds excessively and cannot be washed. Skip non-machine-washable blends that require high maintenance. Natural fibers like pure wool or cotton are harder to care for and may felt during washing.
Pro Tips for Yarn Selection
Always check the label for washing instructions before purchasing. Buy all skeins from the same dye lot to prevent visible color differences across your blanket. Purchase one to two extra skeins to account for mistakes or future repairs.
Gather Minimal Supplies
The beauty of this method lies in its simplicity. You need almost nothing to get started.
Only Three Essentials Are Required
You need bulky yarn in sufficient quantity for your chosen blanket size, scissors for cutting yarn, and a flat workspace such as a table, floor, or bed.
No needles, hooks, or complex tools are required. This makes the project accessible to anyone regardless of crafting experience.
Optional but Helpful Supplies
A measuring tape helps track the width of your foundation chain. A lighter works for fusing synthetic yarn ends, but only use this on 100% acrylic or polyester blends.
Workspace Setup
Use a surface at least 4 feet by 3 feet. Move to the floor if the blanket grows too large for your table. Keep yarn tangle-free by placing it in a bowl or bag while working.
Start With a Slip Knot
Every hand-knitted blanket begins with a slip knot that serves as your first active stitch.
Standard Slip Knot Method
Make a loop with the yarn, leaving a 6 to 8 inch tail. Pull the working end through the loop. Slide your fingers into the loop and gently tighten. Adjust the loop size using the working yarn to achieve a comfortable fit on your fingers.
Alternative Hand-Knitting Slip Knot
Wrap yarn around your fingers. Use your thumb and index finger to form a knot that slides easily. Secure by pulling the tail to tighten.
Pro Tip: Keep the loop loose enough to slide comfortably on your fingers but tight enough that it will not accidentally slip off during knitting.
Build the Foundation Chain
The foundation chain sets your blanket’s width. Getting this right ensures consistent sizing throughout your project.
Create the Base Width
Insert your hand into the slip knot. Pull the working yarn through the loop, keeping it snug against your fingers. Repeat to form a chain of loops. Twenty-four chains create approximately 3 feet width, suitable for a 4×6 foot blanket. Thirty chains create approximately 56 inches width for an oversized throw.
Maintain Even Tension
Use four fingers as a gauge to keep loops consistent. Pull only the working yarn, not the tail, to avoid creating tight stitches. Do not pull too tightly. Keep loops loose and flexible for easier knitting.
Visual Cue: Chains should slide easily over your fingers without resistance.
Knit the First Row
The first row establishes the knitting pattern and creates the signature bunny ear loops along the edge.
Work Opposite the Chain Direction
Lay the working yarn across the top of the chain, running leftward. Starting from the last chain, pull a new loop through using only the working yarn. Keep previous loops open. Repeat across the entire row, then turn your work.
This technique creates the distinctive bunny ear loops along the edge that give hand-knitted blankets their charming, handmade appearance.
Continue Row by Row
Building your blanket requires alternating direction with each row to create flat fabric.
Alternate Knitting Direction
Turn the work. Lay the working yarn across the previous row, now running rightward. Pull a loop through each existing loop from front to back. Use three fingers to guide the yarn for even stitching. At the end of the row, turn and reverse direction.
Key Knitting Rule
Always reverse direction after finishing a row to keep the blanket flat. Failing to do this creates curled edges and uneven fabric.
Maintain Consistent Loops
Keep loop size uniform for a clean, professional edge. If a loop is too tight, gently stretch it before moving on. You can pause anytime without risk of unraveling. The loops remain secure until you actively work them.
Join a New Skein of Yarn
When your yarn runs out mid-project, you need to attach a new skein securely.
Knot Method
When yarn runs out, leave a 6-inch tail. Tie the new skein to the old with a loose square knot on the back side. Knit two to three stitches with the new yarn. Flip and tighten the knot. Weave in ends during the finishing stage.
Seamless Fusion for Synthetics Only
Use a lighter to melt the core of two yarn ends. Press ends together while cooling. This creates an invisible join perfect for 100% synthetic yarns like Bernat and Balapet. Never use this method on natural fibers.
Warning: Keep flame away from loose yarn and skin.
Change Colors for Stripes
Adding stripes or color blocks personalizes your blanket and creates visual interest.
Best Time to Switch Colors
Change colors only at the beginning of a new row for clean, aligned stripes. This ensures the color transition follows the row structure for a professional look.
Step-by-Step Color Change
Pinch the yarn where it exits the last stitch. Pull out that stitch to expose the base. Cut the old yarn, leaving a 6-inch tail. Attach the new color using either a square knot or fusion method. Re-knit the undone stitch with the new color. Continue knitting forward.
Example Stripe Pattern
A popular pattern uses 14 rows of teal, 19 rows of gray, and 23 rows of white for a 56-row throw that measures 4×6 feet.
Design Tip: Weave in all ends on the same side to avoid creating bulk along one edge.
Manage a Growing Blanket
As your blanket lengthens, handling becomes more challenging. Proper management prevents strain and tangling.
Fold or Roll as You Go
Accordion fold or roll the completed portion of your blanket. Keep only the active edge in your hands. This reduces drag and prevents wrist strain during extended sessions.
Space-Saving Tip
Move to the floor when the blanket outgrows your table. Use a large bed or cleared carpet area to accommodate the growing project.
Finish With a Clean Bind-Off

The bind-off creates a secure edge that will not unravel.
Standard Cast-Off Method
Knit two loops as usual. Pull the first loop over the second, keeping the second loop on your hand. Create a new loop with the working yarn. Pull the previous loop over the new one. Repeat across the row. When one loop remains, cut the yarn, leaving a 6 to 7 inch tail. Pull the tail through the final loop and tighten.
Alternative Join-Through Method
Hook your fingers into two adjacent loops. Pull the working yarn through both. Repeat across for a tight, closed edge.
Result: A secure, professional-looking edge that will not unravel no matter how often the blanket is used.
Weave in Loose Ends
Securing all tails ensures your blanket withstands years of use.
Secure All Tails
Flip the blanket to the wrong side. Tighten any loose knots. Trim tails to 6 inches. Use your fingers to weave each tail three to four stitches deep into the back. Trim excess close to the fabric.
Durability Tip: Thoroughly weave in all starting and ending tails. Leaving long strands on the surface risks snagging and unraveling.
Know Blanket Size and Time
Understanding yarn requirements helps you plan projects accurately.
Yarn Quantity by Size
A lap throw requiring 35×40 inches needs 2 to 3 skeins and takes approximately 1 hour. An oversized throw at 56×60 inches needs 2 to 3 skeins and takes about 2 hours. A large 4×6 foot throw needs 8 skeins and takes approximately 3 hours using Balapet or equivalent jumbo yarn.
Real-World Test: One maker completed a 4×6 foot blanket in 3 hours using Balapet yarn and efficient technique.
Rows Equal Length
More rows create a longer blanket. More chains in your foundation create a wider blanket. Adjust these numbers to customize your dimensions.
Customize Design and Texture
The bunny ear edge is not a flaw. It is a distinctive decorative feature that adds handmade charm.
Embrace the Bunny Ears Edge
The natural result of hand knitting creates loops along the edges. These bunny ears add decorative, handmade charm that distinguishes your creation from machine-made blankets.
Create Visual Interest
Use stripes or color blocks to add personality. Try neutral tones like sage green, gray, or beige for décor-friendly looks that blend with any home style. Mix textures by combining different yarn types such as fluffy and smooth varieties.
Drape and Use
Your finished blanket is ideal for draping over sofas, beds, or chairs. It can be folded neatly into a basket or ottoman when not in use.
Care for Your Handmade Blanket
Proper care ensures your blanket lasts for years.
Washing Instructions
Always check the yarn label first before washing. For machine washable yarns like Bernat, use a gentle cycle with cold water and mild detergent. For hand washing, use cold water and mild soap. Gently squeeze the blanket. Never wring out excess water.
Drying Tips
Lay flat to dry to prevent stretching. Tumble dry on low only if the yarn label allows. Never use high heat, which can damage fibers and cause shrinkage.
Pro Tip: Hand washing preserves texture and extends the life of your blanket.
Troubleshoot Common Issues
Knowing common problems helps you avoid them.
Tight Chains
Cause: Pulling both tail and working yarn creates tightness.
Fix: Pull only the working yarn when forming new stitches.
Uneven Loops
Cause: Inconsistent tension throughout the project.
Fix: Use your fingers as a guide for consistent loop size. Redo stitches if needed.
Yarn Tangling
Cause: Cluttered workspace with yarn piled randomly.
Fix: Work on a clean surface and fold the blanket as it grows to manage excess fabric.
Bulky Joins
Cause: Poorly woven ends that stick out from the surface.
Fix: Weave tails deeply into the fabric and trim neatly close to the surface.
Color Bleed
Cause: Low-quality dye that runs during washing.
Fix: Pre-wash skeins before starting or choose trusted brands known for colorfastness.
Maximize the Advantages
This method offers unique benefits that traditional knitting cannot match.
Why This Method Wins
No tools are needed beyond your hands and scissors. It is beginner-friendly with no experience required. Most blankets finish in 1 to 3 hours. The cost runs 95% cheaper than retail, typically $15 to $45 versus $300 or more. You have full control over size, color, and texture. It is family-safe and great for kids and teens. The repetitive motion is therapeutic and reduces stress. You can pause anytime and resume without risk of dropped stitches.
Consider Special Uses
Understanding limitations helps you choose appropriate projects.
Baby Blankets
Standard jumbo yarn is too thick and warm for swaddling or crib use. These blankets work safely as play mats or floor blankets only. For actual baby blankets, use lighter weight yarn not covered in this guide.
Gifting and Decor
Handmade blankets make ideal gifts for baby showers, housewarmings, and holidays. Sage green and neutral tones blend with any home style. Share your finished projects on social media with tags like @TheDIYMommy.
Practice With Smaller Projects
Building confidence with simpler items first leads to better results.
Build Confidence First
Try finger knitting a round ball pillow as a starter project. Attempt a simple square throw pillow before tackling a full blanket. Free patterns are available online to help master the technique.
Companion Projects: These smaller items help develop the muscle memory and tension control needed for larger blankets.
Watch Video Tutorials
Visual learners benefit from seeing techniques in action.
Learn by Doing
Video tutorials demonstrate the full process including slip knot, chaining, knitting, color change, and finishing. OT Crochet Nook offers free hand-knitting guides. Etsy shop WildlyWovenBlankets provides downloadable patterns and kits for those wanting additional resources.
Key Takeaways for Making Blankets Without Needles
Making a blanket without needles is more than a craft project. It is a gateway to creativity, relaxation, and personalized home décor. With just your hands and a few skeins of jumbo yarn, you can create a soft, warm, and beautiful throw that rivals high-end store versions.
Choose Couture Jazz, Bernat Big Blanket, or Balapet yarn for the best results. Start with a slip knot, build a foundation chain, and knit row by row using the pull-through loop method. Change colors only at row starts, manage size by folding as you go, and finish with a secure bind-off.
With proper care involving cold wash and lay-flat drying, your blanket will last for years. Whether making it for yourself, as a gift, or with kids, this project proves that beautiful handmade items do not require complex tools or skills.
Now grab your yarn and start knitting. Your cozy masterpiece awaits.
Frequently Asked Questions About Making Blankets Without Needles
Can I really make a blanket without any needles or hooks?
Yes. This method uses only your hands, bulky yarn, and scissors. Your fingers replace needles by pulling loops through existing stitches. The technique is completely beginner-friendly and requires no prior crafting experience.
What type of yarn works best for needle-free blanket making?
Super bulky (#6) or jumbo (#7) yarn produces the thick, plush texture that makes these blankets look professional. Recommended brands include Couture Jazz, Bernat Blanket Big, and Balapet. Avoid wool roving or non-machine-washable blends.
How long does it take to make a blanket without needles?
A lap throw takes approximately 1 hour. An oversized throw takes 2 to 3 hours. A large 4×6 foot blanket can be completed in about 3 hours using jumbo yarn and efficient technique.
Can I wash my hand-made blanket?
Yes, most recommended yarns are machine washable. Use cold water, gentle cycle, and mild detergent. Hand washing in cold water with mild soap is recommended for best texture preservation. Always lay flat to dry.
What if I run out of yarn in the middle of my blanket?
Tie a new skein to the old using a loose square knot on the back side. Knit a few stitches, then tighten the knot. For synthetic yarns, you can also fuse ends together using a lighter. Weave in all knots during the finishing stage.

