
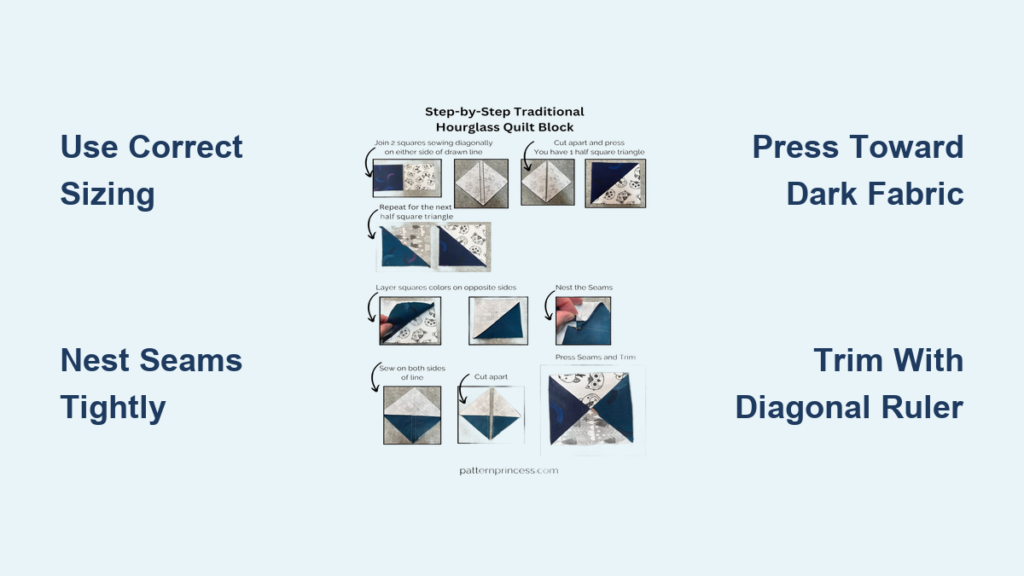
There’s something deeply satisfying about creating an hourglass quilt block from scratch. With its bold symmetry and dynamic contrast, this classic design has been a favorite among quilters for generations. If you’ve ever wondered how to make an hourglass quilt block that lies perfectly flat with crisp points, you’re in the right place.
In this guide, you’ll learn the exact method to construct sharp, accurate hourglass blocks every time. We’ll cover foolproof math formulas, pro pressing techniques, trimming secrets, and tips to avoid common pitfalls. By the end, you’ll be able to turn two simple squares into stunning quilt art with confidence.
Calculate the Correct Starting Square Size
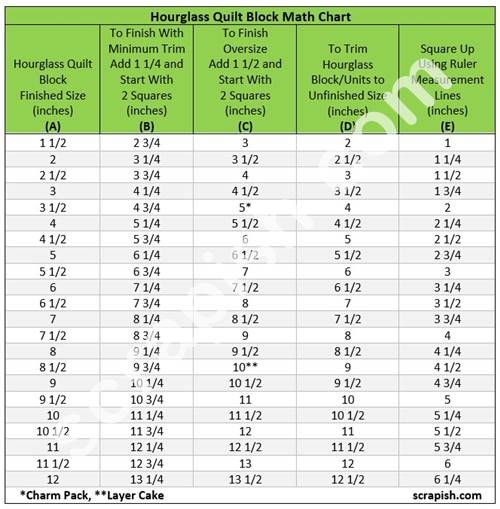
Use the Foolproof Sizing Formula
Getting your starting square size right is the foundation of a perfect hourglass quilt block. Since you’re making diagonal seams and trimming, you need extra fabric for accuracy.
- Add 1.25 inches to your desired finished size for the minimum cut.
- Add 1.5 inches for the recommended cut, which gives you wiggle room for squaring up.
For example, a 4 inch finished block requires 5.25 inch (minimum) or 5.5 inch (recommended) starting squares. A 3.5 inch finished block works perfectly with 5 inch charm squares. A 2 inch finished block needs 3.25 inch or 3.5 inch starting squares.
Always round up if your math isn’t exact. It’s better to trim down than to come up short.
Know Your Final Trim Size
After sewing and cutting, you’ll trim each block to its unfinished size, which is 0.5 inches larger than the finished measurement. This accounts for seam allowances when the block is sewn into the quilt.
| Finished Size | Unfinished (Trim To) |
|---|---|
| 2″ | 2.5″ |
| 3.5″ | 4.0″ |
| 4″ | 4.5″ |
| 6″ | 6.5″ |
| 12″ | 12.5″ |
Write your target trim size on your ruler or keep this chart nearby. Precision here ensures all blocks match perfectly.
Gather Essential Tools and Fabrics
Choose High-Contrast Fabrics
The hourglass effect relies on contrast. Pick one light and one dark fabric for each pair. Low contrast prints or similar tones can make the design disappear.
- Solid versus print creates strong definition.
- For a scrappy look, mix multiple lights and darks while keeping values distinct.
- Pre-cuts like 5 inch charm squares work perfectly for 3.5 inch finished blocks.
Pro Tip: Test contrast by squinting at your fabric pair. If the shapes blur, the values are too close.
Equip Your Workspace
You only need a few key tools to make an hourglass quilt block successfully:
- Rotary cutter, mat, and ruler for precise cutting.
- 1/4 inch presser foot for consistent seam allowances.
- Diagonal line ruler critical for aligning and trimming blocks.
- Water soluble marker or Frixion pen for drawing seam lines.
- Sharp pins or clips to nest seams securely.
- Iron and pressing surface, since pressing is non-negotiable for flat blocks.
Optional but helpful: a Clearly Perfect Slotted Trimmer lets you trim dog ears and square up before pressing. This tool is ideal for bias edges.
Create Half Square Triangles First
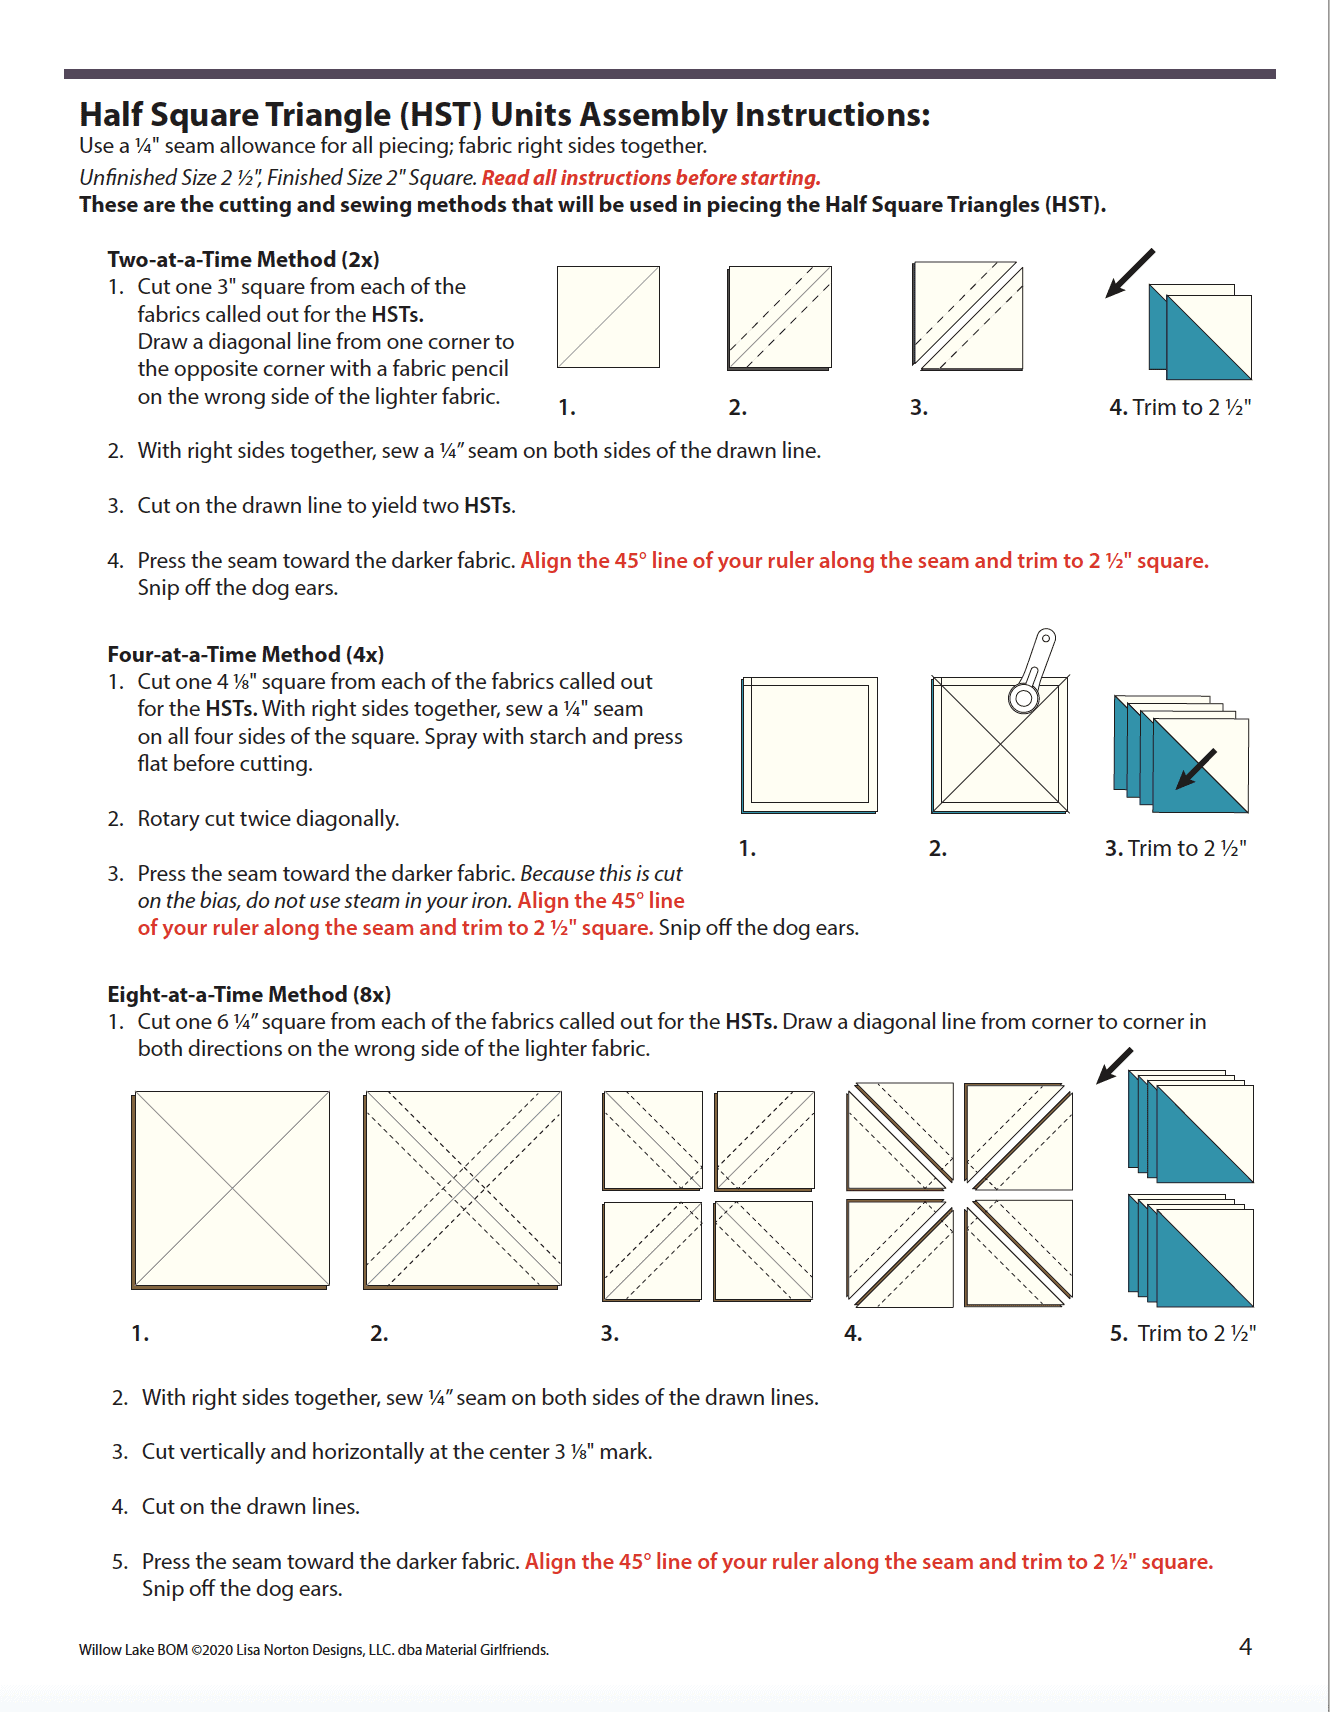
Mark and Sew Diagonally
Each hourglass quilt block starts with two Half Square Triangles (HSTs). Here’s how to begin:
- Take two same-size squares, one light and one dark.
- Place them right sides together.
- On the back of the lighter square, draw a diagonal line from corner to corner.
Now sew 1/4 inch on both sides of that line. Don’t backstitch. Just maintain a continuous seam.
Pro Tip: For speed, chain piece multiple pairs by feeding them one after another without cutting threads.
Cut and Press HSTs Correctly
After sewing, cut along the marked line to separate the two units.
Now open and press:
- Always press the seam toward the dark fabric.
- This creates nested seams later, which is critical for alignment.
- Do not trim yet. Leave them oversized for accuracy.
Handle gently. These bias edges stretch easily.
Quick Check: Each unit should show a light triangle on one half and dark on the other.
Assemble the Hourglass Block
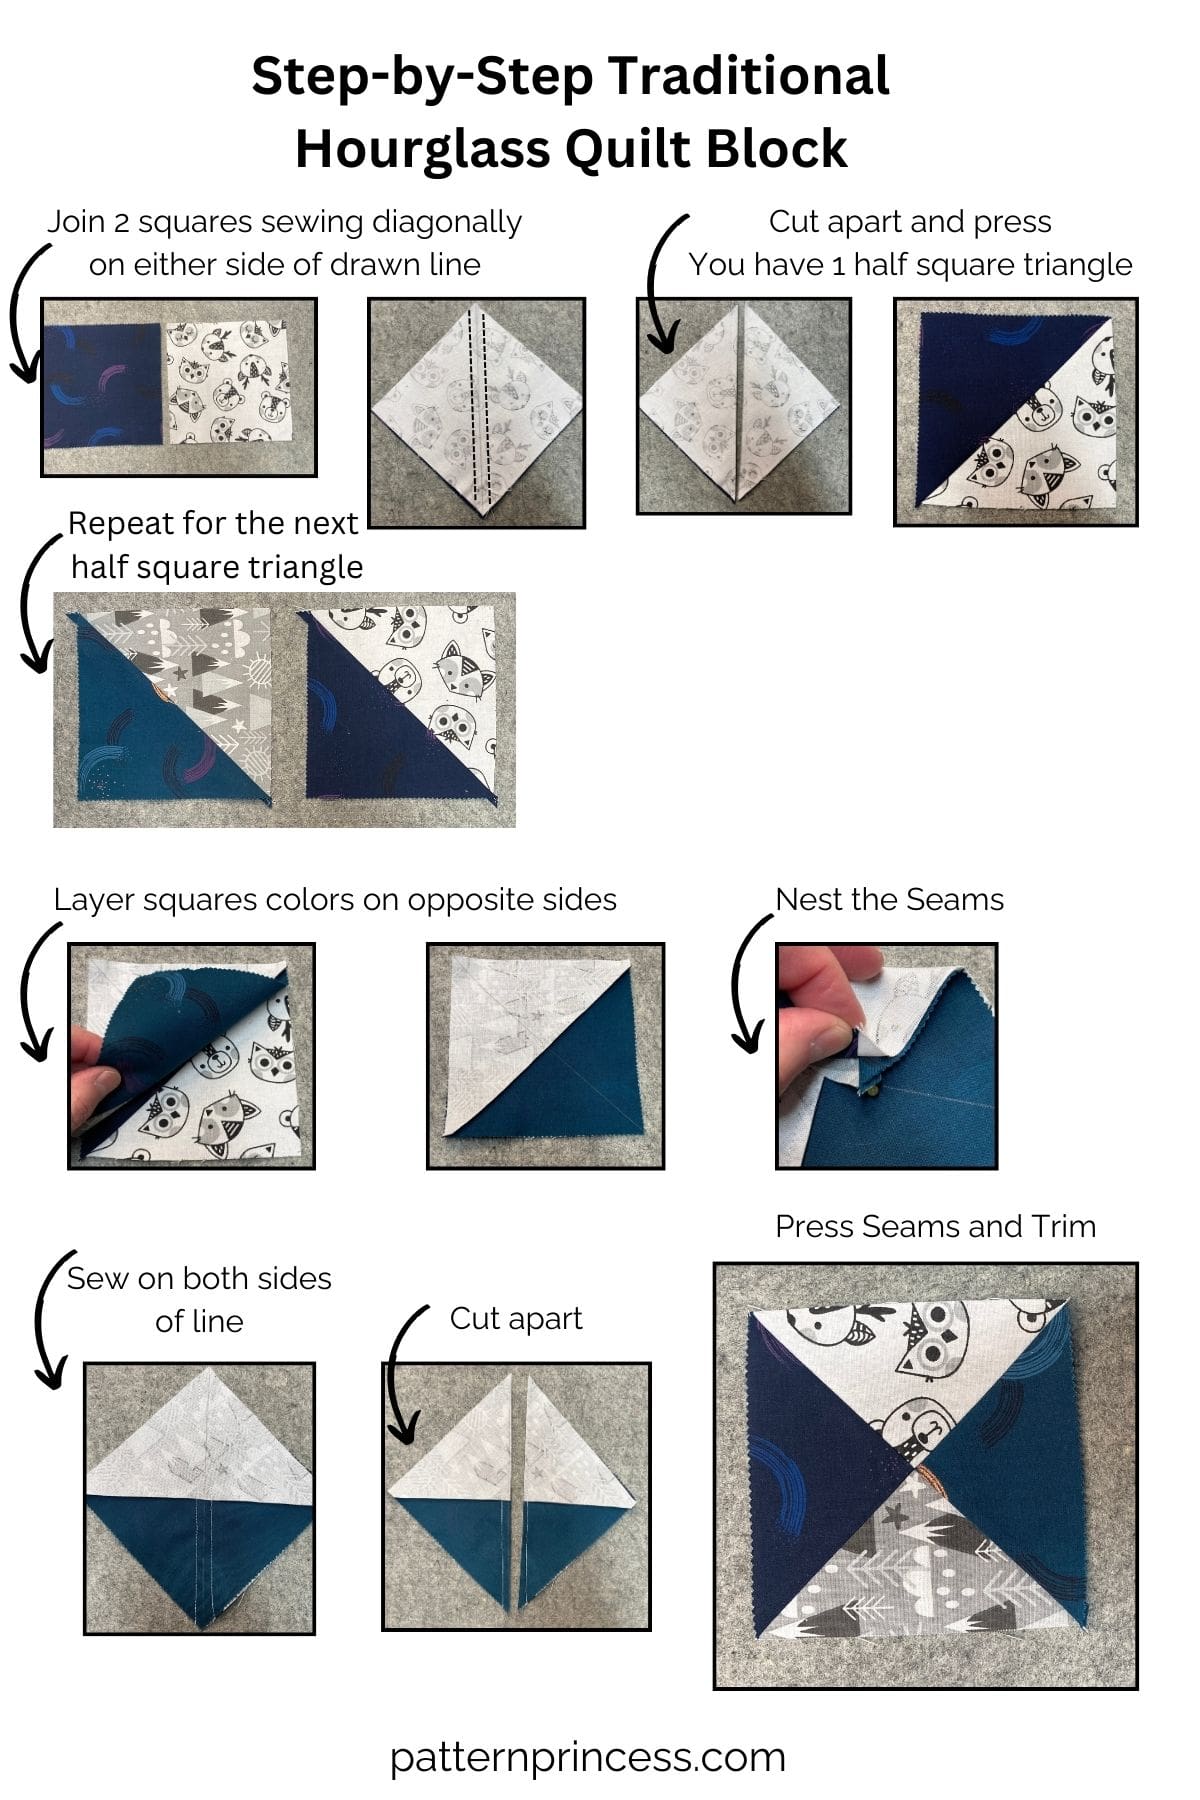
Pair HSTs with Nested Seams
Now take two HSTs and join them to form the hourglass shape:
- Place them right sides together.
- Rotate one 180 degrees so lights face darks, forming a checkerboard.
- Nest the center seams. Because both were pressed toward dark fabric, the seams will lock together like puzzle pieces.
Feel for the “pop” where they interlock. Pinch the center and peek inside to confirm perfect alignment before pinning.
Pinch Test: If the center feels bulky or misaligned, adjust before pinning.
Mark the Perpendicular Seam Line
Draw a new diagonal line across the paired HSTs. This line must be perpendicular to the existing seam.
- Don’t just go corner to corner. That’s inaccurate if blocks shifted.
- Instead, align your ruler’s 90 degree line with the horizontal seam and draw vertically.
This second diagonal will become the outer edges of your hourglass.
Sew, Cut, and Reveal the Block
Sew 1/4 inch on both sides of the new line.
Then cut down the center of the drawn line.
Voilà. You now have two identical hourglass quilt blocks.
Each should show four triangles meeting at a perfect center point.
Press for Flat, Crisp Blocks
Open or Use the Rotating Press Technique
Now press the final seam:
- Press open to reduce bulk at the center.
- Or press to one side, but be consistent across all blocks.
For a flatter result, use the rotating press technique:
- Hold the block folded closed.
- Gently pull side seams apart to loosen the center.
- Press the four seam allowances in a clockwise or counter-clockwise spiral.
This spreads out the bulk instead of stacking it, which is ideal for quilting later.
Warning: Avoid dragging the iron. Use a press and lift motion to prevent stretching the bias edges.
Trim to Perfect Size

Align Ruler with Diagonal Seam
Trimming is essential because bias edges distort during sewing.
Use a ruler with a diagonal line:
- Place it on the block’s front.
- Align the ruler’s diagonal with one of the block’s seam lines.
- Center the ruler so the halfway mark hits the block’s center.
For a 4 inch unfinished block, center at 2 inches.
Trim in Two Passes for Accuracy
- Trim the top and right edges, leaving fabric beyond the ruler.
- Rotate the block 180 degrees.
- Realign the ruler’s diagonal with the other seam and center point.
- Trim the left and bottom edges.
Now all four sides match your target size, such as 4.0 inches for a 3.5 inch finished block.
Goal: Sharp points that touch the corners exactly, with no trimming into the design.
Avoid Common Mistakes
Prevent Misaligned Centers
The number one issue when learning how to make an hourglass quilt block is off-center intersections.
Fix it by:
- Nesting seams tightly before sewing.
- Pinning at the center and ends.
- Peeking at the back to confirm alignment.
If seams don’t lock, realign. Don’t force it.
Stop Fabric from Stretching
Diagonal seams are on the bias and stretch easily.
Prevent distortion by:
- Pressing with up and down motions, not sliding.
- Handling blocks gently.
- Trimming only after sewing and pressing.
Fix Bulky Centers
Four seams in one spot create thickness.
Solutions include:
- Pressing seams open.
- Using the rotating press method.
- Choosing lightweight fabrics or cotton batiste for backing.
Scale Up for Larger Projects

Make Multiple Blocks Efficiently
For quilts, you’ll need many blocks. Speed up production with these strategies:
- Batch processing: mark all squares, then sew all first seams, then cut and press.
- Chain piecing: sew dozens of pairs in one long chain to save time and thread.
- Group work: process in sets of 10 or 25 to track progress.
Example: A 7×7 table topper with 49 blocks needs 50 pairs of 5 inch charm squares.
Mix Colors for Creative Effects
Go beyond two fabrics to add visual interest:
- Use three or four different prints to create kaleidoscopic patterns.
- Arrange blocks so colors spin across the quilt.
- Mirror pairs to form larger pinwheels or X shapes.
Try a scrappy hourglass using leftover HSTs from other projects.
Combine Blocks into Larger Designs
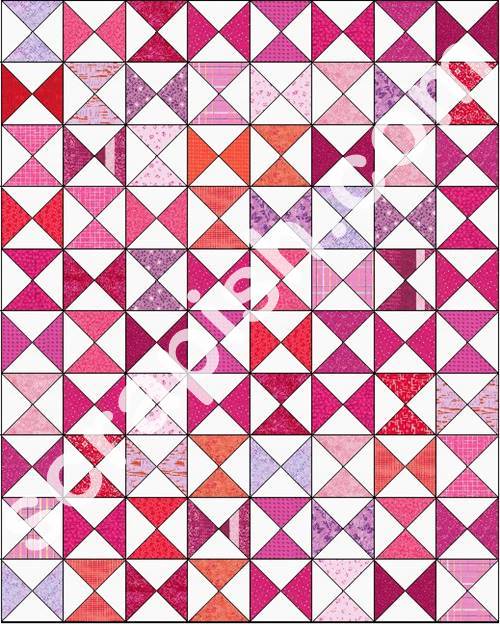
Join Four Blocks into a Mega Hourglass
Some patterns combine four QSTs into a larger 4-patch hourglass:
- Lay out four blocks in a 2×2 grid.
- Ensure centers align to form one big hourglass.
- Sew into two rows.
- Press top row seams left, bottom row seams right.
- Nest the middle seam and sew rows together.
- Press the final seam open.
Trim the whole unit to the target unfinished size, such as 12.5 inches for a 12 inch finished block.
Result: A bold, seamless center with dramatic movement.
Master the Final Quality Checks
Inspect Each Block Before Assembly
Before sewing blocks into a quilt top, inspect each one:
- Points reach the corners.
- Center meets at a single point with no gaps.
- Size matches exactly, such as 4.0 inches unfinished.
- Edges are on the straight grain with no stretch.
- Block lies flat with no cupping or curling.
Reject or re-trim any that don’t meet standards.
Store Blocks Properly
Keep finished blocks flat and protected:
- Stack between sheets of tissue paper.
- Label with size and project name.
- Avoid folding or piling heavy objects on top.
Frequently Asked Questions About Hourglass Quilt Blocks
What is an hourglass quilt block also called?
The hourglass quilt block is also known as a Quarter Square Triangle (QST), Big Dipper, Yankee Puzzle, Whirling Blade, or Reverse X. These names all describe the same four-triangle construction meeting at a central point.
How many squares do I need to make one hourglass block?
Two fabric squares yield two finished hourglass quilt blocks. When using pre-cut 5 inch charm squares, the number of pre-cuts equals the number of finished blocks you can produce.
Can beginners learn how to make an hourglass quilt block?
Absolutely. This block is beginner-friendly because it avoids cutting bias-edged triangles manually. By sewing and cutting Half Square Triangles twice, you preserve the fabric’s grainline and achieve accurate results with simple steps.
Why are my hourglass blocks stretched and distorted?
Stretching happens because diagonal seams are on the bias. Handle blocks gently, press with up-and-down motions instead of sliding, and trim only after sewing and pressing to minimize distortion.
What is the difference between an HST and an hourglass block?
A Half Square Triangle (HST) contains two triangles. An hourglass block is a Quarter Square Triangle (QST) containing four triangles. You make an hourglass by combining two HSTs and sewing a second diagonal seam.
How do I prevent bulky centers in my hourglass blocks?
Press seams open rather than to one side, or use the rotating press technique to spiral the seam allowances. Choosing lightweight fabrics also helps reduce bulk at the center intersection.
Key Takeaways for Mastering the Hourglass Quilt Block
Learning how to make an hourglass quilt block is a foundational quilting skill that scales to any project size. The three most important points to remember are: use the correct sizing formula (add 1.25 to 1.5 inches to your finished size), nest seams tightly and press toward the dark fabric for perfect alignment, and always trim to the unfinished size using a diagonal ruler for sharp points.
Your next step is simple: grab two contrasting charm squares, follow the sew, cut, press, repeat method, and create your first block today. Once you master this technique, you can mix fabrics, scale up for full quilts, and build stunning designs with confidence.

