
There’s something magical about a quilt with clean diagonal lines that seem to weave across the surface like interlocking links. The Irish Chain quilt delivers exactly that effect through a surprisingly simple grid of nine-patch blocks and solid squares. Even beginners can achieve this timeless look without complex curves or tiny pieces.
In this guide, you’ll learn how to plan your size, cut fabric efficiently, use strip piecing for speed, assemble the blocks, and finish your quilt with professional results. You’ll also get troubleshooting tips to keep your chains crisp and your edges flat from start to finish.
Choose Your Size and Layout for Your Irish Chain Quilt
Pick the Right Dimensions
The Irish Chain quilt adapts beautifully to any size. Your choice depends on the intended use and how much fabric you have on hand:
- Crib Size (42″ x 54″): Perfect for baby gifts. Uses a 7×9 block grid.
- Baby Throw Size (52″ x 52″): Square format ideal for strollers or lap use. Built on a 7×7 grid.
- Twin Size (81″ x 81″): Fits a twin bed. Uses a 9×9 block grid.
Each version uses finished blocks between 6″ and 9″, with raw cut sizes ½” larger to account for ¼” seam allowances.
Understand the Chain Pattern
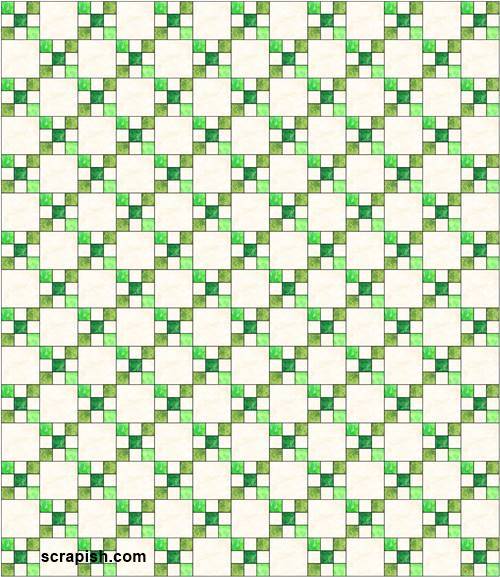
The visual magic of the Irish Chain comes from its alternating layout:
- Nine-patch blocks (3×3 grids with dark corners and a dark center) form the chain links.
- Solid background squares fill the spaces between blocks.
When arranged correctly, the dark corners of the nine-patch blocks align diagonally, creating that continuous chain effect across the quilt top.
Key Tip: Always start odd-numbered rows with a nine-patch block and even-numbered rows with a solid square. This checkerboard alternation is what creates the chain illusion.
Cut Fabric Efficiently
Gather Tools and Materials
Before you start cutting, gather everything you need:
- Rotary cutter, quilting ruler, and cutting mat
- Background fabric (light or low-volume prints)
- Contrasting fabric (dark or bold print)
- Fabric pen or labels for marking
- Iron and pressing board
High-quality 100% cotton fabric like Kona Cotton gives the best results for crisp seams and accurate piecing.
Cut by Size Option
Crib Size (42″ x 54″)
- Background fabric: 8 strips of 2.5″ × width of fabric (WOF); 31 squares of 6.5″ × 6.5″
- Contrast fabric: 10 strips of 2.5″ × WOF
Baby Throw (52″ x 52″)
- Fabric A (background): 5 strips of 8″ × WOF, cut into 24 squares of 8″ × 8″
- Fabric B (contrast): 10 strips of 3″ × WOF
- Background strips: 8 strips of 3″ × WOF
Twin Size (81″ x 81″)
- Background fabric: 10 strips of 9.5″ × WOF, cut into 40 squares of 9.5″ × 9.5″
- Background strips: 15 strips of 3.5″ × WOF
- Contrast fabric: 18 strips of 3.5″ × WOF
Pro Tip: Buy 2 yards of contrast fabric even when only 1.75 yards is required. This covers any cutting errors or fabric flaws.
Use Jelly Rolls to Save Time
If you prefer precuts, a standard jelly roll (40 strips of 2.5″ × WOF) can supply all the contrast strips for crib or throw sizes. Pair it with a coordinating solid for the background and skip the long strip cutting entirely.
Make Strip Sets for Speed

Build Outer Units (Dark-Light-Dark)
These form the top and bottom rows of your nine-patch blocks.
- Sew one background strip between two contrast strips: Contrast – Background – Contrast.
- Press seams toward the darker (contrast) fabric.
- Trim both ends to straighten the strip set.
- Cut into segments equal to the strip width (for example, 3.5″ cuts from 3.5″ strips).
Each segment is now a three-square row: [Dark][Light][Dark].
Build Inner Units (Light-Dark-Light)
These form the middle row of the nine-patch block.
- Sew one contrast strip between two background strips: Background – Contrast – Background.
- Press seams toward the dark (center) strip.
- Trim and cut into same-size segments as the outer units.
Each segment: [Light][Dark][Light].
Quantity Needed by Size
| Size | D-L-D Units | L-D-L Units |
|---|---|---|
| Crib | 24 | 12 |
| Baby Throw | 14 | 7 |
| Twin | 36 | 18 |
Why strip piecing? It is faster, more accurate, and reduces the handling of small individual pieces.
Assemble Nine-Patch Blocks
Sew Rows into Complete Blocks
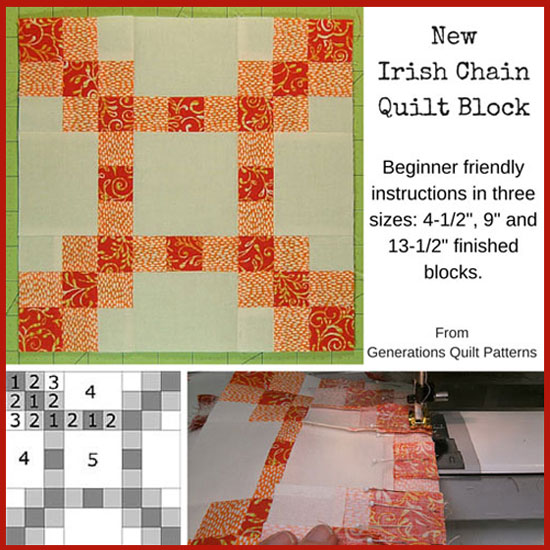
Each nine-patch block requires:
- 2 × [Dark-Light-Dark] segments
- 1 × [Light-Dark-Light] segment
Arrange them in this order:
Row 1: [D][L][D]

Row 2: [L][D][L]

Row 3: [D][L][D]
- Sew the three rows together vertically.
- Press row seams in opposite directions: Press top and bottom rows to the left, middle row to the right (or alternate as needed).
- This allows seams to nest when joining, locking them together for perfect alignment.
Check Block Size
After sewing, press the completed nine-patch block and measure it carefully:
- Should be 6.5″ (crib), 8″ (throw), or 9.5″ (twin) square.
- If undersized, check your seam allowance. Use a scant ¼” (slightly less than ¼”) for accuracy.
Trim to Match
If your nine-patch blocks come out smaller than your solid background squares:
- Trim the solid squares to match the nine-patch size.
- Never stretch or force mismatched blocks. This causes puckering and distortion.
Arrange and Sew the Quilt Top

Plan the Layout
Lay out all blocks on a design wall or large floor space:
- Odd rows: Start and end with a nine-patch block.
- Even rows: Start and end with a solid background square.
- Alternate like a checkerboard to form diagonal chains.
For a 9×9 grid:
– 41 nine-patch blocks
– 40 solid squares
For a 7×7 grid:
– 25 nine-patch blocks
– 24 solid squares
Visual Tip: Step back and view from across the room to confirm the chain effect is clearly visible.
Sew Blocks into Rows
- Chain-piece blocks within each row to save time.
- Press seams all in one direction per row:
– Press odd rows to the left
– Press even rows to the right - This creates nesting seams where rows meet.
Join the Rows
- Match seam intersections carefully at every block.
- Pin or clip nested seams to keep them aligned.
- Sew slowly, easing fabric together without stretching.
- Press final seams downward (toward the bottom of the quilt) for durability.
Avoid Wavy Edges: Nesting and alternating press directions prevent bias distortion and wavy borders.
Finish the Irish Chain Quilt
Prepare Backing and Batting
- Backing: Cut 4–6″ larger than the quilt top on all sides.
- Crib: approximately 1.5–2 yards
- Twin: approximately 5.5 yards
- Batting: Choose cotton, cotton-blend, or low-loft polyester.
Design Option: Use a floral, gingham, or tone-on-tone print backing for a surprise element when the quilt is flipped over.
Baste Layers Together
Secure the quilt top, batting, and backing:
- Use safety pins every 3–4 inches.
- Or use spray baste for a smooth, wrinkle-free surface.
- Work on a large, clean floor or table.
Choose a Quilting Pattern
Enhance the diagonal chain with one of these popular designs:
Diagonal Wavy Stitches
- Free-motion or walking foot
- Large, flowing waves on both diagonals
- Creates diamond-like texture
Figure-Eight Motif
- Continuous figure-eight pattern across the quilt
- Hides imperfections and adds organic movement
- Great for beginners
Stitch-in-the-Ditch (Optional)
- Sew along seam lines to secure layers invisibly
- Best if you want the piecing to remain the star
Thread Tip: Use 40-weight cotton (like Aurifil 2600 Dove) for smooth quilting and subtle blending.
Bind the Edges
Cut Binding Strips
- Use 2.5″ wide strips from background fabric (or contrasting for definition)
- Join strips diagonally to reduce bulk
- Total length needed: approximately 160″ for crib, approximately 320″ for twin
Apply Binding
- Sew binding to the front edge with raw edges aligned.
- Fold to the back and hand-stitch or machine-wrap for a clean finish.
- Miter corners for crisp, professional edges.
Style Choice:
– Matching binding (such as Sky blue) fades into the background
– Contrasting binding (such as gingham or pink polkadot) frames the quilt boldly
Troubleshoot Common Issues
Chain Doesn’t Line Up
Cause: Inconsistent seam allowances or misaligned rows.
Fix:
– Use a scant ¼” seam throughout
– Press alternating rows in opposite directions
– Pin nested seams before sewing
Quilt Edges Are Wavy
Cause: Seams pressed all one way, causing bias stretch.
Fix:
– Alternate press directions row by row
– Avoid pulling fabric while sewing
– Stay-stitch ¼” from the edge if needed
Pattern Looks Muddy
Cause: Low contrast between fabrics.
Fix:
– Test fabric pairings in natural daylight
– Ensure one fabric is clearly light, the other dark
– Avoid similar tones (such as cream on beige)
Blocks Are Different Sizes
Cause: Inaccurate cutting or stretching during sewing.
Fix:
– Trim solid squares to match nine-patch blocks
– Use a rotary cutter and ruler for precision
– Press, don’t iron, seams to avoid distortion
Customize Your Irish Chain Quilt Design
Go Two-Tone for Modern Appeal
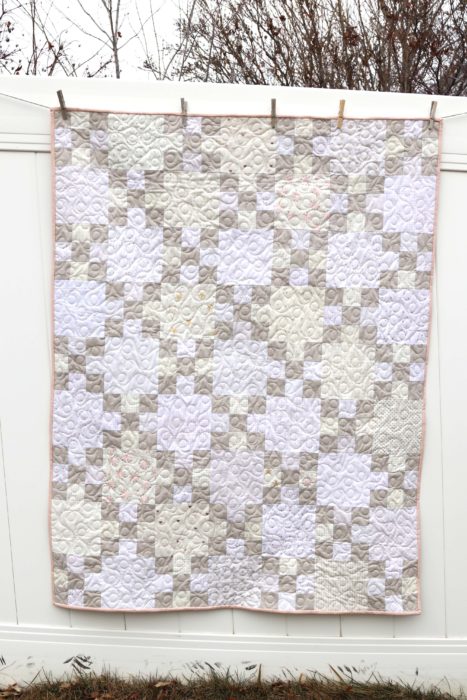
Use solid colors like Kona Sky and Pickle, Gray and White, or Navy and Cream. The bold contrast makes the chain pop and gives a contemporary look.
Try a Scrappy Version
Use assorted low-volume prints:
- Mix florals, dots, and geometrics for the background
- Keep nine-patch blocks in one solid color
- Or reverse: scrappy chain on solid background
This approach is perfect for stash busting, especially if you have leftover 2.5″ strips.
Scale Up or Down
- Larger blocks (12″ finished) create a modern, minimalist look
- Smaller blocks (4.5″ finished) create an intricate, traditional feel
Adjust strip widths accordingly (such as 1.5″ strips for 4.5″ blocks).
Final Tips for Success
- Press, don’t iron: Lift the iron to avoid stretching seams.
- Label your pieces: Use tags to distinguish D-L-D and L-D-L units.
- Work in natural light: Ensures accurate color and value matching.
- Make a test block first: Confirm sizing and contrast before cutting all fabric.
The Irish Chain quilt is more than a pattern. It is a gateway project that teaches strip piecing, nesting seams, and value contrast. These skills apply to countless other quilts once you master them.
Frequently Asked Questions About Irish Chain Quilts
What is an Irish Chain quilt pattern?
An Irish Chain quilt is a traditional design that uses nine-patch blocks alternating with solid squares in a checkerboard layout. The dark corners of the nine-patch blocks align diagonally to create the illusion of interlocking chains running across the quilt.
How many blocks do I need for an Irish Chain quilt?
For a 9×9 grid (twin size), you need 41 nine-patch blocks and 40 solid squares. For a 7×7 grid (baby throw), you need 25 nine-patch blocks and 24 solid squares. A 7×9 grid (crib size) requires 32 nine-patch blocks and 31 solid squares.
What size should I cut my Irish Chain quilt squares?
Cut sizes depend on your finished block size. For 6″ finished blocks, cut 6.5″ squares. For 8″ finished blocks, cut 8.5″ squares. For 9″ finished blocks, cut 9.5″ squares. The extra ½” accounts for ¼” seam allowances on each side.
Can beginners make an Irish Chain quilt?
Yes, the Irish Chain is one of the most beginner-friendly quilt patterns. The design uses only straight seams, simple squares, and strip piecing techniques. The geometric pattern also hides minor imperfections better than more complex designs.
What fabrics work best for an Irish Chain quilt?
Solid fabrics like Kona Cotton maximize the visibility of the chain pattern and create a modern look. Low-volume prints work well for scrappy versions. The key is high contrast between your light and dark fabrics so the chain effect remains visible.
How long does it take to make an Irish Chain quilt?
Thanks to strip piecing, most Irish Chain quilts come together quickly. A crib-size quilt can often be completed in a weekend, while a twin-size quilt may take a few days of focused sewing time. The repetitive process also makes it a relaxing project for many quilters.
Key Takeaways for Making Your Irish Chain Quilt
The Irish Chain quilt rewards careful planning and consistent seam allowances more than any other skill. Use a scant ¼” seam throughout, press your seams strategically toward the darker fabric, and alternate press directions row by row to lock everything into place. Strip piecing transforms what could be hundreds of small pieces into a fast, satisfying assembly process.
Once your quilt top is complete, choose a quilting pattern that complements the diagonal chain. Diagonal wavy stitches and figure-eight motifs both enhance the geometric design without competing with it. Finish with binding that either blends in or frames the quilt boldly, depending on the look you want.
Your next step is simple: pick your size, gather your fabrics, and cut a single test block. Confirm your contrast and measurements before cutting into all your yardage. With these foundations in place, you’ll create an Irish Chain quilt with crisp chains and clean lines that will last for years.

