
Crocheting corners on a blanket might seem like a small detail, but it is one of the most critical techniques for achieving a polished, professional finish. Whether you are working in rows, rounds, or adding a border, mastering how to crochet corners ensures your blanket lies flat, maintains symmetry, and showcases your skill. Without proper corner shaping, even the most beautiful stitch patterns can end up curling, ruffling, or looking uneven.
This guide breaks down exactly how to crochet corners on a blanket from foundational increases to edging techniques and common fixes. You will learn how to handle hidden stitches, choose the right increase for your stitch height, and create crisp, consistent corners every time.
Mastering Corner Increases by Stitch Type
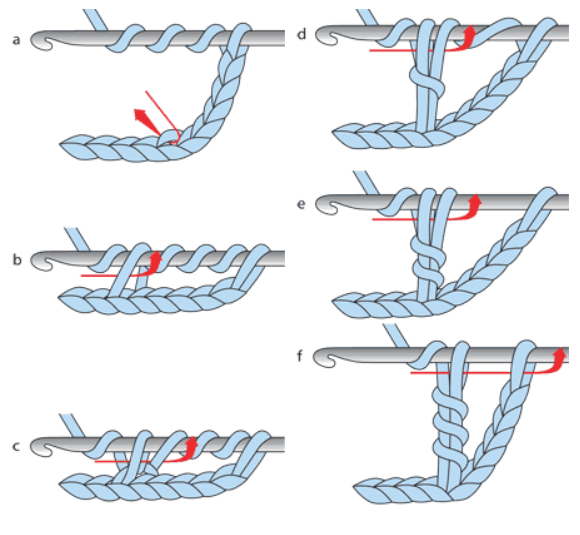
The key to smooth, flat corners is increasing stitches at each corner point. The number of stitches you add depends on the height and drape of your primary stitch.
Single Crochet Corner: Three SC in One Stitch
When using single crochet, the fabric is dense and less flexible, so a triple increase allows the edge to turn cleanly.
• Work SC across the side until the last stitch.
• Work three SC into the final stitch to form the corner.
• Turn your work and continue SC along the next edge.
• The first stitch after the corner cluster is often hidden, so look carefully for its base loops.
Pro Tip: Use a stitch marker to mark the center SC of the three-SC cluster. It helps with alignment in edging rounds.
Double Crochet Corner: Five DC or Shell Style
Double crochet is taller and drapes more, requiring a larger increase to prevent pulling.
• Work DC to the last stitch of the side.
• Work five DC into that final stitch for a rounded, full corner.
• Alternatively, use a shell-style corner: three DC, chain one, three DC in the same stitch for a defined, open look.
This technique is standard in granny squares and center-out blankets. The chain-one space creates a clear pivot point for the next round.
Treble and Half-Double Crochet Variations
Different stitches need tailored increases.
• Half Double Crochet: Use four HDC in the corner stitch to balance height and flexibility.
• Treble Crochet: Due to its length, use six to seven TR in one stitch or four TR, chain two, four TR for structured corners.
Always test your increase on a swatch. If the corner cups inward, add one more stitch. If it flares, reduce slightly.
Crocheting Corners in the Round
When working from the center outward, corner placement defines the entire shape.
Granny Square Corner Formula
Each round builds on the last, with clusters marking both sides and corners.
• Corner Cluster: three DC, chain two, three DC all in the same corner space from the previous round.
• Side Clusters: place three DC in each chain space or stitch between corners.
• Consistency Is Key: Keep the same number of clusters per side as the round progresses.
Example: Round two might have one cluster between corners, Round three has three clusters, Round four has five, always increasing evenly.
Aligning Corners Across Rounds
Misaligned corners cause wavy edges. To prevent this, place new corner clusters directly over those from the prior round. Use locking stitch markers to mark each corner as you go. Count clusters before joining the round to ensure all four sides match.
Finding the Hidden Stitch After Corners
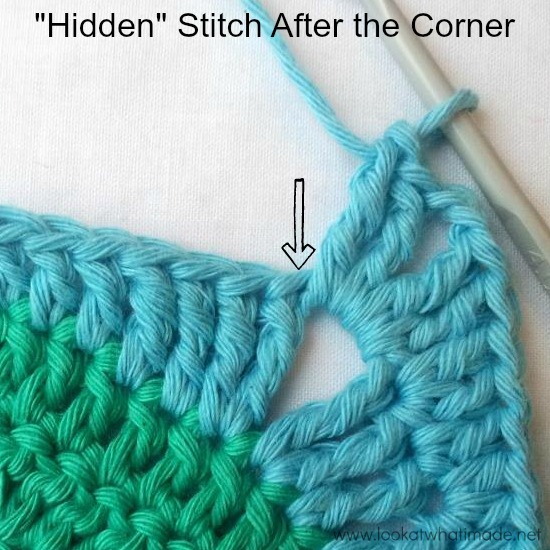
One of the top reasons blankets lose stitches at the edges is the hidden stitch, the first real stitch of the new side often buried under the corner cluster.
Why the Hidden Stitch Gets Missed
• The bulk of three to five stitches in one spot covers the base loops of the next stitch.
• Right-handed crocheters should look just to the right of the corner post.
• Left-handed crocheters should look just to the left.
• The loops sit low and may appear part of the corner.
How to Spot and Use It
- Pause at the corner. Do not rush into the next row.
- Rotate the work slightly to see the edge from different angles.
- Gently pull apart the corner stitches with your hook to expose the hidden loops.
- Insert hook into both loops of that stitch, not the side of the corner post.
Pro Tip: Place a stitch marker in that first stitch after the corner during early rounds to avoid missing it.
Adding Edging That Enhances Corners
A border is not just decorative. It frames your work and reinforces corners. The right edging can hide minor imperfections and create a clean, finished look.
Choosing the Right Border Style
• Single Crochet: Best for modern, solid-color blankets. Use three SC in corner stitch.
• Shell Stitch: Best for vintage or feminine designs. Center shell on corner.
• Picot or Bobble: Best for baby or heirloom blankets. Accent corner with picot.
• Granny Stripe: Best for colorful, bold afghans. Use three DC, chain two, three DC in corner.
• Scallop Edge: Best for soft, romantic styles. Full scallop centered on corner.
Step-by-Step Border Application
-
Join Yarn at a Corner: Slip stitch into any corner stitch to begin. Starting at a corner ensures even distribution.
-
First Round: Stabilize the Edge: Work one SC in each stitch along the side. At the corner, work three SC in the corner stitch. Repeat for all sides and join with slip stitch to first SC.
-
Second Round: Add Design: Try shell stitch: three DC, chain one, three DC centered over each side and corner. Or crab stitch for a twisted, elegant edge.
-
Final Touches: Join with a slip stitch. Cut yarn, leave a six-inch tail. Weave in ends deep into corner clusters for durability.
Pro Tip: Block the blanket before edging if it is curling or uneven. Wet blocking relaxes fibers and makes stitching smoother.
Fixing Common Corner Problems
Even experienced crocheters run into issues. Here is how to diagnose and correct them fast.
Blanket Is Curling Inward
Cause: Too few stitches at corners, so fabric cannot spread to turn.
Fix: Increase corner clusters. Try four SC instead of three. Check gauge, as tight tension can also cause curling.
Edges Are Ruffling or Flaring
Cause: Too many stitches. Corner increases are too large or miscounted.
Fix: Reduce increases. Try four DC instead of five. Skip one stitch near the corner if ruffling starts mid-side.
Diagonal Pulling or Twisting
Cause: Misaligned corner clusters. Each round shifts slightly.
Fix: Mark corners with locking stitch markers every round. Ensure corner clusters land in the same relative position.
Gaps at Corner Joints
Cause: Chain-two or chain-three spaces not closed properly in next round.
Fix: In the following round, work into the chain space itself, not around it. Use a slip stitch or SC to close the gap neatly.
Stitch Increase Guidelines by Height
Use this quick-reference table to choose the right corner increase.
| Stitch Type | Corner Increase | Purpose |
|---|---|---|
| Single Crochet | 3 SC in one stitch | Prevents tight turn |
| Half Double Crochet | 4 HDC in one stitch | Balances flexibility and fullness |
| Double Crochet | 5 DC or three DC, CH1, three DC | Accommodates height, defines corner |
| Treble Crochet | 6-7 TR or four TR, CH2, four TR | Compensates for long drape |
Note: Always test on a swatch. Gauge and yarn weight affect results.
Pro Tips for Perfect Corners Every Time
Use Stitch Markers Strategically
Place a locking marker in each corner stitch at the end of every round. This helps maintain count and alignment, especially in multi-round projects.
Count Stitches Frequently
Count at the end of every row or round. Expected count should increase predictably, for example, plus four stitches per round in granny squares.
Check Flatness Regularly
Lay the blanket flat every few rounds. Look for cupping, ruffling, or skewing as early signs of imbalance.
Block for a Professional Finish
Wet block the finished blanket by soaking in cool water with mild soap. Press out water without wringing. Lay flat on a towel, shape corners with pins, and let dry completely. Blocking evens out tension, smooths corners, and gives your blanket a store-bought look.
Frequently Asked Questions About Crocheting Corners on a Blanket
How Many Stitches Do You Increase at a Corner When Crocheting a Blanket?
The number depends on your stitch type. Use three SC, four HDC, five DC, or six to seven TR in the corner stitch. These increases provide enough fabric to turn a 90-degree corner without pulling or puckering.
Why Does My Blanket Corner Curl or Ruffle?
Curling usually means too few stitches at the corner, while ruffling indicates too many. Check your stitch count and adjust the corner increase accordingly. Consistent tension and proper stitch markers also help prevent distortion.
What Is the Hidden Stitch After a Corner?
The hidden stitch is the first real stitch of the new side, often obscured by the bulk of corner increases. It sits just beside the corner post. Look carefully and use a stitch marker to avoid missing it.
Do I Need to Block My Blanket After Finishing?
Yes, blocking is recommended for a professional finish. It relaxes fibers, smooths corners, and corrects minor unevenness. Wet blocking works well for most yarn types.
Can I Add Edging to Any Blanket Corner?
Yes, you can add edging to any blanket. Simply join yarn at a corner and work one SC in each stitch around the perimeter. Use three SC in each corner stitch to maintain shape.
How Do I Keep My Corners Symmetrical in Round Projects?
Use locking stitch markers to mark each corner cluster. Place new corner clusters directly over those from the prior round. Count clusters before joining to ensure all four sides match.
Key Takeaways for Crocheting Corners on a Blanket
To crochet corners on a blanket like a pro, you must increase stitches at each corner using the appropriate number for your stitch height. Three SC, five DC, or shell-style increases work best depending on your project. Always identify and work into the hidden stitch to maintain accurate stitch counts throughout your blanket.
Use stitch markers to track corners and maintain symmetry. Add a stabilizing border with three SC or a shell in each corner to reinforce the edges. Check flatness frequently and adjust increases as needed to prevent curling or ruffling.
Weave in ends securely, especially at high-stress corners. Block the finished piece to finalize shape and smooth edges for a professional appearance. With these techniques, your blankets will lie flat, look polished, and stand the test of time.

