
If you’re wondering how to make a camp blanket, you’re in the right place. Whether you’re crafting for comfort around the fire, preparing for backpacking trips, or creating a lasting keepsake for a scout, a homemade camp blanket combines warmth, personalization, and practicality. From no-sew fleece throws to custom down-filled quilts, wool poncho-blankets, and badge-adorned memorabilia, this guide walks you through every method using real-tested materials, tools, and techniques. You’ll learn how to build one in under three hours, or invest in a long-term project that lasts for years. No fluff, no guesswork, just proven steps from experienced makers and outdoor educators.
Choose Your Camp Blanket Type
Selecting the right blanket type depends on your skill level, intended use, and budget. Each method offers distinct advantages for different camping scenarios.
No-Sew Fleece Blanket
Perfect for beginners and kids, this no-sew fleece blanket requires only scissors, fabric, and time. It’s soft, warm, and fringed for a polished look. Often used in charity drives or as emergency comfort items for children, it’s also a great starter project for first-time crafters. You can complete this project in two to three hours with minimal experience.
Custom Down-Filled Blanket
Lightweight and ultra-warm, this version uses ripstop nylon and goose down for backpackers who need heat without bulk. It demands sewing skills and precision but results in a compressible, durable blanket ideal for cold-weather camping. This option suits intermediate to advanced sewists willing to invest more time and money.
Wool Poncho-Blanket
Durable and weather-resistant, the wool poncho-blanket doubles as a wearable layer. Made from 80% wool, it stays warm even when wet and resists fire, perfect for scouts and traditional campers. Convert a standard blanket into a hooded poncho with pockets and bias binding for maximum versatility outdoors.
Personalized Badge Blanket
Ideal for end-of-year gifts, these blankets feature crests, embroidered names, and patches collected over time. Combine fleece or wool with a zig-zag stitch to secure badges and create a sentimental, long-lasting memento. This option works beautifully for commemorating scouting achievements and camp memories.
Build a No-Sew Fleece Blanket
This method requires no sewing machine and produces a cozy result in under three hours. It’s ideal for beginners, children, or anyone wanting a quick project.
Gather Fleece and Tools
You’ll need 4 yards of fleece (2 yards per side), sharp scissors, a ruler, painter’s tape, and a Post-it Note. Use two different patterns or colors for visual appeal. Fabric stores like Joann Fabrics carry wide selections on sale. Slight imperfections in cutting won’t show, so focus on consistency rather than perfection.
Cut and Align Fabric
Lay both pieces on a large table with wrong sides facing. Trim edges to align perfectly. Cut 3-inch squares from each corner using the Post-it as a guide. This reduces bulk when tying the fringe knots later. Take your time here since even alignment makes the tying process smoother.
Mark and Cut Fringe Strips
Use painter’s tape and a yardstick to mark 3-inch vertical strips around all edges. Cut 1-inch wide × 3-inch long fringes. Work one side at a time, or cut all first, then tie. Using a template helps maintain consistent strip width throughout the project.
Tie the Fringe Securely
Pair one top strip with one bottom strip. Tie a basic knot, then double-knot to secure. Pull gently to avoid bunching the fabric. Continue around all four sides until complete.
Time Estimate: 1.5 to 2 hours
Result: A cozy, fringed blanket ready for gifting or camping.
Sew a Custom Down-Filled Blanket
This project requires intermediate sewing skills and produces a lightweight, compressible blanket perfect for backpacking. The custom fabric design adds personal flair.
Design a Custom Fabric Pattern
Use Adobe Photoshop to create a seamless repeat pattern. Set canvas to 7 inches × 6 inches at 300 ppi (RGB). Fill background, import vector graphics, and merge layers. Apply Filter > Other > Offset with horizontal at 1050 px (half width) and vertical at 900 px (half height). Fill gaps, then save as PNG for upload.
Order Custom Ripstop Nylon
Upload your design to roilstop.com. Select lightweight ripstop nylon with calendered finish. Order 2 linear yards for front, 2 for back, and +1 yard for binding. Choose the cut and folded option for clean edges. This ensures your custom print arrives ready for construction.
Cut and Prepare the Shell
Trim fuzzy selvage edges. Fold fabric right sides together and clip with Wonder Clips (pins can damage ripstop). Mark ¼-inch seam allowance with a water-soluble pencil that disappears after completion.
Sew Three Sides Closed
Using a regular presser foot, sew two sides and the bottom with ¼-inch seams. Leave the top open for down insertion. Trim corners and square edges with a triangle ruler to reduce bulk and create clean corners.
Divide and Stuff with Down
Mark eight 7-inch columns with a water-soluble pencil. Stuff 6 oz of goose down (approximately ¾ oz per column) by hand. Work quickly in a draft-free room to minimize feather escape. Close the opening as you go to prevent down from spilling everywhere.
Cut and Attach Bias Binding
Cut 2.5-inch wide strips on the 45° bias. Join strips end-to-end. Sew to edge with 3/8-inch seam, then fold to back. Hand-sew with a ladder stitch for invisible finish. At corners, fold binding at 90°, secure with a stitch, then continue along the edge.
Convert Wool into a Poncho-Blanket
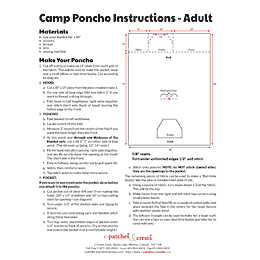
This method transforms a standard wool blanket into a wearable camp layer. The result provides warmth, weather resistance, and hands-free convenience around the campfire.
Source a Quality Wool Blanket
Buy a 66″ × 84″ wool blanket (80% wool, 20% synthetic) from E-Patches & Crests for $49.95 CAD. Avoid low-quality blends like Stansport, which may have chemical smells and weak stitching. User feedback confirms E-Patches blankets are thick, odor-free, and well-constructed.
Download a Free Poncho Pattern
Get the Wool Blanket Poncho Pattern (Style #4) from E-Patches & Crests. It includes hood, pocket, and bias tape instructions. Alternative options include a V-neck campfire blanket design. The free pattern simplifies construction significantly.
Modify the Blanket
Cut a 3-inch V-shaped slit at the center front for head entry. Trim 14 inches from one end for the hood. Cut a 30″ × 14″ piece for the hood panel. Serge or zig-zag all raw edges to prevent fraying. Find center and optionally leave back 2 inches longer than front for coverage.
Cut and Finish the Neck Opening
Cut a 14-inch diameter circle for the head. Attach 1-inch bias tape to the neck and hood edges. Use a small zig-zag stitch for durability around curves. This prevents fraying and creates a clean finished edge.
Add a Kangaroo Pocket
Cut a 20″ × 14″ fabric piece. Fold ½-inch seam on the top edge. Top-stitch if needed, then attach to front before adding crests. Optionally add a drawstring or slit to widen the neck opening for comfort.
Personalize with Crests and Embroidery
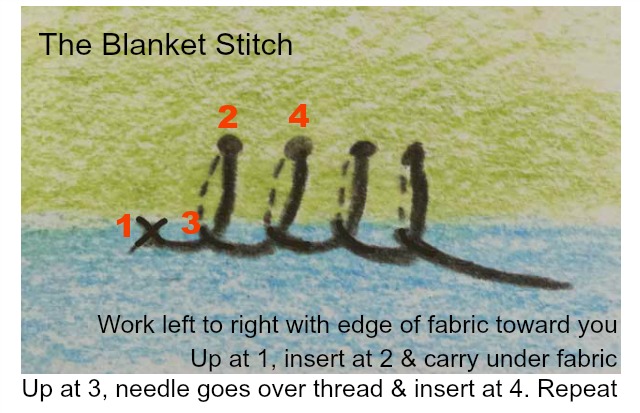
Adding crests, patches, and embroidery transforms a basic blanket into a meaningful keepsake. This step works best on fleece or wool base materials.
Plan Badge Placement
Lay out crests, patches, and names before sewing. Leave room for future additions since many scouts add crests annually. Use a grid layout for symmetry and visual balance across the blanket surface.
Sew Crests with Zig-Zag Stitch
Use a small zig-zag stitch for flexibility and strength. It grips irregular shapes better than straight stitch. Choose matching thread for a subtle look or clear thread for faster application (though it may feel slightly plastic). Sewing 30+ crests can take six or more hours, so pace yourself.
Embroider Names for a Personal Touch
Use satin-stitch setting to embroider names on pockets or corners. This adds emotional value, especially on end-of-year gifts. Expect an additional cost of approximately $11 CAD per poncho if outsourced to a professional.
Earn More Crests Over Time
Join E-Patches & Crests’ points program to earn free badges through purchases. Build a lifetime memory blanket by adding achievements yearly. This creates a visual timeline of growth, travel, and camping memories.
Compare Materials and Performance
Understanding material characteristics helps you choose the right blanket for your specific needs and camping conditions.
| Material | Warmth | Water Resistance | Durability | Care Needs |
|---|---|---|---|---|
| Fleece | High (dry) | Poor | Moderate | Machine wash, air dry |
| Wool | Very High (wet/dry) | Good | High | Hand wash, lay flat |
| Ripstop + Down | Very High (dry) | Fair (if treated) | Moderate | Spot clean, store dry |
Wool from E-Patches is thick, odor-free, and well-stitched. The Stansport version had chemical smell and poor seams, making it not recommended for serious use.
Estimate Your Project Cost
Budget considerations help you plan which blanket type matches your resources. Prices vary by material quality and customization level.
| Item | Cost | Notes |
|---|---|---|
| Fleece (4 yd) | Varies | Joann Fabrics, on sale |
| Custom Ripstop (3 yd) | $50–$70 | Roil Stop, printed |
| Goose Down (6 oz) | $20–$30 | High-fill power |
| Wool Blanket | $49.95 CAD | E-Patches & Crests |
| Embroidery | $11 CAD | Fabricland, outsourced |
Start with a no-sew fleece blanket under $30 as a budget-friendly entry point. Upgrade to wool or down later as your skills and budget allow.
Know Your Use Case
Matching your blanket type to your actual use ensures you get maximum value from your project.
For Family Camping: Make a no-sew fleece blanket that’s safe for kids, washable, and cozy by the fire. Great for impromptu picnics or car emergencies.
For Backpacking: Choose the custom down-filled blanket. It’s lightweight, compressible, and warmer per ounce than any synthetic alternative.
For Scouts and Guides: Create personalized poncho-blankets with crests and names. Ideal as end-of-season gifts or achievement rewards.
For Emergency Kits: No-sew fleece blankets are used by police departments to comfort children in crisis. Fast, warm, and comforting.
For Sentimental Keepsakes: A badge-covered wool blanket becomes a visual timeline of growth, travel, and memories meant to last decades.
Expert Tips for Success
These insider recommendations help you avoid common mistakes and achieve professional results on your first attempt.
Work in a draft-free room when stuffing down to contain feathers. Use a table with raised edges to prevent down from escaping onto the floor. Cut bias binding at 45° to ensure flexibility around curves, especially on neck and hood edges. Use water-soluble pencil marks since they vanish after completion, essential for column guides and seam alignment. Serge or zig-zag raw wool edges to prevent fraying and extend blanket life. Air dry wool flat and never machine dry to maintain shape and texture. Design seamless patterns using Photoshop’s Offset filter to create repeatable, professional-looking prints.
Final Thoughts: Start Simple, Build Meaning
Making a camp blanket isn’t just about warmth. It’s about crafting connection. The no-sew fleece version takes under three hours and delivers instant satisfaction. The down-filled blanket challenges your sewing skills but rewards with exceptional performance. The wool poncho blends tradition and utility. And the personalized crest blanket? That becomes a storybook of adventures.
These projects are simple enough for novice sewers, though attaching crests can be time-consuming. Start with what matches your skill and purpose. Whether it’s a gift, a survival item, or a memory archive, your handmade camp blanket will outlast store-bought versions in both meaning and use.
Frequently Asked Questions About Making a Camp Blanket
What is the easiest camp blanket to make at home?
The no-sew fleece blanket is the easiest project. It requires only fabric, scissors, and basic knot-tying skills. Most people complete it in under three hours with no prior crafting experience.
How much fabric do I need for a no-sew fleece blanket?
You need 4 yards of fleece total (2 yards per side). Using two different patterns creates visual interest and a reversible design. Joann Fabrics and similar stores offer frequent sales on fleece fabric.
Is a wool blanket better than fleece for camping?
Wool provides superior warmth even when wet and resists fire better than fleece. It’s more durable and lasts decades with proper care. However, wool requires hand washing and air drying, while fleece is machine washable.
Can I make a camp blanket suitable for backpacking?
Yes, the custom down-filled blanket made with ripstop nylon and goose down offers excellent warmth-to-weight ratio. It’s compressible, lightweight, and ideal for cold-weather backpacking trips.
How long does it take to sew on all the badges and crests?
Sewing 30+ crests can take six or more hours depending on your sewing speed and experience. Plan accordingly and pace yourself to avoid fatigue. Consider enlisting help for large numbers of patches.
Where can I find patterns for making a wool poncho-blanket?
E-Patches & Crests offers free downloadable poncho patterns (Style #4) on their website. These include hood, pocket, and bias tape instructions for converting standard wool blankets into wearable layers.

