You’ve probably seen it. A quilt that looks like floating cubes, casting shadows and shifting before your eyes. That’s the magic of the tumbling blocks quilt pattern, a classic design that turns flat fabric into a mesmerizing optical illusion. With just three fabric values (light, medium, and dark), this timeless geometric pattern creates the appearance of stacked 3D cubes tumbling across the surface. Whether you’re drawn to vintage charm or modern minimalism, the tumbling blocks quilt delivers bold visual impact.
But here’s the truth: many quilters avoid this pattern, fearing the dreaded Y-seams where three fabric pieces meet at a single point. The good news? You don’t have to master advanced techniques to bring this design to life. Modern methods eliminate Y-seams entirely, making the tumbling blocks quilt accessible even to confident beginners. In this guide, we’ll walk you through every step, from choosing the right fabrics and cutting precise diamonds to assembling your quilt using beginner-friendly techniques or traditional methods.
Cut Perfect 60-Degree Diamonds for Your Tumbling Blocks Quilt

Precision starts with the right shape. The tumbling blocks quilt relies on 60-degree diamonds, technically parallelograms with two 60° and two 30° angles. These aren’t measured diagonally. They’re sized by width from one parallel side to the other. Use the wrong angle, and your blocks won’t align, breaking the 3D illusion.
Use a Specialty Ruler for Accuracy
Invest in a 60-degree ruler like the Jaybird Quilts Sidekick or any square ruler with 60° markings. These tools ensure clean cuts and consistent angles. Place the ruler on a fabric strip, aligning the 60° line with the edge. Cut one side, then shift the ruler to the desired width (for example, 4 inches) for the second cut.
Pro tip: Acrylic rulers slip easily. Stick True Grips or non-slip tape to the back to prevent shifting during cutting.
Check Angles Every Few Cuts
Even slight angle drift ruins alignment. After every 2 to 3 cuts, lay your ruler back on the fabric to verify the 60° angle hasn’t changed. Realign if needed. Accuracy now saves frustration later.
Try Die-Cutting for Bulk Projects
If making multiple quilts or teaching a class, use a die-cut machine with a 60-degree diamond die. This method delivers perfect consistency and speeds up prep time, especially for kits or donation quilts.
Avoid Y-Seams with the Triangle Method
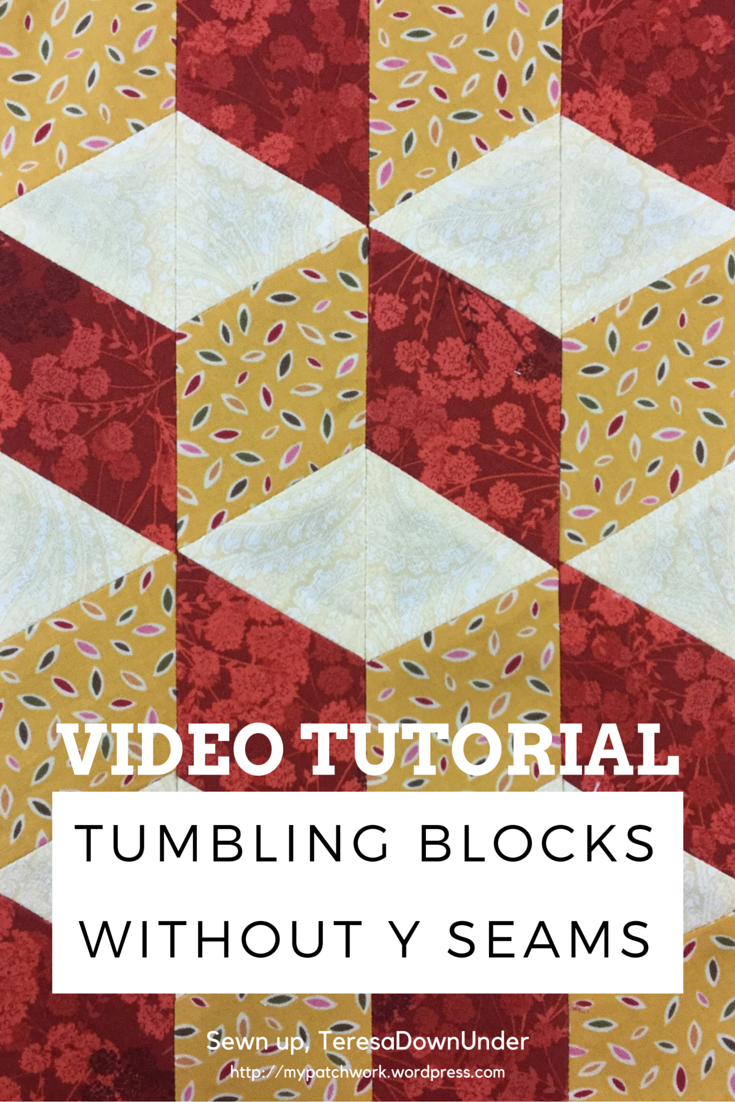
Fear of Y-seams stops many from trying the tumbling blocks quilt. But there’s a smarter way: split the light diamonds into two triangles. This no-Y-seam method replaces complex intersections with straight seams you can chain-piece on your machine.
Cut Light Diamonds into Two Triangles
Keep dark and medium diamonds whole. Slice each light diamond down the center into two 60-degree equilateral triangles. Now, instead of sewing three pieces together at a point, you’ll sew triangles to diamond sides using standard straight seams.
Yes, you’ll add a vertical seam down the center of each light section. That line can disappear under quilting stitches or become a design feature.
Chain-Piece for Efficiency
With dozens or hundreds of small pieces, organization is key. Lay out your quilt row by row. Then chain-piece all units: feed pieces through the machine without cutting threads between them. This keeps sections linked, prevents loss, and speeds assembly.
Once chained, clip threads, press seams, and lay out the full top before joining rows.
Master Traditional Y-Seams for Seamless Tumbling Blocks
If you want seamless cubes with no center seam, tackle the traditional Y-seam method. It’s advanced, but doable with focus and the right technique.
Mark Your Seam Points
Arrange three diamonds: dark on top, medium right, light left. Mark the ¼-inch point at each 60° corner (the wide angles). These marks tell you where to start and stop stitching so seams intersect cleanly.
On 30° (narrow) corners, sew all the way to the tip.
Sew in Two Stages
- Join medium and light diamonds right sides together. Start at the top ¼-inch mark, backstitch, and sew to the outer point. Press the seam toward the medium fabric.
- Attach the dark diamond to the light side first. Sew from the outer edge inward, stopping exactly at the ¼-inch center mark. Don’t catch the medium piece.
- Lift the presser foot, rotate the block, and align the dark with the medium. Tuck the light piece out of the way. Start stitching at the center mark and sew outward.
Press Seams in a Wheel Pattern
To reduce bulk, press all three seams away from the center in a rotating direction, like spokes on a wheel. Clip the dog ears (fabric triangles at seam ends) to make the block lie flat.
Build Hexagon Star Units for Better Alignment

For better control over alignment, skip individual three-diamond blocks and build hexagon star units instead. This method focuses on the underlying grid, not the cube illusion.
Assemble Two Half-Hexagons
Lay out six diamonds in a hexagon shape. Sew three together (top, right, bottom) but stop stitching at the ¼-inch mark on both ends. Repeat with the other three to create a second half-unit.
Leave the seam allowances open so they can be joined later.
Join Halves with a Straight Seam
Match the two half-units, aligning the center points and seam starts. Sew with a straight seam across the middle. This creates a stable foundation with crisp points.
Finish with Final Two Diamonds
Now add the last two diamonds using Y-seams. Because most of the unit is already assembled, you only handle two intersections instead of six.
Sew Rows and Fill Gaps
Once star units are complete, sew them into rows. Insert loose diamonds between units to complete the tumbling block effect along edges and between blocks.
Choose Fabrics for Maximum 3D Effect
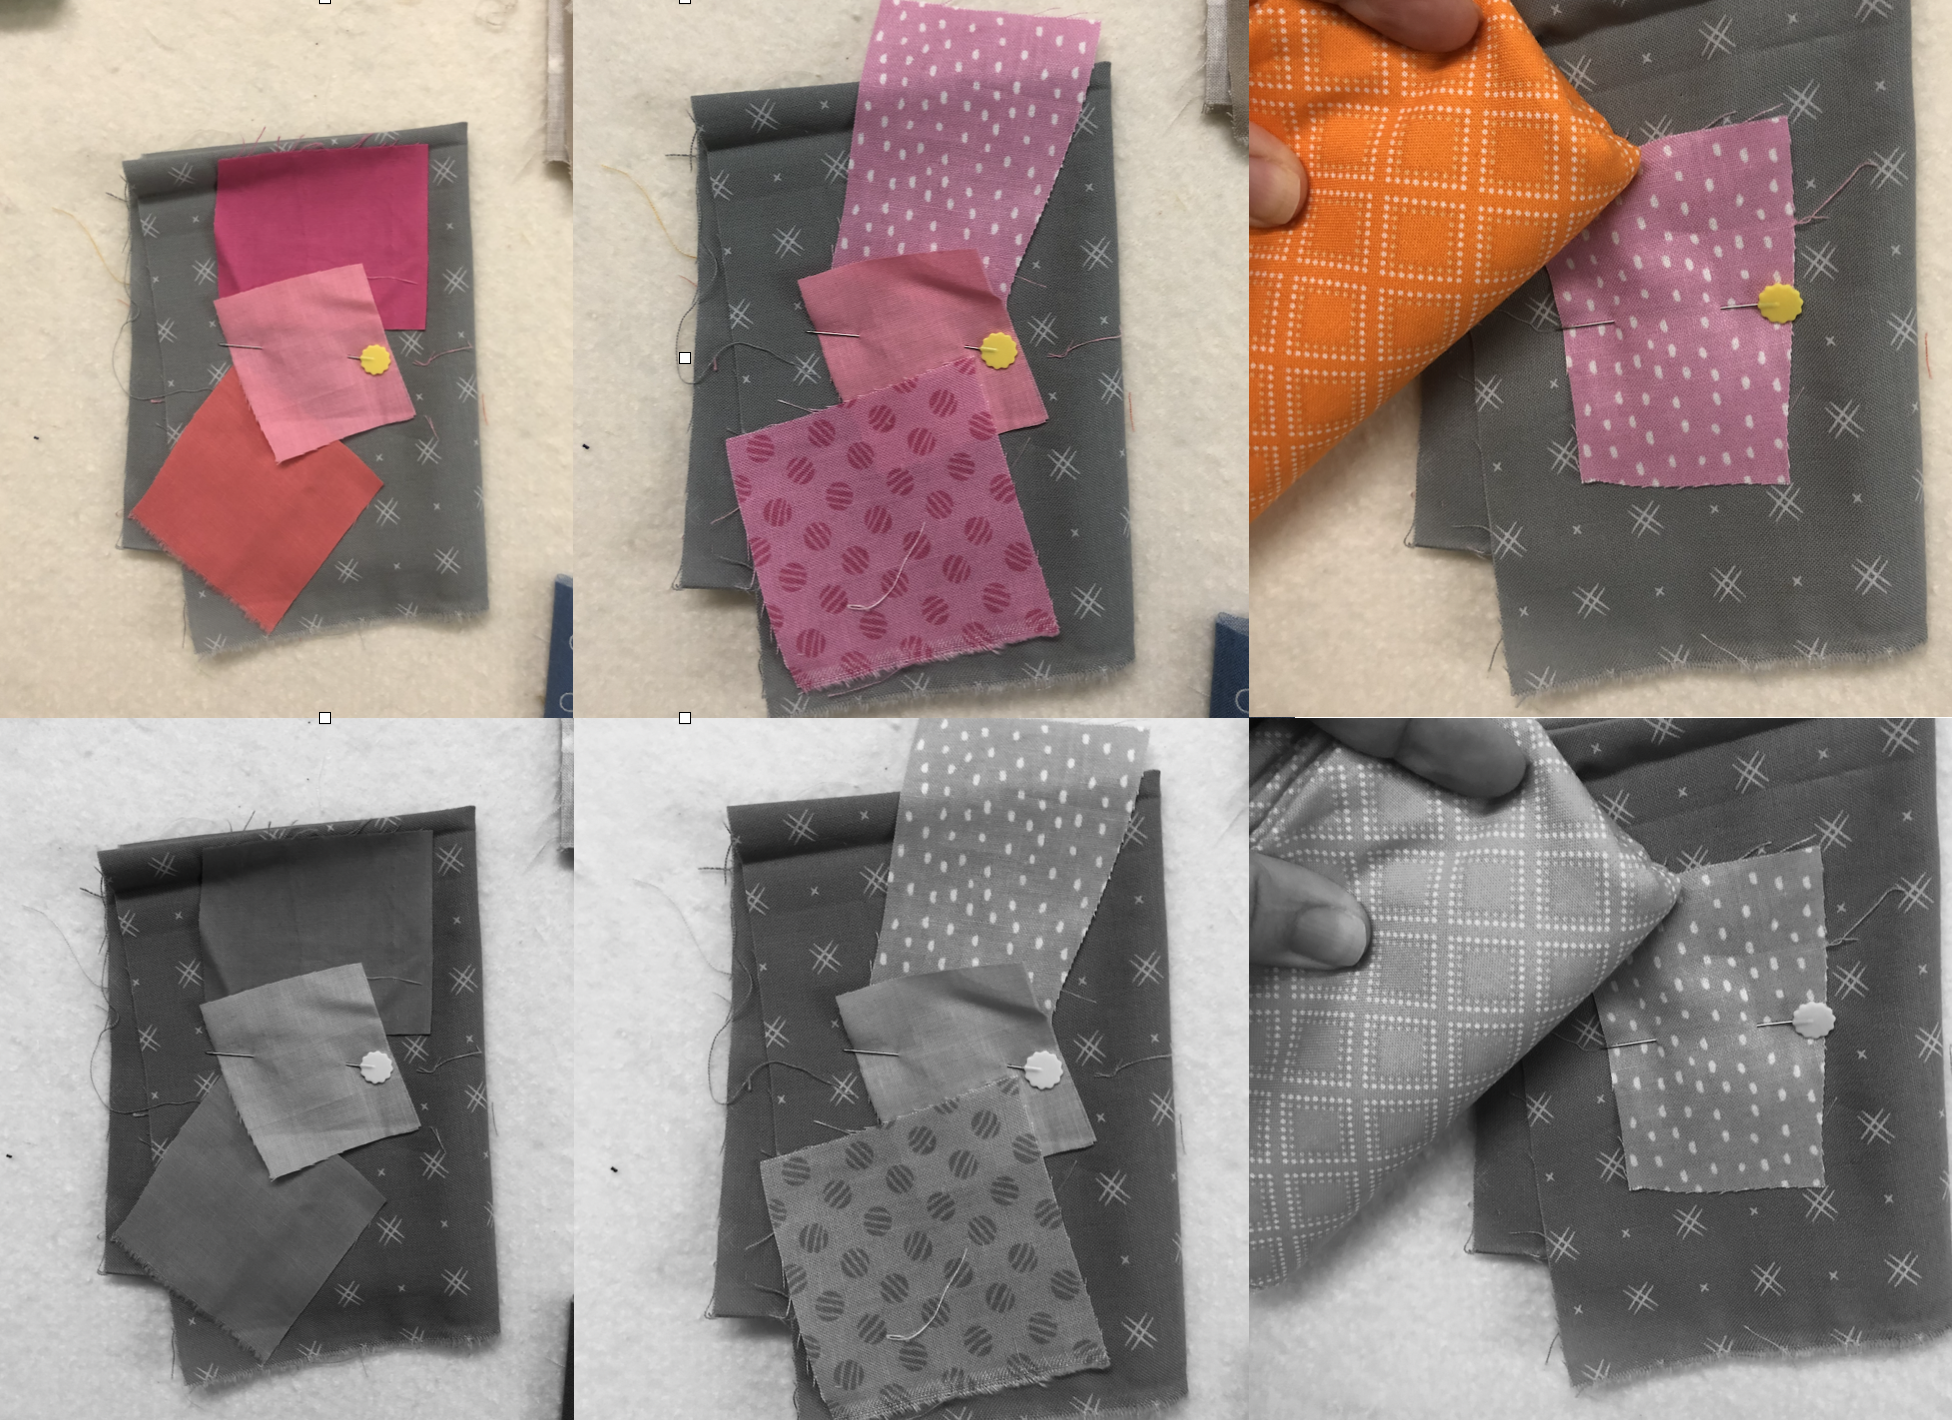
Color choice is everything. The tumbling blocks illusion depends entirely on value contrast, not color.
Sort by Light, Medium, Dark
Pull fabrics and sort them into three value piles:
– Light: Represents the cube’s top (catches the light)
– Medium: One visible side
– Dark: Shadowed side
Hold fabrics at arm’s length or view them in grayscale on your phone. If two look the same, they’re too close in value.
Use High-Contrast Schemes
For the strongest 3D effect, go bold:
– Black, gray, white
– Navy, teal, cream
– Burgundy, tan, ivory
Avoid similar tones like light blue, medium blue, and navy. They’ll flatten the design.
Try Modern Variations
Break tradition with:
– Monochromatic scraps in one color family
– Bright solids for a pop-art look
– Themed prints like city skylines or superhero fabrics
Just maintain clear value separation.
Simplify Construction with Printed Interfacing

Want foolproof accuracy? Use printed interfacing from brands like Quiltsmart. This method guides every stitch, making it perfect for beginners.
Follow the Printed Lines
The interfacing sheet has exact seam lines and layout guides. Place fabric pieces directly on the printed shapes, right side up.
Sew and Flip
Sew along each printed line, then fold the next piece into place. The stabilizer holds everything perfectly aligned.
Remove Interfacing After Sewing
Once the unit is complete, tear away the paper backing (if fusible) or leave the stabilizer for added body.
No measuring. No marking. No mistakes.
Speed Build with Strip Piecing
Marci Baker’s strip piecing method is ideal for fast baby quilts or scrappy projects.
Cut and Sew Strips
Use one 3-inch strip of light fabric and two 2.5-inch strips of medium and dark fabrics. Sew them together in a three-strip unit. Press seams toward the darker fabric.
Sub-Cut with 60-Degree Ruler
Place your 60-degree ruler on the strip set and cut angled segments. Each cut produces a complete tumbling block unit ready for assembly.
Assemble Pre-Made Blocks
Arrange blocks and sew into rows. This method skips individual diamond cutting and speeds up construction dramatically.
A baby quilt (46.5″ x 54.5″) can be pieced in a single weekend.
Test Your Tumbling Blocks Quilt with a Mini First
Before diving into a full-sized quilt, make a 16 x 16 inch mini version. It’s the best way to test your method, fabric values, and cutting accuracy.
Practice Your Technique
Try both Y-seam and no-Y-seam methods on a small scale. See which feels more comfortable and delivers the look you want.
Verify the 3D Effect
Step back and squint. Do you see cubes? If the pattern looks flat, your values are too close. Swap one fabric and retest.
Refine Cutting Skills
Mini quilts use small shapes, exposing any angle errors. Use this project to perfect your ruler technique and seam consistency.
Square Up Your Tumbling Blocks Quilt Before Binding
The tumbling blocks quilt has jagged edges due to diamond points. Before binding, square up the quilt top.
Trim for Straight Edges
Use a large square ruler and rotary cutter. Align the ruler with the outermost points and trim all four sides to create straight, perpendicular edges.
This ensures your binding lies flat and the quilt hangs evenly.
Mark Center Points
Find the center of each side and mark with a pin. Match these to binding ends for even distribution.
Maintain and Preserve Your Tumbling Blocks Quilt
A well-made tumbling blocks quilt can last generations, but only if constructed and cared for properly.
Secure All Seams
With hundreds of seams, durability depends on backstitching or knotting each one. Loose ends can unravel under use.
Quilt Densely for Strength
Use stippling, grid, or echo quilting to reinforce the many intersections. Dense quilting also helps hide the center seam in no-Y-seam versions.
Display Delicate Versions
Quilts made with vintage or fragile fabrics are better as wall hangings. Limit washes and display out of direct sunlight to prevent fading.
Find Patterns and Tools for Tumbling Blocks Quilts
Ready to start? Here’s what you need.
Buy Digital or Kit Patterns
- It’s Sew Emma’s Little P Patterns: $8.98 for a baby quilt PDF
- Quiltsmart Interfacing Kits: Include printed guides, instructions, and fabric requirements
- Free Tutorials: Leah Day’s “Tumbling Blocks Sunrise” and Marci Baker’s strip-piecing guide
Gather Essential Tools
- 60-degree ruler (Jaybird Sidekick or equivalent)
- True Grips for non-slip cutting
- Mini Wonder Clips for holding small pieces
- Design wall or flannel-backed board to organize layout
Frequently Asked Questions About the Tumbling Blocks Quilt Pattern
What is the tumbling blocks quilt pattern?
The tumbling blocks quilt pattern is a geometric design that creates an optical illusion of stacked 3D cubes on a flat surface. It uses 60-degree diamonds in three fabric values (light, medium, and dark) to trick the eye into seeing depth and shadow.
Are Y-seams required for the tumbling blocks quilt pattern?
Y-seams are required only for the traditional method. Modern adaptations like splitting light diamonds into triangles, strip piecing, or printed interfacing allow you to complete a tumbling blocks quilt using only straight seams.
What size diamonds should I cut for a tumbling blocks quilt?
Diamond size depends on your project. A common size is 4 inches wide, measured from one parallel side to the other. Mini quilts use smaller diamonds (around 1 to 2 inches), while bed quilts often use 4 to 6 inch diamonds.
How do I choose fabric values for a tumbling blocks quilt?
Sort your fabrics into three distinct value piles: light, medium, and dark. Hold them at arm’s length or view in grayscale. If two fabrics look similar in grayscale, they’re too close in value and will flatten the 3D effect.
Can beginners make a tumbling blocks quilt?
Yes. Beginners can successfully make a tumbling blocks quilt using printed interfacing kits, strip piecing methods, or the no-Y-seam triangle technique. These approaches eliminate complex seam intersections while still producing the classic 3D cube illusion.
How do I square up a tumbling blocks quilt top?
Use a large square ruler and rotary cutter. Align the ruler with the outermost diamond points and trim all four sides to create straight, perpendicular edges. This step is essential before adding binding to ensure the quilt hangs evenly.
Final Thoughts on Mastering the Tumbling Blocks Quilt Pattern
The tumbling blocks quilt pattern offers something for every skill level. Beginners can start with printed interfacing or strip piecing, while advanced quilters can tackle traditional Y-seams for a seamless finish. The key to success lies in three essentials: precise 60-degree cutting, strong value contrast in fabric selection, and consistent ¼-inch seams.
Start with a mini quilt to test your chosen method and verify your fabric values. Once you’ve mastered the technique on a small scale, scale up to a baby quilt or bed-sized project. Remember that this pattern rewards patience. With careful cutting and accurate piecing, you’ll create a quilt that looks like floating cubes tumbling across the surface.
Ready to begin? Gather your three fabric values, grab a 60-degree ruler, and choose a method that matches your skill level. The tumbling blocks quilt pattern isn’t just a project. It’s a statement piece that transforms flat fabric into a stunning 3D illusion.